

How to Send WordPress Emails with Microsoft 365(Office 365)?


Microsoft 365 offers Microsoft Exchange-based hosted email. Exchange is one of the most popular mail service providers for businesses, offering features such as push email and widespread compatibility.
Email marketers can connect Microsoft 365(formerly office 365) to WordPress to ensure better email deliverability, even if they send many of them!
If you’re using Microsoft 365 subscription for your business emails and would like to use the same email for sending WordPress emails, we’ll help you get started. Read this article to learn how to connect and send WordPress emails with Microsoft 365.
What is the Microsoft 365 Mailer?
Microsoft offers email address and inbox services and a tool to improve the deliverability of your emails. They do this through an API, so you don’t have to enter any sensitive login details into your WordPress admin area.
Microsoft offers free service to anyone with their email accounts([email protected], [email protected], or a Microsoft 365 email address). It can send up to 1,000 emails per minute, much higher than the limits on most other mailers.
If it’s a good match for your consideration, let’s see why you should consider sending WordPress emails with the Microsoft 365 mailer.
Why should you send WordPress emails with Microsoft 365 Mailer?
To begin with, WordPress is a content management system rather than an email service provider. Users do not receive emails from WordPress.
Many WordPress users report that their emails aren’t delivered to their inboxes. The problem is due to the way WordPress handles email delivery.
Here’s what happens when you send an email from WordPress:
- The wp mail() function is one of your WordPress files’ core programs. Plugins use the wp mail() method to send emails to WordPress.
- WordPress sends this email request to your hosting provider’s server, which processes it with PHP email.
- Finally, PHP instructs the hosting provider’s mail server, and the email router on your server sends the emails to the recipients.
Many hosting providers do not have an email infrastructure, and many hosting servers automatically prohibit PHP emails. That’s why you should never send emails using WordPress. Unfortunately, it’s a familiar yet irritating problem for WordPress users—but one that you can resolve.
The simplest solution is to use an SMTP plugin instead of the PHP mailing system. An SMTP plugin helps you route your emails via an SMTP server. SMTP(Simple Mail Transfer Protocol) is the international standard for sending and receiving emails over the internet.
If your web hosting provider does not offer email hosting, you can use an SMTP plugin to send WordPress emails. Any reliable email service such as Gmail/Google Workspace, Amazon SES, MailGun, Microsoft 365, etc., should deliver your emails just fine!
SMTP plugins are easy to set up and utilize. We suggest FluentSMTP for improving email deliverability as it is a free and open-source SMTP plugin for WordPress.
Download FluentSMTP
(100% Free)
Get the most powerful SMTP plugin for free and hit the recipient’s inbox with your WordPress emails

However, setting up an SMTP plugin for beginners can be daunting. But don’t worry; we’ll guide you in setting up Microsoft 365 mailer in FluentSMTP through our step-by-step tutorial.
Things to consider before getting started
The Microsoft 365(WordPress SMTP office 365) setup process is more complex than most other mailer options. There are some requirements before setting up Microsoft 365 as your mailer service.
- Your site needs to have SSL(HTTPS) enabled.
- While Microsoft 365 setup does not require any paid Microsoft services, they will require your credit card details to reduce spam signups.
- A Microsoft 365 account with admin privileges is needed to grant your application SMTP access. The Global administrator needs to configure the admin consent workflow to set up this mailer without admin privileges.
Setting up Microsoft 365 Mailer in FluentSMTP
FluentSMTP offers an easy way to set up the Microsoft 365 mailer in WordPress. All it needs is your email address and proper authorization. Let’s set up Microsoft 365 mailer in FluentSMTP in some easy steps:
Getting started with FluentSMTP
To get started with setting up Microsoft 365 mailer in WordPress, you need to have FluentSMTP.
Installing FluentSMTP is pretty simple. To install FluentSMTP on your WordPress site:
- Go to the WordPress dashboard, scroll down to Plugins and click Add New.
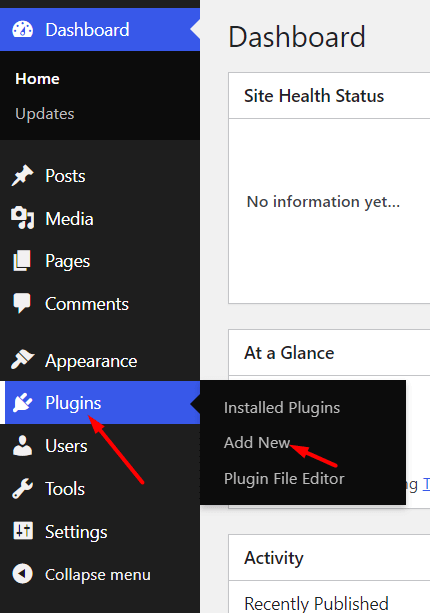
- Search for FluentSMTP and click on Install
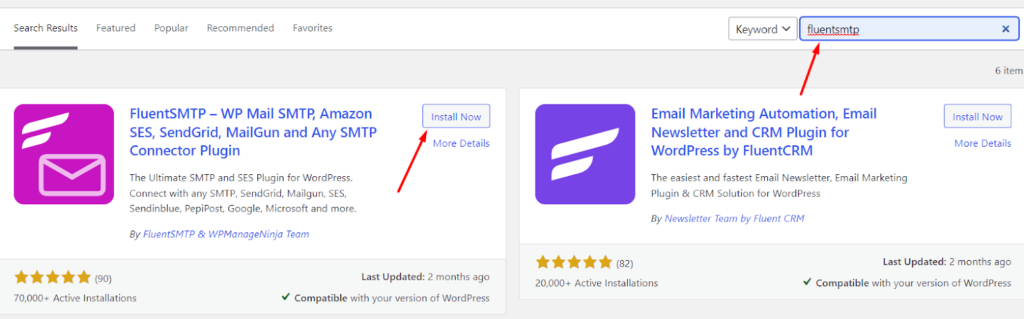
- Once installed, click activate. The plugin will be installed and activated.
Configuring Fluent SMTP with Microsoft 365 mailer
After installing the plugin, you must configure FluentSMTP with your Microsoft 365 account. Here’s how to do it quickly:
- Hover over to Settings and click FluentSMTP from your WordPress dashboard,
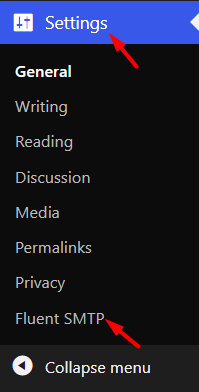
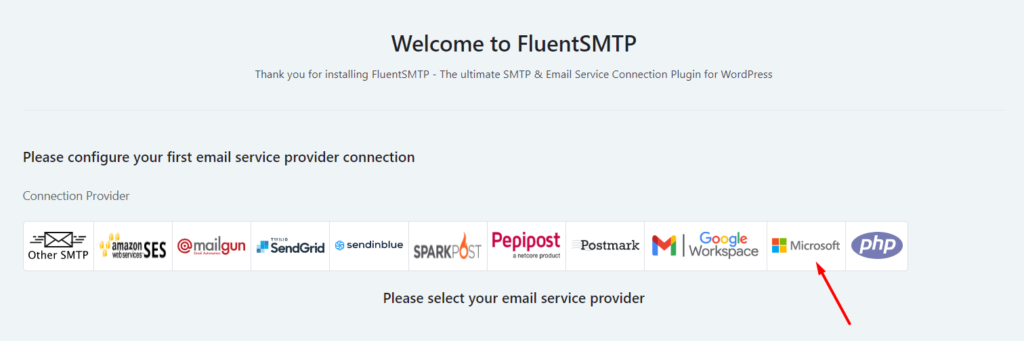
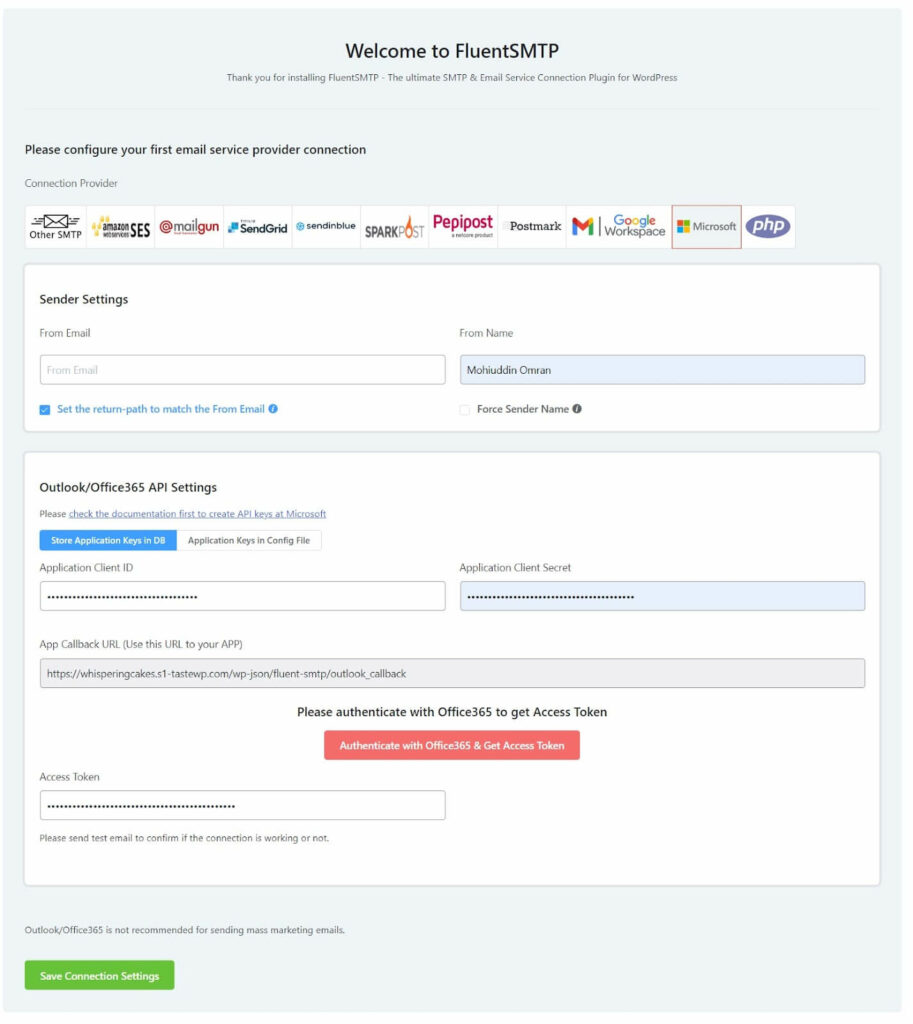
- It’s where you’ll be asked to configure your email service provider connection. Select Microsoft as your email service provider to configure it with FluentSMTP.
- Now, you’ll need to configure the sender details such as From Email and From Name. These will be used for sending emails from WordPress.
Note: You can also enable the Force Sender Name checkbox. Enabling this option will help you avoid configuring From Email and From Name settings every time in other site areas. We recommend keeping this checkbox disabled if you don’t want to force the From Name.

- Lastly, you need to submit an Application Client ID and Application Client Secret.
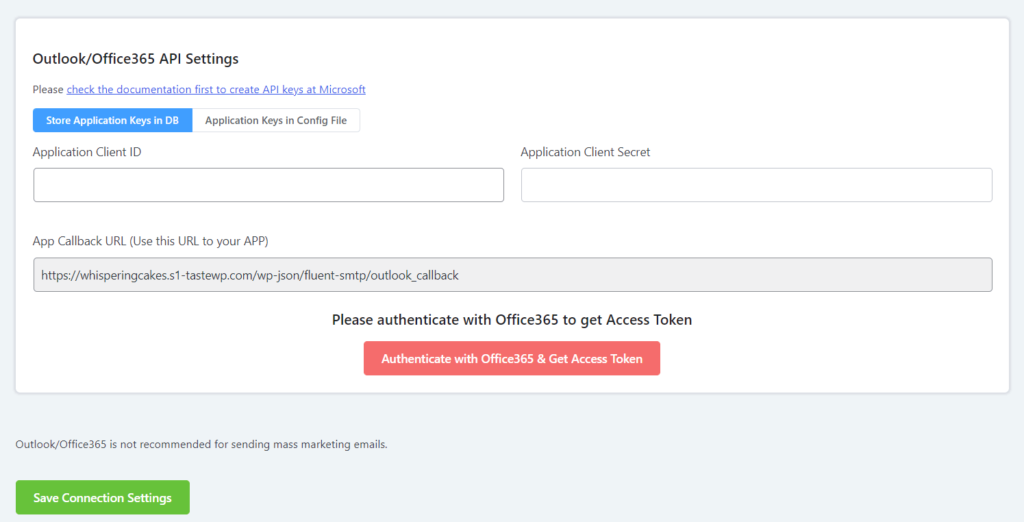
Finally, you’ll need to acquire the Application Client ID and Application Client Secret from Microsoft. The next step illustrates how it’s done.
Configuring a Microsoft Azure Account
You’ll need a Microsoft Azure account to get the Application Client ID and Application Client Secret.
You can simply log into Microsoft Azure if you have a Microsoft 365 account with any extension like Hotmail, Outlook, or Live. If you don’t have a Microsoft 365 account, you can sign up for a free Microsoft Azure account.
Create an application ID
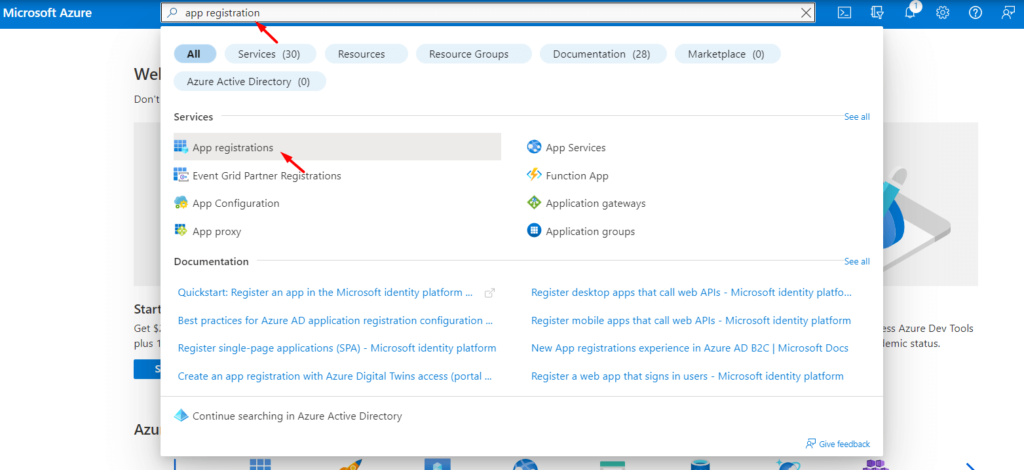
- First of all, you’ll have to open the Azure Portal to create an application ID. Once it is open, search for app registration.
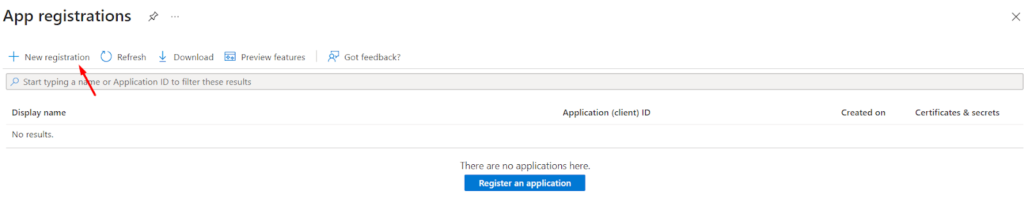
- Click on the +New Registration option at the top of the page. Alternatively, you can click the register an application button.
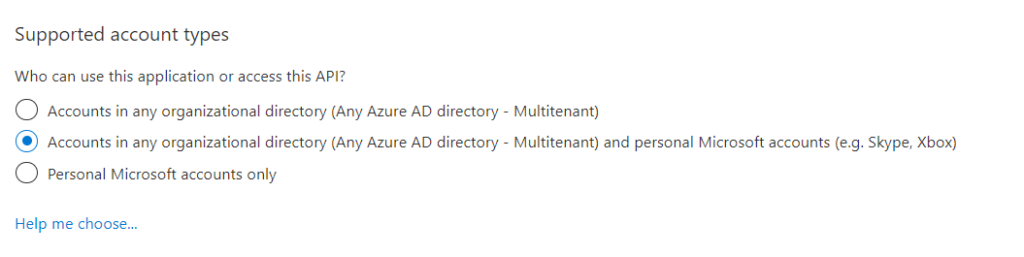
- You’ll need to fill out the Name, Supported account types, and Redirect URI in the form. You can add any name you want to the Name section because this is only for the organization.

- Now it’s time to determine Supported account types, which define who can use this application or access this API. We selected the second option that allows both multitenant and personal accounts.
- The last stage of this form is setting up Redirect URI. From the first dropdown, leave this set to Web. Then in the second field, you’ll need to copy this value from your FluentSMTP settings.
Note: To find the Redirect URI, you’ll have to switch back to the tab or window where you left your site’s FluentSMTP settings open. Under the Outlook / 365 section, you’ll see the Redirect URI field.
The Redirect URI is usually on this format in FluentSMTP, https://{yourdomain.com}/wp-JSON/fluent-smtp/outlook_callback
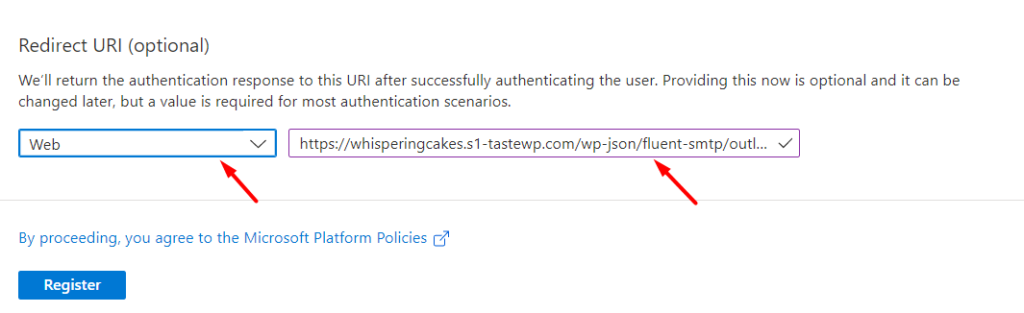
You’ll need to copy the redirect URI and paste it into your Microsoft Azure app registration form. When you’re done with the Redirect URI, click on the Register button to go ahead.
- When this registration form is submitted, you’ll be redirected to the Overview page. Here, you’ll find your Application (client) ID. Copy the Application (client) ID and paste it into your FluentSMTP settings in the Application Client ID field.

Create an Application Client Secret
After the client ID, you’ll need to find your client’s secret for the app. To do that,
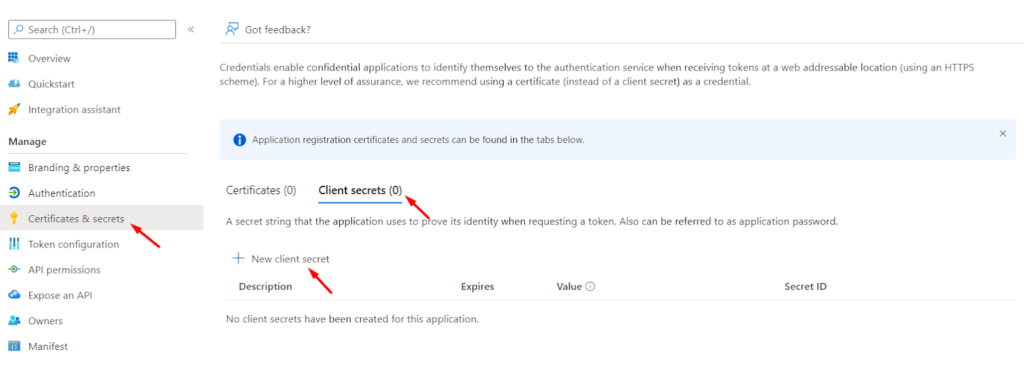
- Click on Certificates & secrets from the left sidebar. On this screen, go to the Client secrets section. Now, click on + New client secret.
- You’ll need to fill out add a client secret form with a Description and an expiration period from the overlay window. The description section is just for you. You can name it however you want.
And for the expiration section, you can select any duration from the dropdown menu as you want.
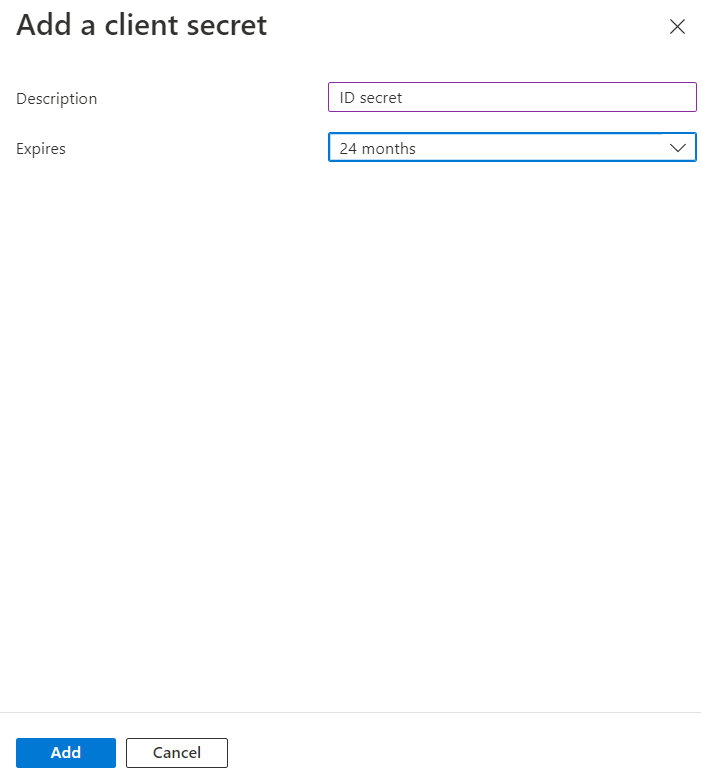
- Click on Add to generate Client Secret key.
- Next, copy and paste this client secret value into your FluentSMTP settings in the Client Secret field on the FluentSMTP window.
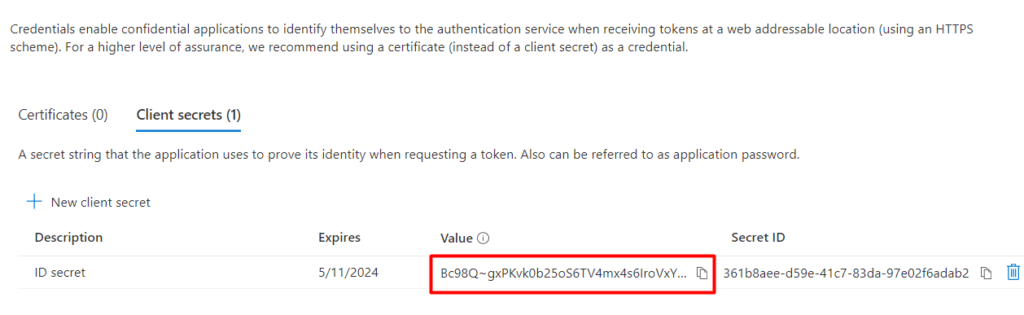
Note: Be careful when copying the API secret that you copy the Value, Not the Secret ID; otherwise, you will get the error CompactToken parsing failed with error code: 80049217
Save settings and authenticate with FluentSMTP
Once you’ve added your Application Client ID and Application Client Secret, you’ll need to scroll down to the Authenticate with office 365 section to get the required access code. Here’s how:
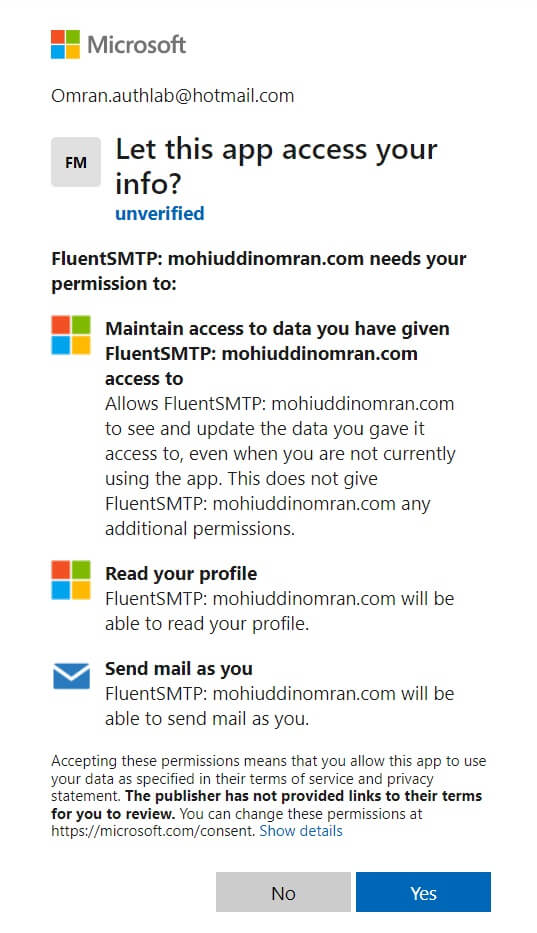
- Click Authenticate with Office 365 & Get Access Token button. You will be redirected to the Microsoft permissions form, click Yes to proceed.
- Once given access, you’ll find your access code from Microsoft Azure.
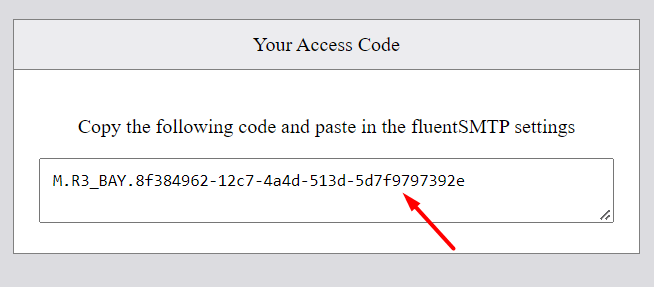
- Copy the access code from there and paste it into FluentSMTP. And finally, click Save Connection Settings to save your configuration.
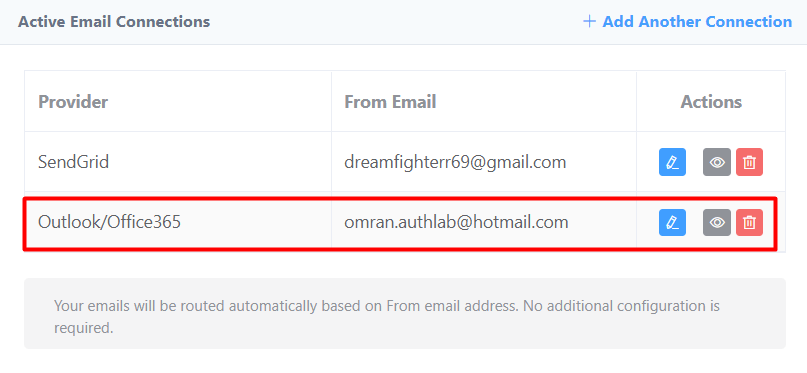
Congratulation, you’ve successfully connected your FluentSMTP with your Microsoft account!
You can find your Microsoft account on the connection setting page in the Settings tab of FluentSMTP. Since FluentSMTP allows you to configure multiple mailers, you can easily delete, view, or edit your connections.
Check Email Deliverability
At this point, you have configured the Microsoft 365 Mailer. However, it’s appropriate to check if the emails are being delivered. FluentSMTP offers a simple way to do so. You can keep track of all emails sent from WordPress with FluentSMTP.
To test whether your WordPress emails are working or not:
- Go to FluentSMTP dashboard and click on Setting from the upper bar.
- Check Log all emails from reporting; this will ensure email logging.
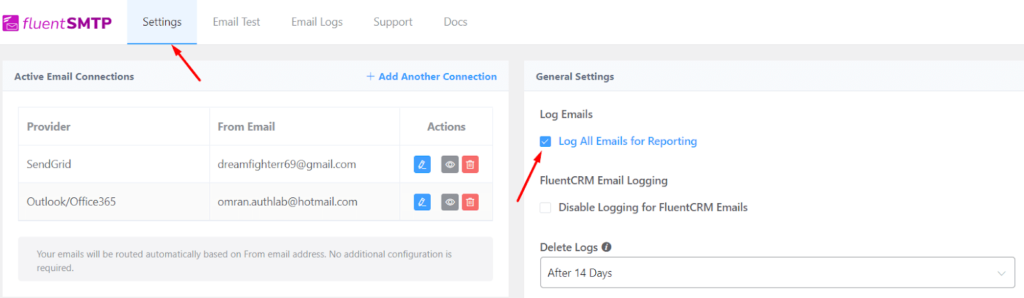
- Click on the Email Test button on the upper bar.
- Select a from email and a to email, and click Send Test Email button to test email deliverability.

You can check your inbox to see if the test email landed successfully.
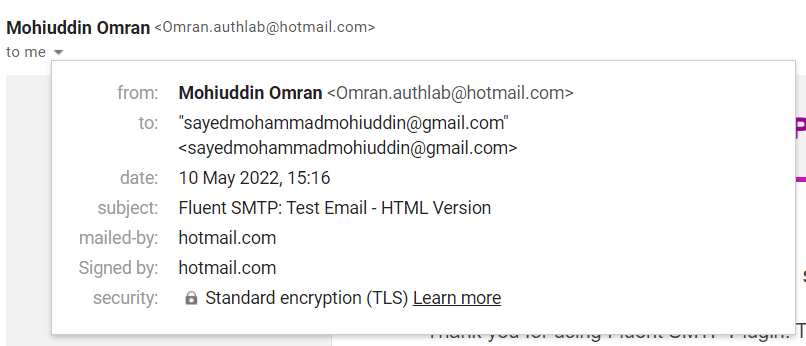
5. Finally, click on Email Logs. Here you can see you sent emails with the email addresses. There are also resend, view, and delete options if needed.

If you receive an email in your email inbox and see your sent email in the email logs list, your Microsoft 365 mailer configuration works perfectly!
Subscribe to Our Newsletter
Get our blog articles, tutorials, and information delivered to your inbox!

Start sending WordPress emails reliably with Microsoft 365 account
FluentSMTP is a feature-rich and lightweight WordPress SMTP and PHP mailer plugin that is completely free and open source. So connect Microsoft 365 for sending WordPress emails and start sending WordPress emails reliably.
We hope this article helped you set up Microsoft 365 mailer for sending WordPress emails. Additionally, you can check out if you face the problem of Elementor form not sending emails. If you have any other questions or face any errors, feel free to leave a comment!

Mohiuddin Omran
WordPress, automation, eCommerce and growth marketing specialist, a WordPress Core Contributor and Media Corps member blending storytelling with technology to craft strategies in SEO, email marketing, and beyond.
Table of Content
Subscribe To Get
WordPress Guides, Tips, and Tutorials


Comments
-
This didn’t work unfortunately. Went through teh steps fine but the test fails. At first the error was “cURL error 28: Operation timed out after 5001 milliseconds with 0 bytes received” but now it’s just
“code”: 423,
“message”: “Not Found”,
“errors”: [
“Not Found”

Leave a Reply