

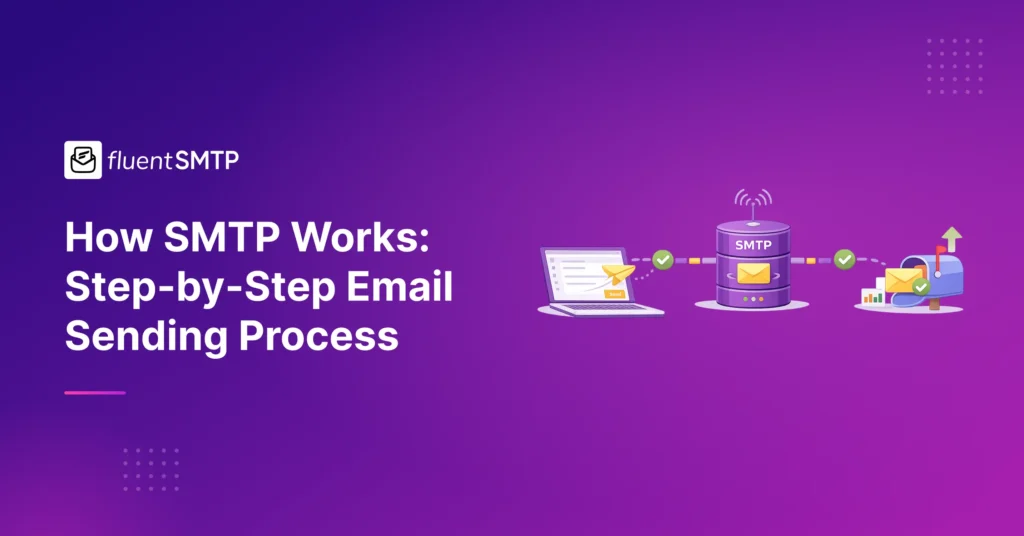
A Complete Guide to Setting Up Amazon SES for Sending WordPress Emails


Most WordPress site sends emails. If you have an e-commerce site, order confirmation emails or order receipts are crucial for you. Similarly, if you have a membership site, membership confirmation emails are a must.
When it comes to sending emails from WordPress, the default configuration often isn’t the best way to go. WordPress emails not being delivered or ending in spam is a recurring issue with the default PHP mailer. And a simple workaround to this is routing your emails using an email SMTP service.
Amazon SES is one of the best-in-class SMTP services that offers reliable email deliverability. Besides, if your WordPress site is sending a massive volume of emails – say 100K or more, you’ll save a lot with Amazon SES as it costs only a dollar for 10000 emails.
However, to use Amazon SES to send your WordPress emails, you need to replace the default email sending method in WordPress using an SMTP plugin. This requires configuring the service in a particular way, and if you’re not confident about doing that, keep reading this article.
In this article, we’ll show you a step-by-step guide to configure Amazon SES in WordPress.
So let’s get started!
Configuring Amazon SES for sending WordPress emails
As soon as you sign up for Amazon SES, you can use it for sending emails. But to use it for sending your WordPress emails, you need to configure it and get the required credentials.
This includes signing up for Amazon AWS, verifying your domain and email address, creating API credentials, and moving out of the sandbox mode. Here’s how you can do that:
1. Sign up for Amazon AWS
First off, you have to sign up for Amazon AWS. After a simple sign-up process, Amazon services will become available for purchase. You may have to provide your billing details. But you won’t be billed until you use one of the services that are offered.
2. Verify your domain with Amazon SES
The next step is verifying your domain. Amazon SES requires this to verify that you’re the owner of the domain and allows you to use any custom domain email address you’ve created.
From your AWS management console, search for Amazon SES and go to Domains to start the domain verification process.
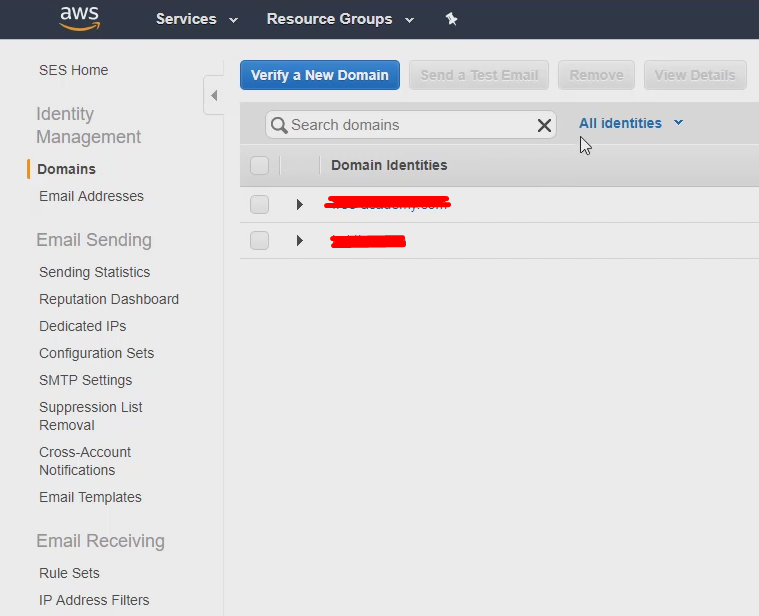
On the domain verification panel, click Verify a New Domain and enter your domain. Check the Generate DKIM Settings checkbox to generate the required keys and records for Amazon SES verification.
Now, go to your domain’s DNS management and configure DKIM keys. Then Amazon SES will start verifying your email address. Don’t worry, it takes only a few minutes!
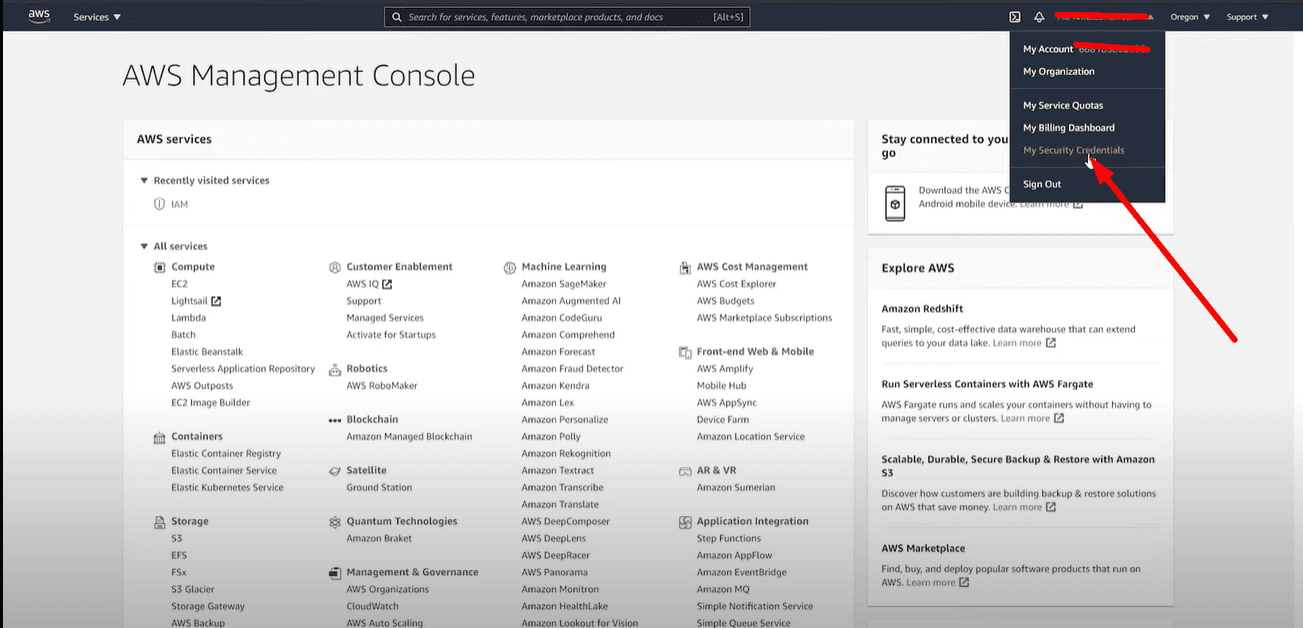
3. Create API credentials
After verifying the domain, you need to create API credentials for integrating your WordPress website with Amazon AWS. The API credentials can be found under My Security Credentials.
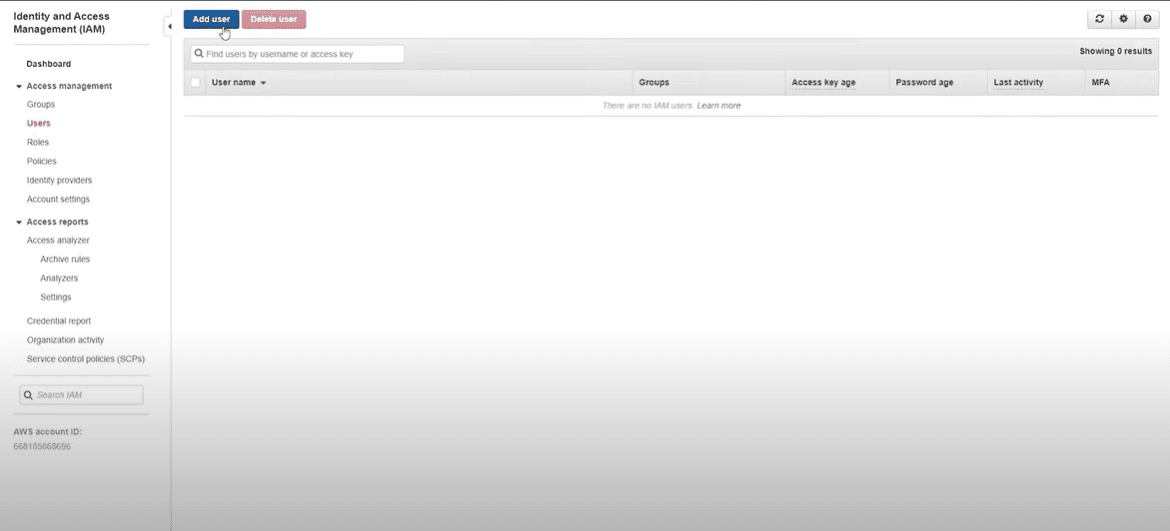
Select Users from the left sidebar and click on Add User as shown below.
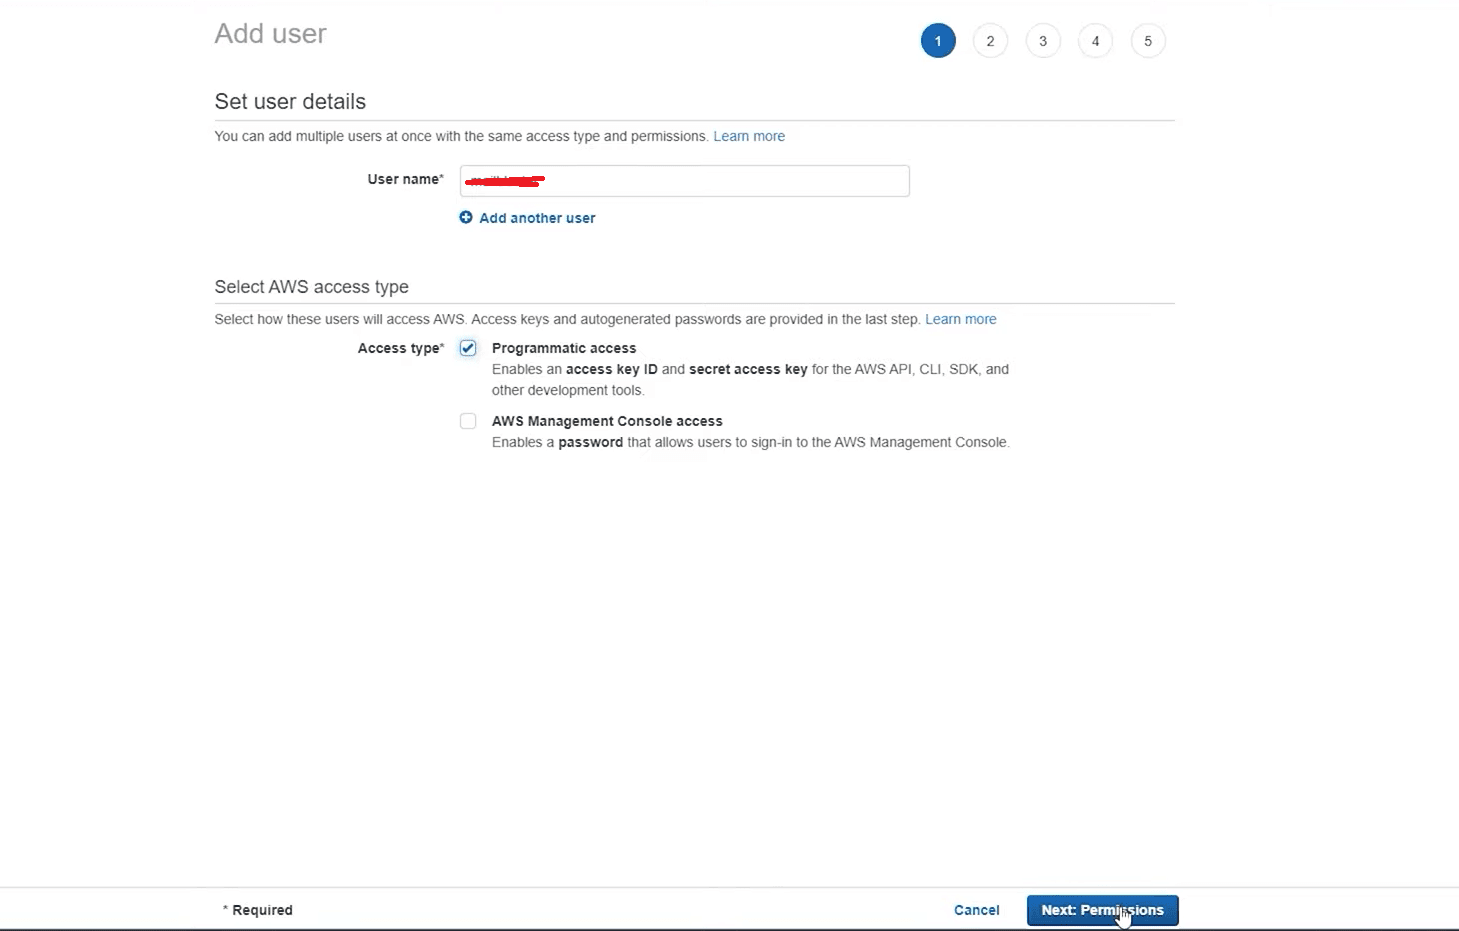
Enter a User name and select Programmatic Access from the Access type, then click Next.
Now, from the Attach Existing Policy tab, Search for SES and SNS and select checkboxes for AmazonSES FullAccess and AmazonSNSFullAccess.
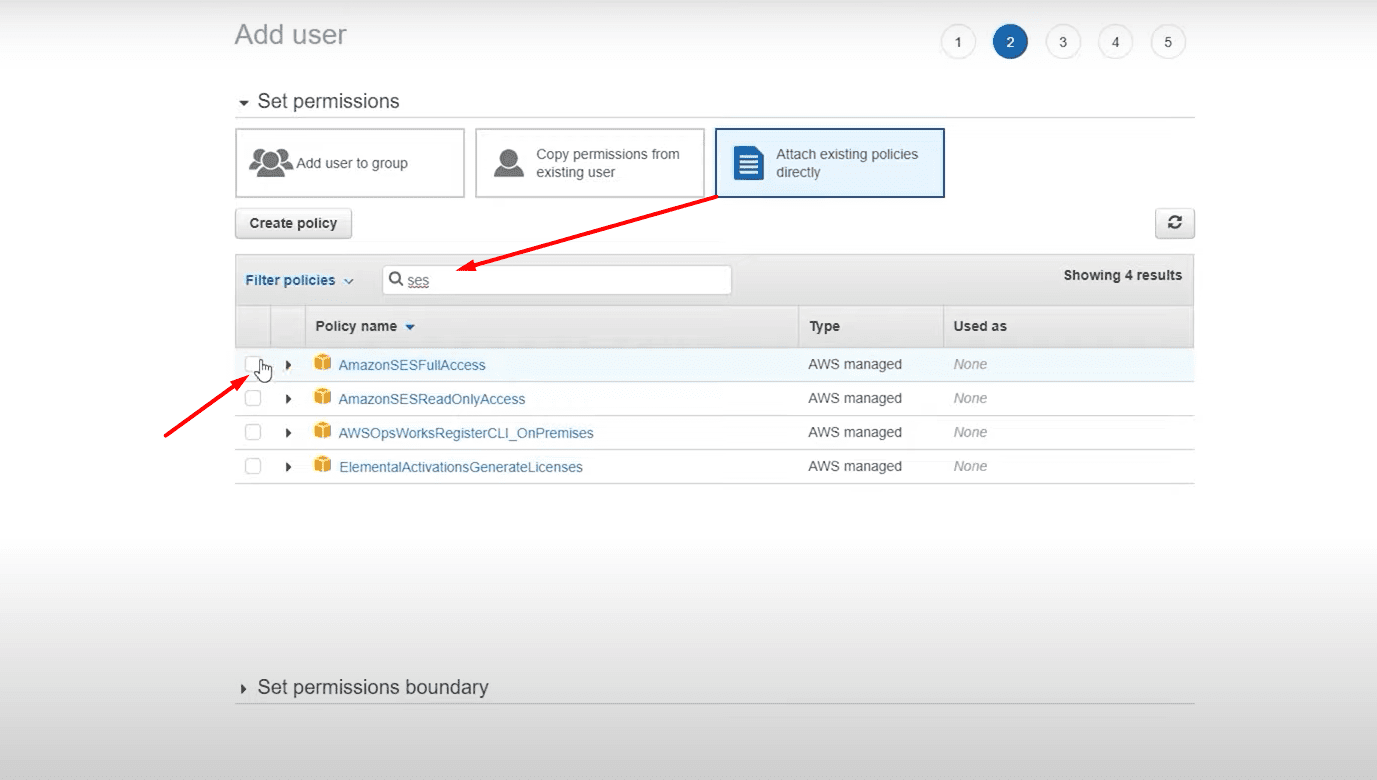
The next step is for adding tags. As it’s completely optional, we’ll skip it altogether. Hit Review to check if everything is in order.
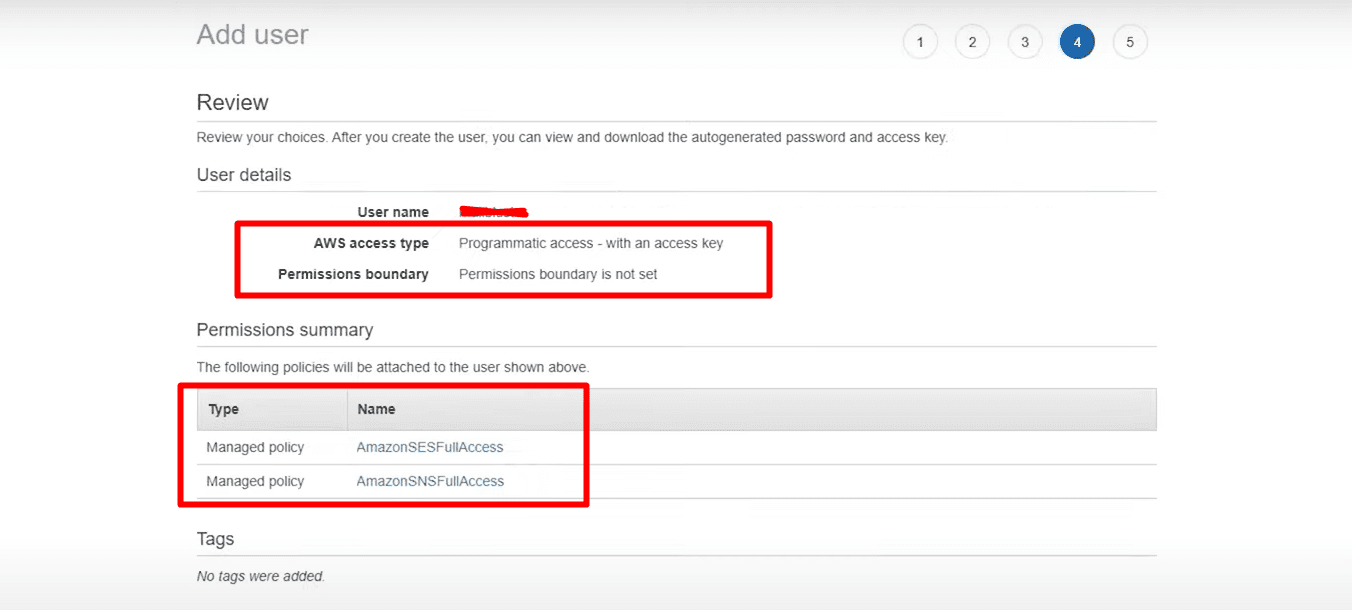
Note that it’s essential to provide Programmatic Access and allow AmazonSESFullAccess and AmazonSNSFullAccess permission, as shown in the screenshot below:
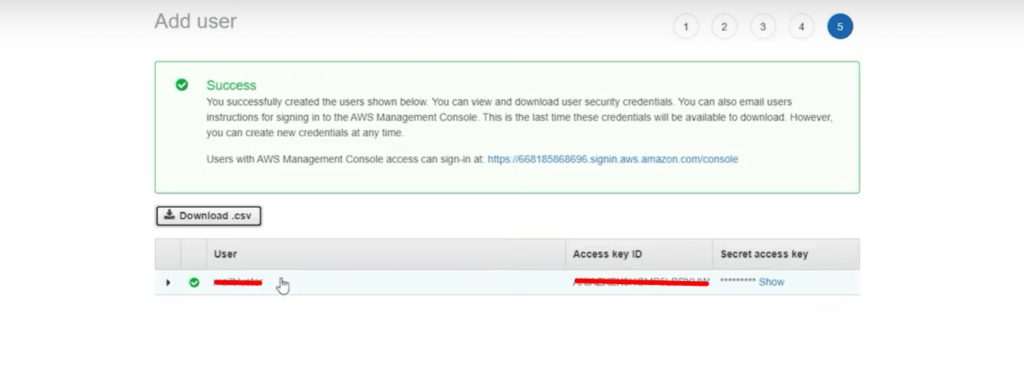
If everything is done correctly, click Create User button to copy and download your credentials. Note that you won’t be able to recover your credentials after this step. So it’s best to store them on your computer while you can access them.
4. Verify your email address
Once your API credentials are set, you need to verify your email address with Amazon SES to send emails from your custom email address.
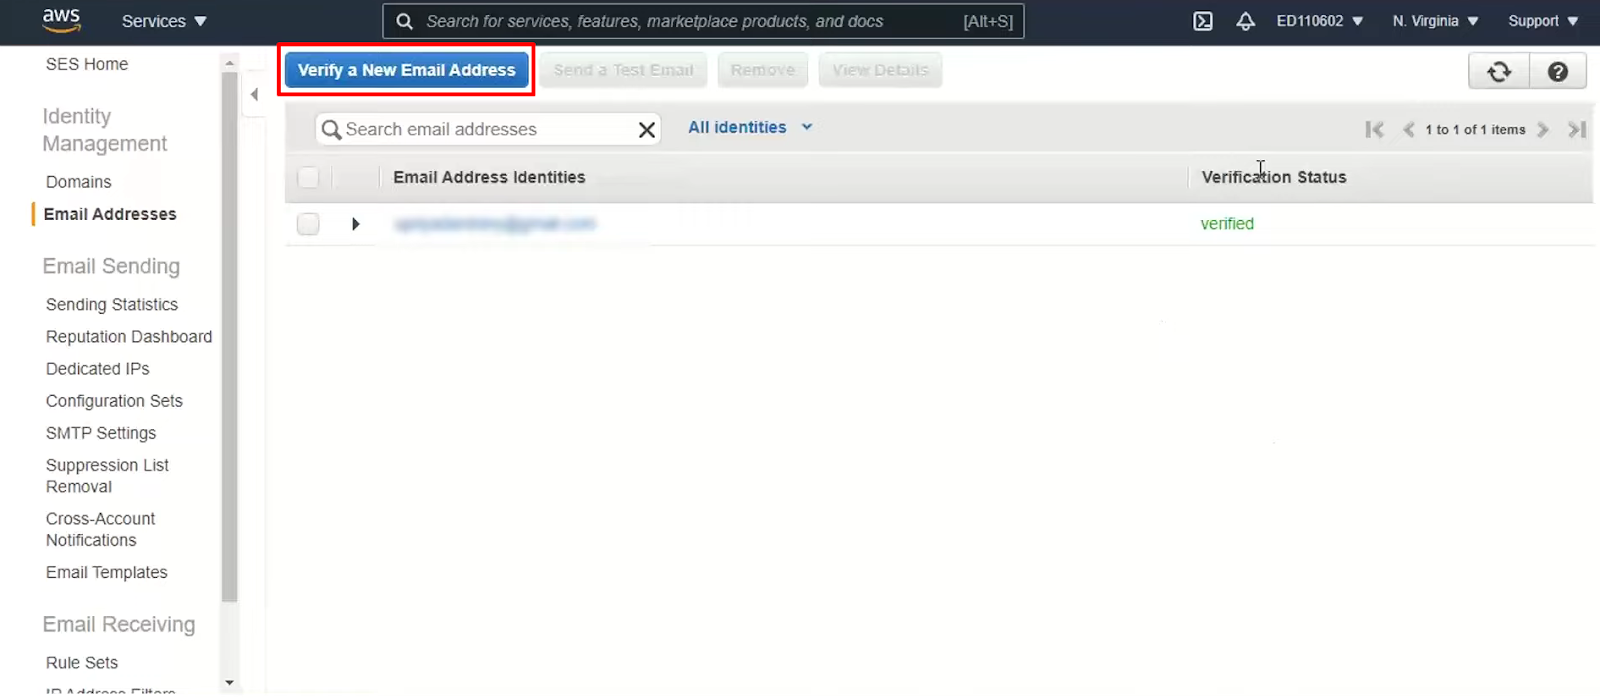
Enter your email address and click Verify This Email Address. You’ll receive a verification email. Click the confirmation link and your email id will be added as a verified sender.
5. Moving out of sandbox mode
Amazon SES accounts are initially sandboxed to prevent spamming and misuse of Amazon SES service. The Sandbox Mode prevents you from sending too many emails or emails outside of your organization and only allows for sending 200 emails per day and only one email/second
If you want to exceed this limit for marketing or transactional emails, you must submit a request to move out of the Amazon SES sandbox. So go to your Amazon SES console and select Sending Statistics.
Then, click the Edit Your Account Details button.
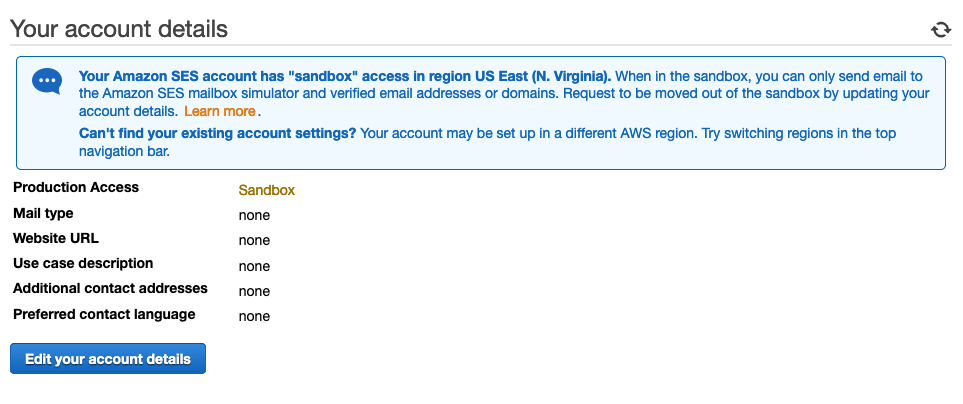
This will bring up a pop-up where you have to Enable Production Mode and select whether you want to send transactional or marketing emails(It’s better to select Marketing Email)
To get the request approved, you need to explain how you intend to use Amazon SES clearly. So you need to be honest and answer some questions related to:
- How do you gather emails?
- What are your bounces and complaints handling policy?
- Is it easy enough to opt out of receiving emails from you?
- What is the sending rate or sending quota that you specified?
Provide the details as per your business preference and click Submit for review.
Once you submit this request, Amazon AWS support agents will review and verify the information. In most cases, it takes about 48 hours or more. If you’re qualified, they will set a new sending quota and increase the number of emails/second.
Setting up Amazon SES SMTP for sending WordPress emails
Now that your Amazon SES account is created and configured for email sending, you need to connect it to your WordPress website using a WordPress SMTP plugin.
WordPress SMTP plugins are usually free, but most don’t offer Amazon SES on their free version. Besides, the free versions are usually the lite versions of the plugin, which doesn’t offer anything other than the integration itself. With those plugins, you won’t see email logs or sending stats inside your WordPress site.
Fortunately for you, FluentSMTP is completely free, and it offers everything any WordPress SMTP plugin can offer. And more, you can set up multiple SMTP services and use fallback connections to ensure that you have an alternate email deliverability system for WordPress when your primary sending service malfunctions.
Here’s how you can set up Amazon SES SMTP for sending WordPress emails using FluentSMTP:
1. Install and Activate FluentSMTP
Go to your WordPress dashboard and hover over Plugins>Add New.
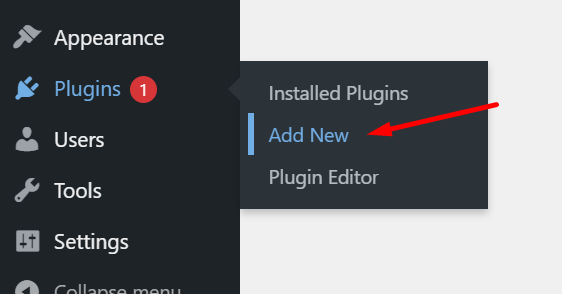
Search for FluentSMTP and click Install Now.
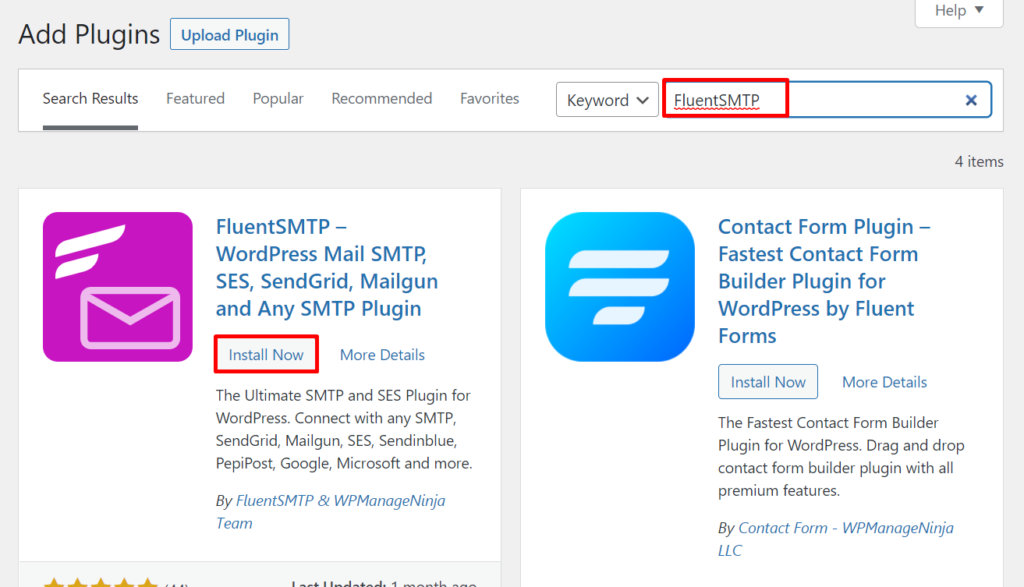
Once the plugin is installed, click Activate. FluentSMTP will be installed and activated on your website.
2. Setting up Amazon SES in FluentSMTP
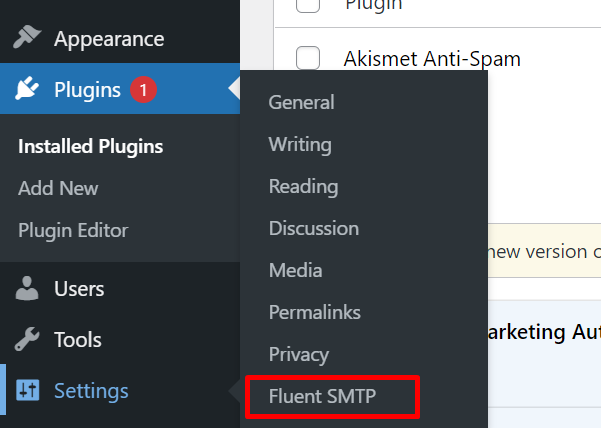
Hover over to Settings and click FluentSMTP.
When FluentSMTP opens, click to start configuring Amazon SES SMTP.
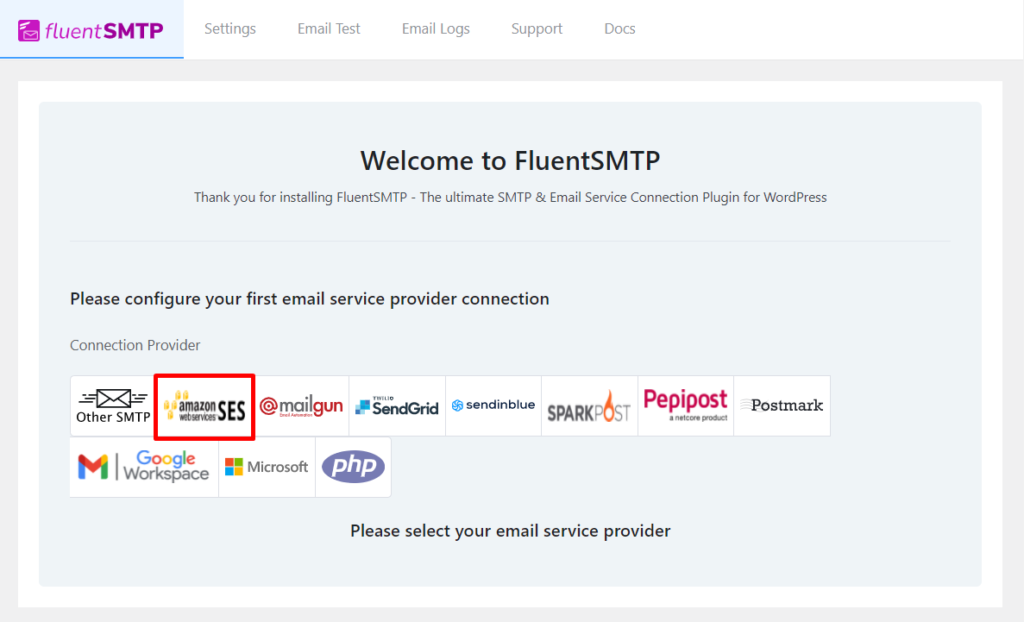
Here you need to:
- Provide your email address in the From Email field.
- Provide your Access Key and Secret Key you’ve obtained from Amazon SES.
- Select the Region of your Amazon SES account(Don’t worry, you can send emails from any location)
- Enable of disable forcing From Email Address from other plugins you use(this will replace the default From Email addresses of all other plugins you use).
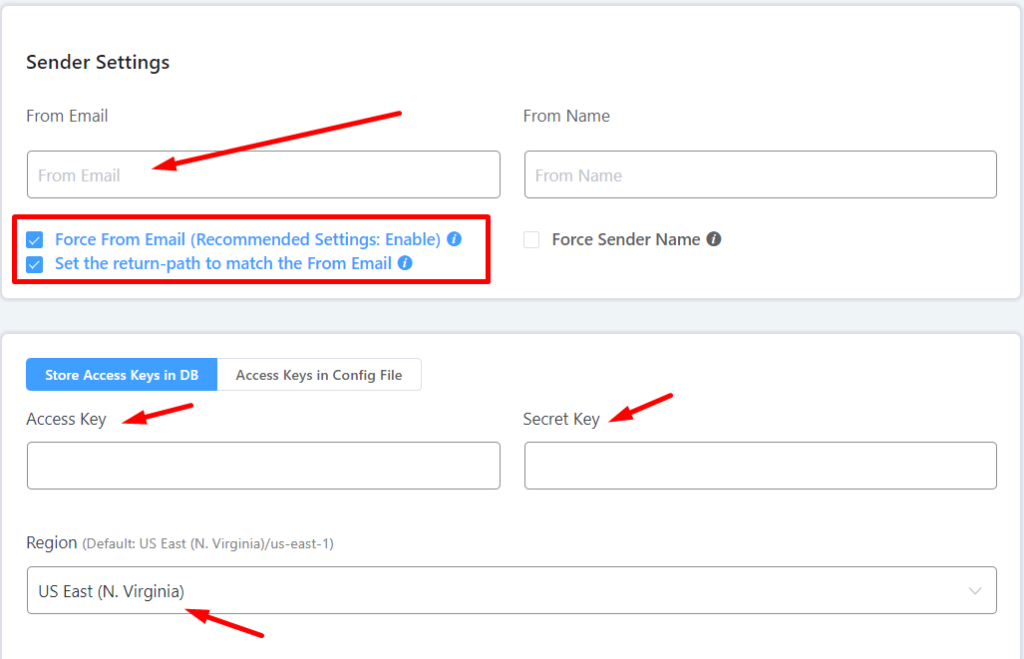
If you want, you can also force a sender name. Finally, hit Save Connection Settings when you’re done.
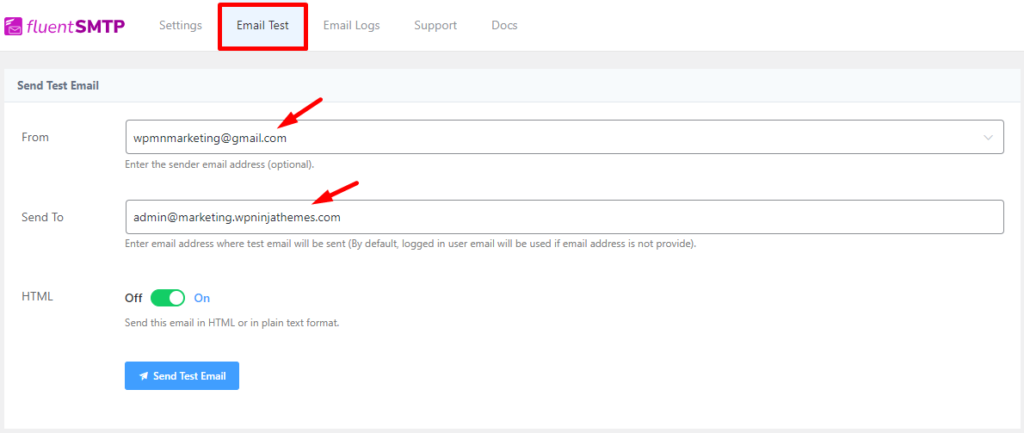
3. Test email deliverability
Your WordPress site will now send emails via Amazon SES. But before wrapping up, let’s test if the SMTP connection is Working Properly.
Go to the Email Test tab and select the email address you’ve just configured with Amazon SES. Then, type your email address in the Send To field and hit Send Test Email. You can test both HTML and non-HTML emails.
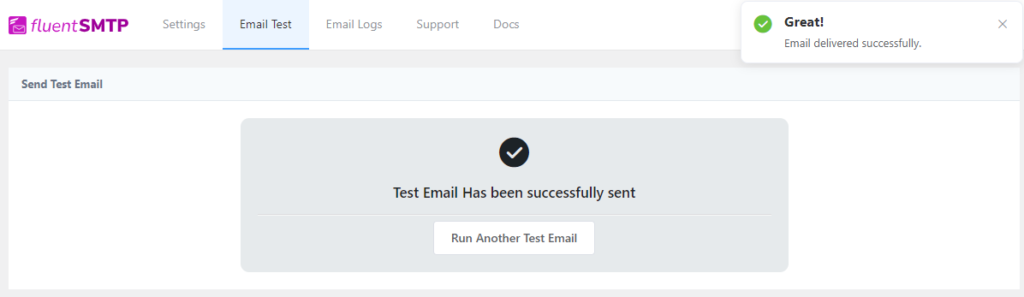
If you get a success message like the screenshot shows, your email configuration is working perfectly!
Turn your WordPress into an email marketing platform!
So, you’ve set up your WordPress site for sending emails using Amazon SES, and your visitors are receiving WordPress emails accurately. Now it’s a good idea to think about setting up email marketing automation on WordPress.

FluentCRM is a WordPress plugin that lets you automate day-to-day your email marketing activities with email campaign management, email sequences, and email marketing automation funnels. With this plugin, you can send personalized emails that will be triggered based on your visitor’s behavior – so that you can improve your user experience and sell more products on autopilot!
We recommend FluentCRM for email marketing on WordPress. Go ahead and give the plugin a try(it’s free!).
Wrapping up
Setting up Amazon SES for sending WordPress emails is quite complex. But Amazon’s reliability and quality of service make it worthwhile. Combining Amazon SES and FluentSMTP lets you send emails with a high delivery rate with minimal mishaps. And as promised, using FluentSMTP will never cost you a dime, ever.
Hope this article helped. Happy mailing!

Nazir Himel
“Produce value through quality content” – is the motto I live by. Content Marketing, SEO, and Email Marketing are my primary interests and if I’m not busy with any of them, you’ll probably find me roaming around the city.
Table of Content
Subscribe To Get
WordPress Guides, Tips, and Tutorials


Comments
-
Okay but your info on getting out of Sandbox is missing. If we use FluentCRM and SMTP how do I respond to Amazon rejection email:
“Thank you for submitting your request to increase your sending limits. We are unable to grant your request at this time because we do not have enough information about your use case.
If you can provide additional information about how you plan to use Amazon SES, we may be able to grant your request. In your response, include as much detail as you can about your email-sending processes and procedures.
For example, tell us how often you send email, how you maintain your recipient lists, and how you manage bounces, complaints, and unsubscribe requests. It is also helpful to provide examples of the email you plan to send so we can ensure that you are sending high-quality content.”

Leave a Reply