

BIMI: What It Is and How to Show Your Brand Logo in Gmail, Yahoo, and More


People don’t spend much time studying their inbox.
They scan the sender name, glance at the subject line, and decide in a second or two whether your email feels safe enough to open.
So even if you’ve already done the hard work, setting up SPF, DKIM, and DMARC, your emails can still get ignored if they look plain or unfamiliar.
Well, that’s where BIMI comes in.
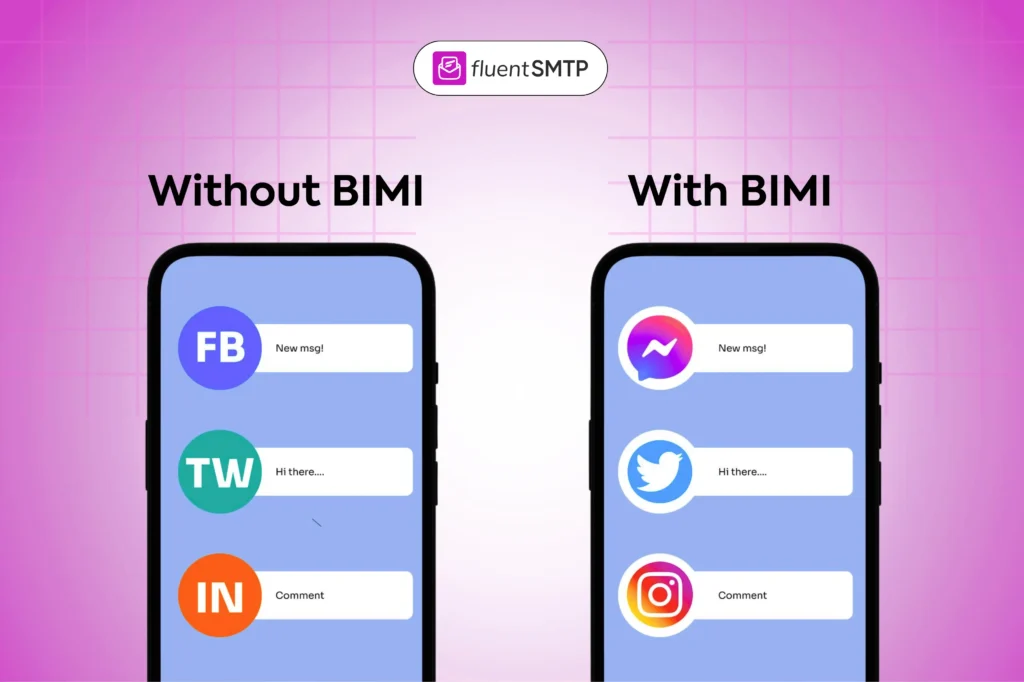
BIMI helps your brand look more official, more recognizable, and far less like a random sender nobody trusts. It displays your logo next to your authenticated emails, adding a visual layer of trust right where decisions happen.
And, if you also want your emails to pass that quick inbox scan rather than get skipped, you’re in the right place.
This guide will walk you through what BIMI is, how it works, what you need before setup, and how to add it without breaking the rest of your authentication stack.
Let’s go!
What is BIMI?
BIMI stands for Brand Indicators for Message Identification. It’s an email standard that allows supported inboxes to display your brand logo next to your authenticated emails.
Think of it as a trust badge for the inbox, not a ranking trick or a spam fix. It’s simply a visible signal that your brand has done the authentication work correctly.
That said, BIMI is not an email deliverability fix. If your emails are landing in spam, BIMI won’t save them. BIMI doesn’t force Gmail or any other provider to accept your email. It only works when your setup already proves that your domain is real and properly authenticated.
Why BIMI Matters
BIMI matters because it gives your emails a stronger visual identity, and that can make a real difference in a crowded inbox where trust gets built or lost very quickly.
Most inboxes show the sender’s name and email address. That’s useful, but it’s not always enough, especially when people are scanning through dozens of emails in seconds. They are not analyzing. They are making quick decisions based on what feels familiar and safe.
Attention in the inbox is shrinking every day. Users skim, skip, and move on faster than ever. In that environment, even the smallest trust signal can make a difference. A recognizable logo next to your email can be that signal.
That’s where BIMI comes in.
Instead of relying only on text, BIMI gives recipients something visual to anchor on. A logo beside the sender’s name makes your email instantly more recognizable and easier to trust at a glance.
Over time, this also contributes to brand reputation. When people repeatedly see the same logo in their inbox, it reinforces familiarity. Familiarity builds trust, and trust increases the chances that your emails get noticed and opened.
This is especially important for brands that send transactional emails, newsletters, or regular updates, where consistency matters.
And that’s exactly what BIMI ensures: your authenticated emails do not just arrive, they look like they belong.
How BIMI Fits into Email Authentication
BIMI does not work in isolation. It sits at the very top of your email authentication stack, which means everything underneath it needs to be properly set up first.
Here is how the full flow works:
- SPF
- DKIM
- DMARC
- BIMI

First, SPF (Sender Policy Framework) defines which servers are allowed to send emails on behalf of your domain
Next, DKIM (DomainKeys Identified Mail) adds a digital signature to your emails so the receiver can verify that it has not been tampered with.
Then DMARC (Domain-based Message Authentication, Reporting & Conformance) ties SPF and DKIM together and tells inbox providers how to handle messages that fail authentication.
Once that foundation is in place, only then can BIMI display your logo in supported inboxes.
So in simple terms, SPF, DKIM, and DMARC build the trust foundation. BIMI simply makes that trust visible. And, if the foundation is weak or missing, BIMI will not work.
Read the complete guide on SPF, DKIM, and DMARC to learn more
BIMI: Myths vs Reality (What It Does and Doesn’t)
BIMI is often misunderstood, which leads to unrealistic expectations. It is not a shortcut for deliverability, but a trust and branding layer that works only when your email authentication is already solid.
Myth 1: BIMI improves email deliverability
Reality: BIMI does not fix spam issues or improve inbox placement. If your emails are not properly authenticated or are flagged as spam, BIMI will not change that.
Myth 2: BIMI replaces SPF, DKIM, and DMARC
Reality: BIMI does not replace SPF, DKIM, DMARC, or sender reputation. Instead, BIMI depends on SPF, DKIM, and DMARC. It only works when those are correctly set up and aligned. It is built on top of them, not instead of them.
Myth 3: BIMI works in all email clients
Reality: BIMI is only supported in certain inboxes. If the email client does not support it, your logo will not appear.
Myth 4: BIMI guarantees higher open rates
Reality: BIMI can improve recognition and trust, but it does not guarantee better open rates. Engagement still depends on your content, timing, and audience relevance.
So, in short, BIMI displays your brand logo in supported inboxes, improves instant brand recognition, helps your emails feel more trustworthy at a glance, and strengthens brand visibility in crowded inbox environments. But, it does not fix deliverability issues, replace SPF, DKIM, or DMARC, work in every email client, or guarantee higher open rates.
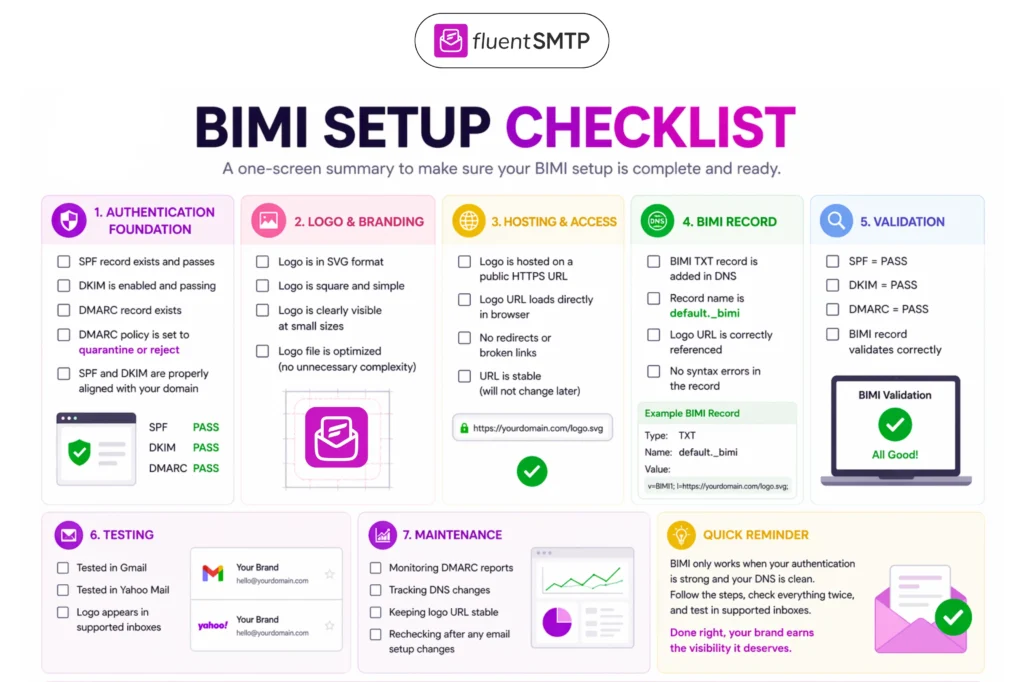
What You Need Before Setting Up BIMI
Before you even think about BIMI, make sure these are already handled:
- SPF is set up correctly
- DKIM is active and passing
- DMARC is configured properly
- Your DNS is under control
- Your logo is ready in the right format
If any of those are broken, fix them first, because BIMI is the final layer, not the starting point. It only makes sense after the domain is already authenticated and the DNS setup is stable enough to support it.
How to Set Up BIMI: Step-by-Step Guide
Setting up BIMI is not complicated if your email authentication is already clean. The real challenge is not the BIMI record itself, but everything that comes before it. BIMI only works when your authentication stack is already solid.
So, follow these steps in order.
Step 1: Make sure SPF is working
Your SPF record defines which mail servers are allowed to send emails on behalf of your domain. If SPF is missing or broken, fix it first. BIMI depends on a trustworthy authentication foundation, and SPF is part of that base layer.
What to check:
- SPF record exists in DNS
- All sending sources are included
- SPF result = PASS
Tools you can use: MXToolbox, Google Admin tools, or any SPF checker
If you have not set up SPF yet, read: How to Set Up SPF Record
Step 2: Make sure DKIM is passing
DKIM adds a digital signature to your emails so receiving servers can verify that the message has not been altered in transit. If DKIM is not passing, BIMI should not be your next step. There is no point adding branding on top of an unverified message.
What to check:
- DKIM is enabled by your email provider
- DNS record is correctly added
- DKIM result = PASS
Tools you can use: Gmail “Show Original”, DKIMCore, or other validators
If you have not set up DKIM yet, read: How to Set Up a DKIM Record
Step 3: Set up DMARC correctly
DMARC connects SPF and DKIM and defines how failed emails are handled. BIMI typically requires a properly configured DMARC policy, so make sure your DMARC record exists and is correctly aligned with SPF and DKIM.
What to check:
- DMARC record exists
- SPF and DKIM are aligned
- Policy is set to quarantine or reject
Tools you can use: dmarcian, Postmark, or any DMARC analyzer. For this guide, we are using dmarcian.
If you need help, read: How to Set Up DMARC Record
Step 4: Prepare your brand logo
This is the logo that will appear next to your emails in supported inboxes. So, make sure your logo is clean, consistent, and optimized for inbox display.
Requirements:
- Square shape
- Simple design
- SVG format
- Clear at small size
Tools you can use: Figma / Illustrator / Canva
Step 5: Host the logo properly (this is where many setups break)
Your BIMI logo is not just a file; it is a referenced asset that inbox providers must be able to access anytime. That means the hosting matters as much as the design. So, make sure:
- The logo is hosted on a stable, publicly accessible URL
- The file format matches BIMI requirements (commonly SVG)
- The URL does not redirect multiple times or expire
- HTTPS is used for secure delivery
How to set it up:
Option 1 (simple):
- Upload to your website: https://example.com/logo.svg
Option 2 (recommended):
- Use cloud storage (Cloudflare R2, AWS S3)
Tools you can use: Cloudflare R2 / AWS S3 / CDN
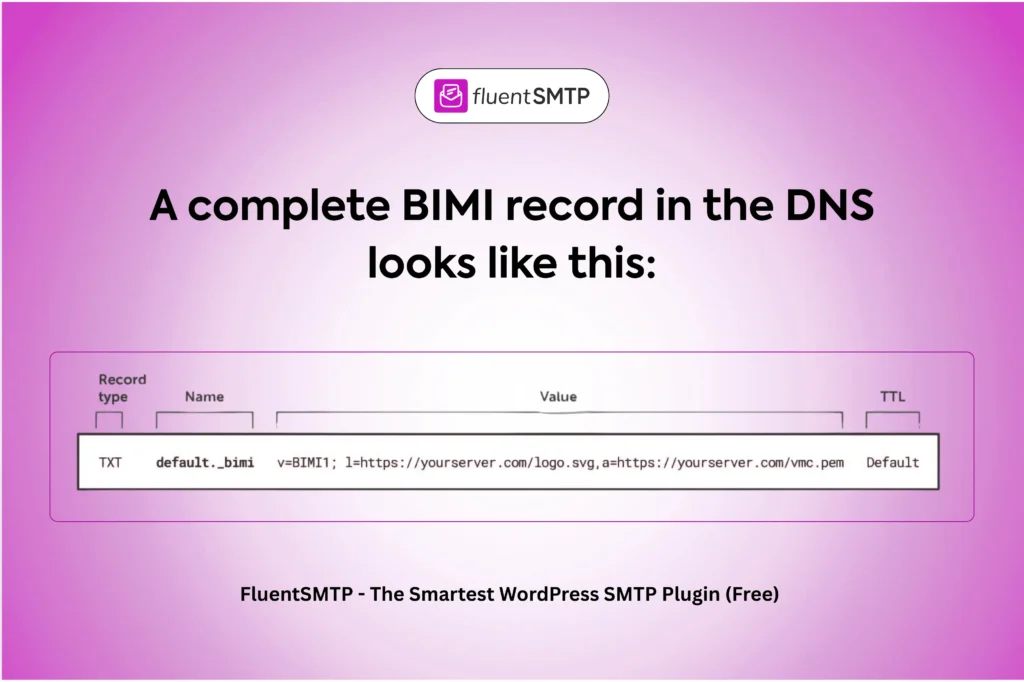
Step 6: Add the BIMI DNS record
Now you can add the BIMI record to your DNS. This is the same place where SPF, DKIM, and DMARC live. The record tells supported inboxes where to find your logo. If your DNS setup is messy or inconsistent, fix it before adding BIMI.
How to set it up:
Cloudflare → DNS → Add Record
Add this record
- Type: TXT
- Name: default._bimi
- Value: v=BIMI1; l=https://yourserver.com/logo.svg;
Tools you can use: BIMI Inspector / DNS checker
Step 7: Validate the setup
Once added, validate your configuration carefully. Even a small DNS error can prevent BIMI from working.
Check for:
- Typos in the record
- Incorrect logo URL
- DNS propagation delays
- Missing or misconfigured authentication records
Tools you can use: MXToolbox / dmarcian / BIMI Inspector
Step 8: Test in supported inboxes
After everything is live, test it in inboxes that support BIMI. Send test emails to Gmail and Yahoo.
Keep in mind, not all email clients support BIMI. If your logo appears in one inbox but not another, it does not necessarily mean something is broken. It may simply be a support limitation.
Step 9: Monitor and maintain
BIMI is not a set-and-forget setup. It needs occasional maintenance.
Keep an eye on:
- DNS records
- DMARC reports
- Logo file changes or hosting issues
- Updates in mailbox provider requirements
If you change domains, email providers, or DNS configurations, revisit your BIMI setup to make sure everything still aligns.
Tools you can use: dmarcian / Postmark / monitoring dashboards
7 Common BIMI Errors (and How to Fix Them)
BIMI failures are rarely about BIMI itself. In most cases, something earlier in the authentication chain is not fully correct.
1. BIMI record exists, but the logo is not showing
Why this happens: Your BIMI record is correct, but one of the required conditions is not met.
What to check:
- DMARC policy is not set to quarantine or reject
- SPF or DKIM is failing
- Logo URL is not accessible
- Inbox provider does not support BIMI
How to Fix:
- Set DMARC to p=quarantine or p=reject
- Verify that SPF and DKIM are passing
- Open your logo URL in the browser and confirm it loads
- Test in Gmail or Yahoo (supported providers)
2. SPF or DKIM is failing
Why this happens: Your authentication setup is incomplete or misaligned.
What to check:
- SPF record missing sending service
- Multiple SPF records (invalid setup)
- DKIM key not added correctly
- DKIM is not enabled from the provider
How to Fix:
- Merge SPF records into a single valid entry
- Add all sending services to SPF
- Re-generate DKIM key and re-add to DNS
- Enable DKIM from your email provider dashboard
3. DMARC is set, but BIMI is still not working
Why this happens: DMARC exists, but it is not strict enough for BIMI.
What to check:
- DMARC policy is p=none
- Alignment between SPF/DKIM and the domain is broken
How to Fix:
- Update policy to:
v=DMARC1; p=quarantine;
or
v=DMARC1; p=reject;
- Ensure domain alignment is correct
4. The logo does not load or fails validation
Why this happens: The logo file does not meet BIMI requirements.
What to check:
- Logo is not SVG
- File is too complex or includes unsupported elements
- URL is not public
- Redirects are present
How to Fix:
- Convert logo to clean SVG
- Optimize using SVGOMG
- Ensure direct HTTPS access
- Remove redirects and test the URL manually
5. BIMI record is added, but validation fails
Why this happens: Small DNS mistakes break the setup.
What to check:
- Typo in record value
- Incorrect record name (default._bimi)
- Missing semicolon
- DNS is not fully propagated
What to Fix:
- Recheck the record syntax carefully
- Confirm the record name is correct
- Wait for DNS propagation (can take time)
- Re-validate after updates
6. BIMI works in one inbox but not another
Why this happens: BIMI is not supported universally.
What to check:
- Inbox provider support
- Provider-specific requirements
How to Fix:
- Test in Gmail and Yahoo first
- Check provider documentation
- Do not assume all inboxes will display BIMI
7. Everything is correct, but still no logo
Why this happens: BIMI sometimes takes time or requires additional verification (like VMC in some cases).
What to check:
- DNS propagation delay
- Provider-specific requirements
- Missing Verified Mark Certificate (VMC) (in some cases)
How to Fix:
- Wait and recheck after propagation
- Validate using BIMI tools
- Check if VMC is required for your provider
BIMI Works Best When The Foundation is Already Strong
BIMI is not a shortcut. It is a visibility layer built on top of trust.
If SPF, DKIM, and DMARC are properly configured, BIMI helps your emails stand out in the inbox with a clear, recognizable identity. It adds that extra layer of confidence at a glance. But if your authentication is still inconsistent or incomplete, BIMI will not fix that. In fact, it will simply not work.
The order matters more than most people expect:
- Fix your authentication
- Clean up your DNS
- Set up BIMI
- Then verify how it appears in supported inboxes
Follow this sequence, and BIMI does exactly what it is supposed to do, nothing more, nothing less.
That’s all. Have a good day.
BIMI FAQs: Answers to the Most Common Questions
Nader Chowdhury
Table of Content
Subscribe To Get
WordPress Guides, Tips, and Tutorials


Leave a Reply