
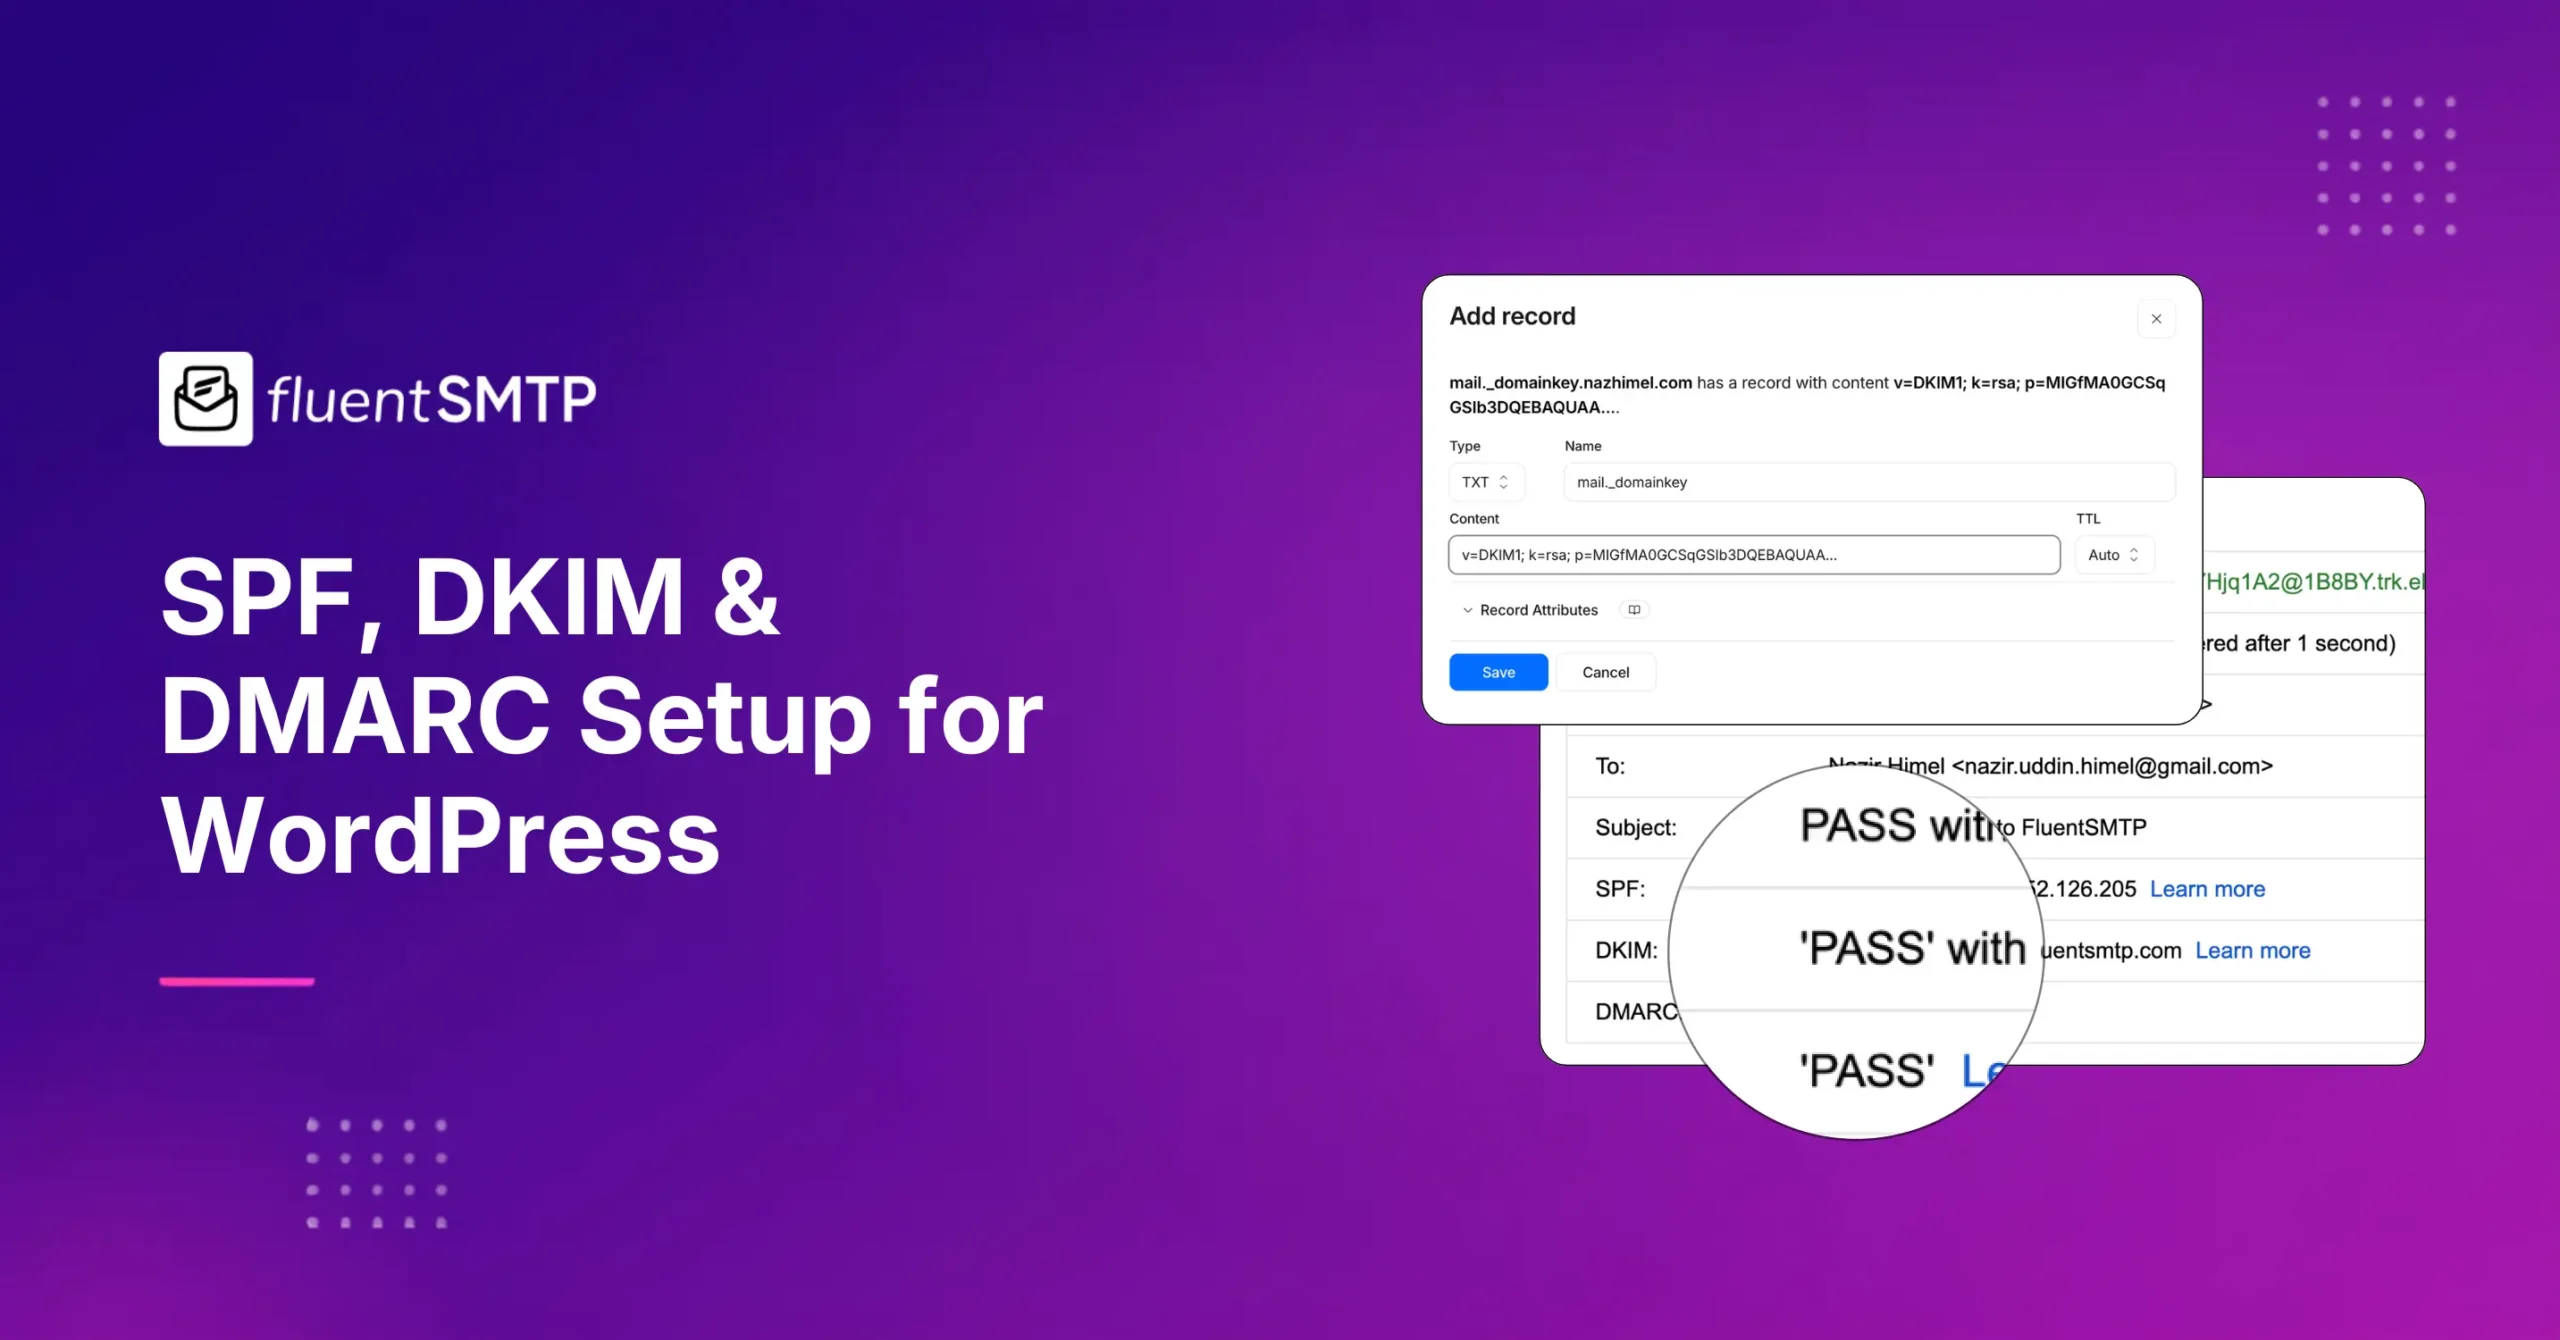
How to Set Up SPF, DKIM & DMARC for Your WordPress Site


Do you know?
Your WordPress emails can be delivered successfully and still fail authentication.
Yeah, I’m referring to SPF, DKIM, and DMARC. The three DNS records that prove your emails are legitimate. Together they tell receiving mail servers:
- This message came from an authorised server
- The content wasn’t altered in transit
- And here’s what to do if something looks wrong
Without those involved, your website’s order confirmations, password resets, membership emails, and contact form notifications may look suspicious to mailbox providers like Gmail and Yahoo.
And as a result, they may land in spam or…never reach the recipient at all!
No worries, I’ll guide you through adding these records to your domain’s DNS settings. You’ll also learn how to verify everything is working and ensure your emails always hit the inbox.
Why WordPress Sites Struggle with Email Authentication?
Most platforms handle email authentication automatically. WordPress doesn’t. And the reason is baked into how it sends email by default.
Many WordPress websites start by sending emails through their hosting server’s default mail configuration. This creates two problems:
- Shared hosting servers often have poor email sending reputations, which means email sent from them is already under suspicion
- WordPress sends PHP mails via a function called
wp_mail, which can’t sign emails with DKIM. No DKIM signature means no cryptographic proof that the message is genuine
The emails may appear to work initially. Contact form notifications arrive. Password reset emails get delivered. WooCommerce sends order confirmations.
But behind the scenes, your emails are being sent in a way that modern spam filters treat as inherently untrustworthy.
The fix is to route your WordPress email through a dedicated SMTP service and add the three DNS records (SPF, DKIM, and DMARC) that tell the world your sending setup is legitimate.
One More Thing Worth Knowing
As of early 2024, Google and Yahoo email deliverability rules require a DMARC record for any domain sending more than 5,000 emails a day.
If you run a WooCommerce store, a membership site, or any kind of transactional email at volume, that threshold is reachable. But if you also send marketing emails from WordPress, it’s a mandatory part of your setup.
What You Need Before Getting Started
Before adding any records, make sure you have access to the tools and settings you’ll need during the setup process.
Most authentication issues aren’t caused by SPF, DKIM, or DMARC themselves. They’re caused by not having access to the right DNS settings or using an email service that hasn’t been properly configured.
Here’s what you need:
Access to Your Domain’s DNS Settings
This is managed through your domain registrar (Namecheap, GoDaddy, Google Domains) or your hosting provider’s control panel (Cloudflare, cPanel, Kinsta). You’ll need to be able to add TXT records.
If you’re not sure where your DNS is managed, search for your domain at MXToolbox DNS Lookup. The results will show which nameservers your domain is using.
An SMTP Service Configured for Your Domain
SPF, DKIM, and DMARC authenticate emails sent through an SMTP service. You’ll need access to the provider dashboard because that’s where you’ll generate or retrieve your DKIM records. If you haven’t connected your WordPress site to an email provider yet, see our SMTP provider setup guides before continuing.
FluentSMTP Installed in WordPress
FluentSMTP connects your WordPress site to your SMTP service and handles the authenticated sending. It’s free, and you’ll use it at the end of this guide to send a test email and confirm authentication is working.
About 20–30 Minutes of Your Time
The actual setup process is usually quick. However, DNS changes take some time to come into effect. Although some DNS updates appear within minutes, others may take several hours before they’re visible worldwide.
Your goal isn’t simply to create three DNS records. Your goal is to reach the point where emails sent from your domain show:
SPF = PASS
DKIM = PASS
DMARC = PASS
We’ll verify those results later. Let’s get started by configuring the record that tells mailbox providers which servers are allowed to send email on behalf of your domain.
Step 1: Set up your SPF record
SPF is the first layer of email authentication.
It has one simple job: tell mailbox providers which servers are allowed to send email using your domain.
When Gmail receives an email claiming to come from yourdomain.com, it checks the SPF record to see whether the sending server is authorized. If the server isn’t listed, the email may fail authentication checks.
Before adding a new SPF record, you should first check whether one already exists.
How to Check If You Already Have an SPF Record
A domain can only have one SPF record. That’s why it’s important to verify your existing setup before creating anything new. To do this:
- Go to MXToolbox SPF Lookup, enter your domain name, and run the check
- If no SPF record exists, you’re good to add one from scratch
- If one already exists, you’ll need to update it by adding your sending service to the existing record
Two SPF records on the same domain will cause authentication failures. See how to merge multiple SPF records if that’s your case.
Add the SPF TXT Record
If your domain doesn’t have an SPF record yet, you’ll need to create one in your DNS settings. The general format looks like this:
v=spf1 include:your-provider-domain ~allThe exact value depends on the email provider you’re using. Below are the values for some popular email services:
| Sending service | SPF record value |
| Google Workspace | v=spf1 include:_spf.google.com ~all |
| Mailgun | v=spf1 include:mailgun.org ~all |
| Amazon SES | v=spf1 include:amazonses.com ~all |
| Brevo | v=spf1 include:spf.sendinblue.com ~all |
| Postmark | v=spf1 include:spf.mtasv.net ~all |
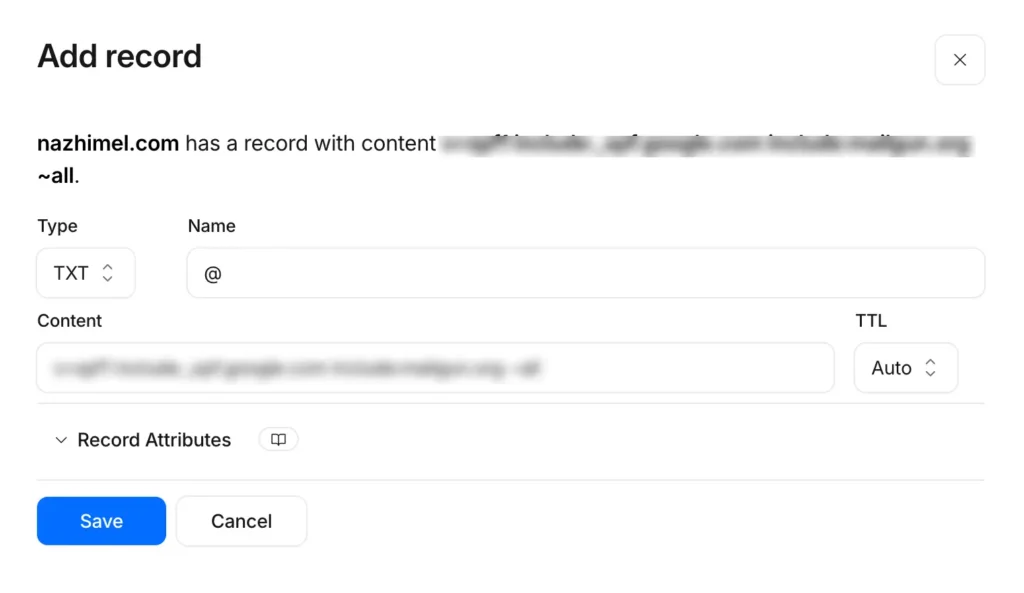
Most providers publish the exact SPF value in their documentation or domain verification settings. Once you have the correct value, create a new DNS record using the following settings:
- Record Type: TXT
- Host / Name: @ (this represents your root domain. Some providers label it differently, but @ or leaving the field blank means the same thing)
- TTL: 3600, or leave at your provider’s default
- Value: use the record for your sending service from the table above
Here’s an example of how I’d set up SPF for my Amazon SES provider:
If you send through more than one service, for example: Google Workspace for your regular inbox and Mailgun for transactional email, you need to combine them into a single record:
v=spf1 include:_spf.google.com include:mailgun.org ~allA Quick Note on ~all
This is a “soft fail” instruction, meaning emails from unlisted servers are flagged as suspicious but not outright rejected. It’s the recommended starting point. You can tighten this to -all (hard fail) later once you’re confident all your legitimate sending sources are covered.
Save the record and move on. If an SPF lookup tool doesn’t immediately detect your new record, give it some time before troubleshooting.
Step 2: Set up DKIM
While SPF verifies who is allowed to send email from your domain, DKIM verifies that the email itself hasn’t been altered along the way.
Think of DKIM as a digital signature attached to every outgoing message: When a mailbox provider receives the email, it checks that signature against a public key stored in your DNS records. If the signature matches, the message passes DKIM authentication.
The good news: you don’t have to generate these keys manually. In most cases, your email provider does that for you.
Where to Find Your DKIM Keys
The location varies by provider. Here’s where you’ll typically find DKIM settings in popular email services:
| Provider | Where to Find DKIM |
| Google Workspace | Admin console> Apps > Google Workspace > Gmail > Authenticate email > select your domain > Generate new record |
| Mailgun | Sending > Domains > Select Your domain |
| Amazon SES | SES console > Configuration > Verified identities > Click Your Domain > DKIM tab > Click “Enable Easy DKIM” |
| Brevo | Settings > Senders, Domains & Dedicated IPs > Domains > Click Your Domain > Find the DKIM Section. |
| Postmark | Settings > Sender Signatures > Click Your Sender Signature → DKIM Settings |
Your provider will give you one of the following:
- A DKIM TXT record
- A DKIM CNAME record
- Multiple DKIM CNAME records
Copy the values exactly as provided.
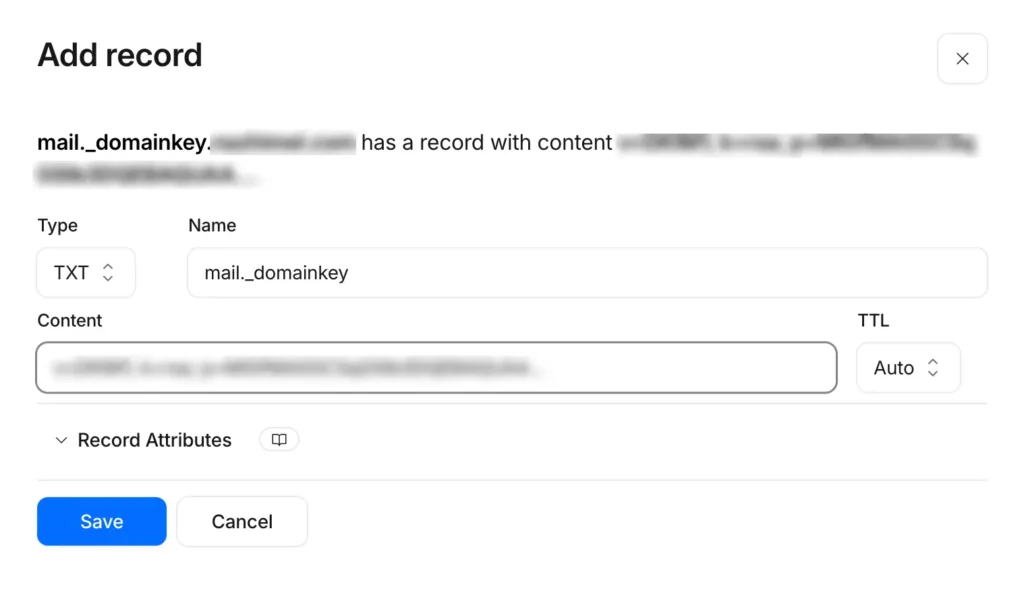
Add the DKIM record to your DNS
Go back to your DNS provider and add a new record:
- Type: TXT or CNAME if you’re using Amazon SES Easy DKIM
- Host / Name: The selector name your provider gave you (e.g. google._domainkey or mail._domainkey). Enter only the part before your domain name; your DNS provider appends the domain automatically
- Value: The long key string from your provider (it will start with
v=DKIM1; k=rsa; p=...)
Verify DKIM with Your Provider
Once the DNS records have been added, return to your email provider’s dashboard and click the Verify or Check DNS button.
Don’t worry if it fails immediately. DNS propagation for DKIM can take anywhere from 15 minutes to a couple of hours. Try again after an hour if it doesn’t pass right away.
For a deep dive on DKIM selectors, key rotation, and how the signature verification process works, see how to set up a DKIM record on your DNS settings.
What Happens After DKIM Is Verified?
Once verification succeeds, your email provider begins signing outgoing emails automatically. For WordPress users sending through an SMTP plugin such as FluentSMTP, this happens behind the scenes.
Every email sent through your authenticated provider will include a DKIM signature that mailbox providers can verify.
At this point:
- SPF identifies authorized sending servers
- DKIM verifies message integrity
Now we can add the final piece of the authentication chain: DMARC.
Step 3: Add Your DMARC Record
With SPF and DKIM in place, you’ve already done most of the work. The final step is adding a DMARC record.
DMARC acts as the policy layer of email authentication. It tells mailbox providers what to do when an email fails SPF or DKIM checks and gives you visibility into authentication problems across your domain.
Unlike the previous two records, DMARC isn’t generated by your sending service. You write it yourself, and the same record works regardless of which SMTP provider you use.
Start in Monitoring Mode
The most important rule with DMARC: don’t start with a strict policy. Start with p=none, which means “collect and report, but don’t take action on failures.” This gives you 2–4 weeks to verify that your legitimate email is authenticating correctly before you risk blocking anything.
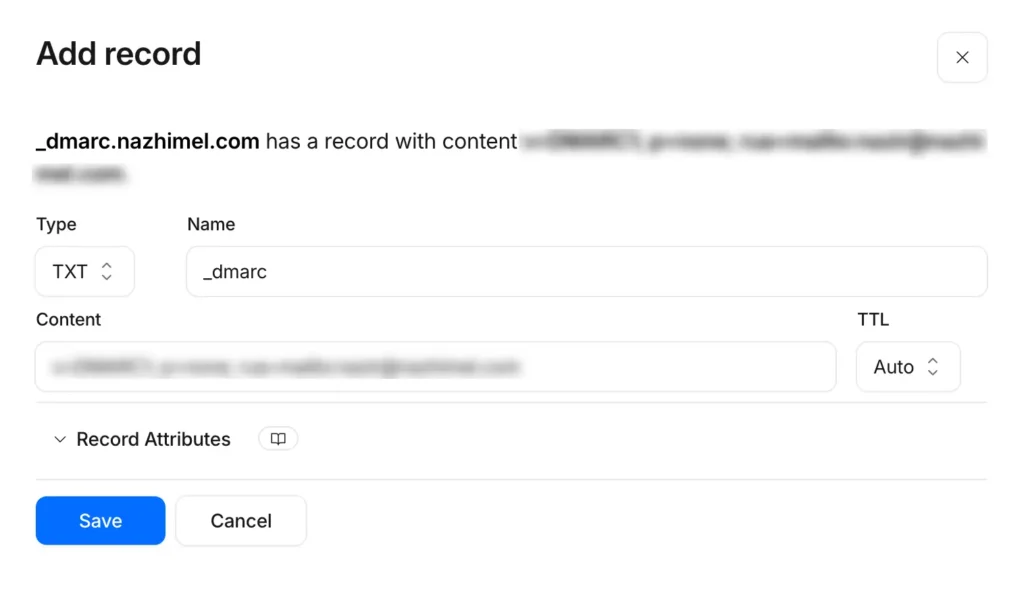
In your DNS provider, add a new TXT record:
- Type: TXT
- Host / Name: _dmarc (your DNS provider will append your domain. The final record name will be _dmarc.yourdomain.com)
- Value:
v=DMARC1; p=none; rua=mailto:[email protected]Replace [email protected] with any email address you actually check. For example:
This is where DMARC sends aggregate reports AKA periodic digests showing which servers sent email using your domain and whether authentication passed or failed.
Moving to enforcement (when you’re ready)
Once you’ve been receiving and reviewing reports for a few weeks and you can confirm your legitimate email is consistently passing:
- Move to
p=quarantine: Suspicious email goes to the spam folder rather than the inbox - After another 2–4 weeks with no unexpected failures, move to
p=reject: Suspicious email is blocked outright
Don’t skip straight to p=reject on day one. If your SPF or DKIM setup has any gaps, a reject policy will block your own legitimate email. The monitoring phase is there for a reason.
For a full explanation of DMARC policy options, alignment, and the rua/ruf tags, see how to set up a DMARC record for your DNS.
Verify Your Authentication Is Working
Adding SPF, DKIM, and DMARC records is only half the job. Before considering your setup complete, you need to verify that mailbox providers can actually see those records and that your emails are passing all three authentication checks.
So once you’ve added all three records, give DNS at least 30–60 minutes to propagate, then run a check.
Method 1: Send a Test Email through FluentSMTP
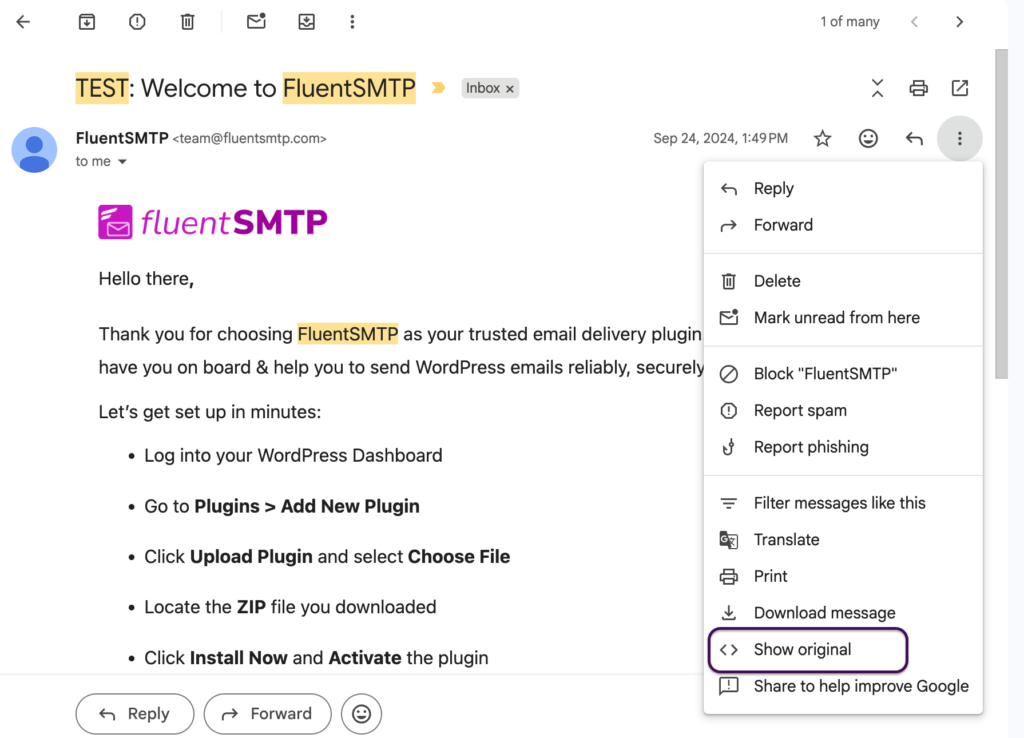
The easiest way to test your setup is to send an email directly from your WordPress website. If you’re using FluentSMTP:
- Open your WordPress dashboard and navigate to Settings > FluentSMTP > Email Test
- Then, send a test email to a Gmail or Yahoo email address you have access to
- Once the email arrives, click the three dots and click Show Originals to reveal the raw email.
- Near the top of the email, or the Authentication-Results line, you will see
spf=pass
dkim=pass
dmarc=pass
For example:
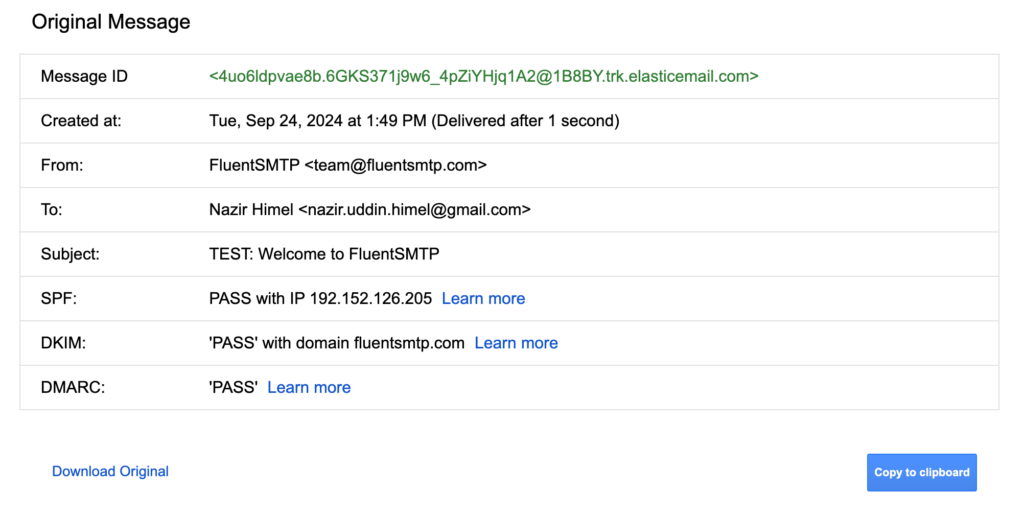
All three passing means your authentication setup is complete and working. If any one shows fail or softfail, the troubleshooting section below has the most likely causes.
Method 2: Use an External Testing Tool
Checking Gmail headers confirms that your authentication is working from the recipient’s perspective. If you want a more detailed report, send a test email to an external testing service.
Popular options include:
- mail-tester.com: gives you a formatted deliverability score, much more readable than raw headers. The site shows you a unique email address; simply send your test email to that address, then click the button to see your score.
- MXToolbox Email Health: runs a full DNS check across all your records without requiring you to send an email, very useful for a quick sanity check.
Common Authentication Issues (and How to Fix Them)
Even when you’ve followed every step correctly, it’s not unusual for one of the authentication checks to fail the first time.
In most cases, the issue isn’t with SPF, DKIM, or DMARC; it’s a small configuration error or simply a matter of waiting for DNS changes to propagate.
Use the table below to identify the most common issues and their likely solutions.
| Problem | Likely Cause | How to Fix It |
| SPF shows fail despite having a record | Multiple SPF records on the domain, or more than 10 DNS lookups | Merge Multiple SPF Records into one |
| SPF shows softfail (~all is working, but the server isn’t listed) | Your SMTP provider isn’t included in the SPF record | Add the correct include: for your provider from the table in Step 1 |
| DKIM shows fail | DNS not yet propagated, selector name entered incorrectly, or wrong record type (TXT vs CNAME) | Wait 2+ hours; double-check the record name and type against your provider’s documentation |
| DMARC shows fail despite passing SPF and DKIM | Alignment failure: the From address domain doesn’t match the domain used for SPF or DKIM | See how to fix the no DMARC record found issue |
Once all three authentication checks consistently pass, your domain is in a much stronger position to achieve reliable email delivery.
What to Set up Next?
At this point, your authentication setup should be complete. The final step isn’t more configuration; it’s making the most of your authenticated domain.
However, passing SPF, DKIM, and DMARC doesn’t guarantee perfect inbox placement. Mailbox providers also evaluate factors such as domain reputation, IP reputation, spam complaints, sender history, Email content, etc.
Here’s where to go from here:
- Start reading your DMARC reports. Once aggregate reports start arriving at the email address you specified in your DMARC record, you’ll want to know how to read DMARC reports
- Add BIMI: BIMI (Brand Indicators for Message Identification) lets your brand logo appear next to your emails in Gmail and Yahoo Mail. It requires a p=quarantine or p=reject DMARC policy first, so come back to our BIMI guide once you’ve completed the monitoring phase.
- Track Email Performance: This is something you should do periodically. Log into your SMTP provider’s dashboard and see if your deliverability score dropped, or if there’s new spam complaints. Sometimes the simplest things help most.
A Note Before You Leave
With authentication fully in place, your domain is now a reliable foundation for sending email at scale. If you’re spending thousands on email marketing, a tool like FluentCRM could be ideal for running marketing campaigns or automated sequences from inside WordPress.
Popular businesses like WP Fusion and Jose Luis Duron are saving thousands with FluentCRM + FluentSMTP, and you should check out this combo if you hate duct-taping tools while spending more than you should!

Nazir Himel
“Produce value through quality content” – is the motto I live by. Content Marketing, SEO, and Email Marketing are my primary interests and if I’m not busy with any of them, you’ll probably find me roaming around the city.
Table of Content
Subscribe To Get
WordPress Guides, Tips, and Tutorials


Leave a Reply