

The Ultimate WordPress Email Marketing Tutorial


Despite the rise of social media, email marketing still reigns supreme. It is the most powerful channel for growing a business.
Email marketing allows you to nurture customer relationships through personalized messages, which eventually generate income for a business. So if you have a business, you’d want to start email marketing someday.
WordPress is the perfect platform for establishing a business online. And if you didn’t know it yet, you can start email marketing right from your WordPress dashboard!
Sound interesting?
Let’s get started with the ultimate WordPress email marketing tutorial for beginners!
The benefits of email marketing from WordPress
There are tons of external email marketing platforms that integrate with WordPress and allow you to do email marketing for your blog and business. So why should you use WordPress email marketing plugins?
Easy to get started
External email marketing platforms require additional configuration before you can start sending email campaigns to your contacts, email marketing plugins don’t. You can simply install a plugin you like and start using it for your blog or eCommerce site.
Save money
External email marketing platforms are usually free to get started. However, they start charging a “success tax” once you exceed the free contact or email send limit.
WordPress email marketing plugins on the other hand offer a free version with limited features. Depending on your needs, you might need to pay a monthly or annual fee for advanced features. There’s no additional cost for storing more contacts or sending emails.
Hence, you get to save a lot of money if you choose to do email marketing with WordPress plugins, which can also be paired with marketing funnel analytics to track conversions and ROI.
Data Ownership
Email marketing platforms generally implement a few terms and conditions to prevent any misuse of their platform. Moreover, they hold the right to delete your account or data if you don’t extend your subscription within a certain period.
An email list is a valuable asset for any business. So you wouldn’t want to lose it at any cost.
WordPress email marketing plugins are often self-hosted. So you’ll always be the sole owner of the data you’ve gathered inside the plugin.
Native Integration
As a business owner, you might use a few other plugins and tools to interact with your audience. While doing so, you might want to integrate these tools with your email marketing platform so that you can automate tasks such as generating leads, sending follow-up emails, and so on.
External email marketing platforms usually require paid add-ons and technical expertise to integrate a tool. In comparison, WordPress email marketing plugins integrate with popular tools like WooCommerce, LearnDash, and MemberPress natively. This makes running your business and email marketing cost-effective as well as effortless.
Do Everything Within Your WordPress Dashboard
Last but not least, external email marketing platforms require you to keep visiting the platform to set up email campaigns, workflows, and view reports. It can be an irritating and time-consuming experience.
WordPress email marketing plugin, on the other hand, gives you the freedom to do everything within your dashboard. You can create email campaigns, set up email sequences and workflows, and view all your data without needing to visit another platform, a better experience overall!
Considerations for WordPress email marketing
As mentioned earlier, it’s easy to start email marketing from WordPress. However, it’s best to answer a few questions before doing so:
- How will you generate leads?
Although lead generation may seem as simple as adding an email subscription form on your WordPress site, there are a few ground rules to follow.
This includes getting your subscriber’s permission to send marketing emails, protecting consumer data, and ensuring that you’re complying with data privacy laws like GDPR.
- Which email marketing plugin will be used for email marketing?
Email marketing plugins are designed to help you collect leads, segment contacts, and send targeted emails. They also help you comply with email marketing regulations by using the necessary details within your emails.
Therefore, you need to pick one which is specifically built for sending marketing emails.
- How will your leads/contacts subscribe to your email list?
Whatever tools you use must integrate with your email marketing plugin to allow users to subscribe to your mailing list. This way, your contact data will stay updated, and you can get back to your subscribers as required.
- How the emails will be sent?
Some WordPress email plugins don’t offer any email-sending service, and WordPress isn’t reliable for sending emails. Hence, you’ll need to use a transactional email service to deliver your marketing emails correctly.
In order to answer all these questions, we’ll need to combine a few tools to make the system work.
Required WordPress email marketing tools
The WordPress plugin repository offers an impressive 59000+ plugins to customize your website and improve its functionalities. Among them, there are numerous fantastic WordPress email marketing plugins.
However, all of these plugins require multiple tools from different vendors which means you need to go an extra mile to set up email marketing with them. The fluent trio is different.
By “fluent trio”, we mean, FluentCRM, Fluent Forms and FluentSMTP. All of these plugins are free and don’t require any manual configuration. So together, these plugins can work wonders in your email marketing strategy.
FluentCRM

FluentCRM is our primary email marketing plugin to build an email list and do email marketing within WordPress. This plugin includes contact profiling, segmentation, email campaign management, email marketing automation, and a granular reporting feature. It also offers a premium edition with a slew of extra features and additional WordPress plugin integrations.
Fluent Forms

Fluent Forms is the most excellent free WordPress form plugin in terms of features and build quality. This will be our email subscription plugin for collecting leads.
Although we’ll teach you how to construct contact forms in less than 30 seconds and embed them on your website, Fluent Forms is capable of much more. Creating sophisticated forms, such as quote request forms, and conversational and multi-step forms is a breeze.
FluentSMTP
For email delivery, we’ll be using FluentSMTP, a free SMTP plugin that allows you to link your site to external email-sending services for marketing and transactional emails. Most email sending providers allow you to send many emails for free. We’ll use one of these.
How to set up email marketing on WordPress
FluentCRM-Fluent Forms-FluentSMTP combination addresses all of the questions you should ask yourself before setting up email marketing on WordPress. They collect leads for your company and assist you in sending marketing emails with excellent deliverability.
Let’s get started with setting up email marketing on WordPress;
Install, activate, and set up FluentCRM
Installing and activating FluentCRM is the first step of WordPress email marketing. To install FluentCRM:
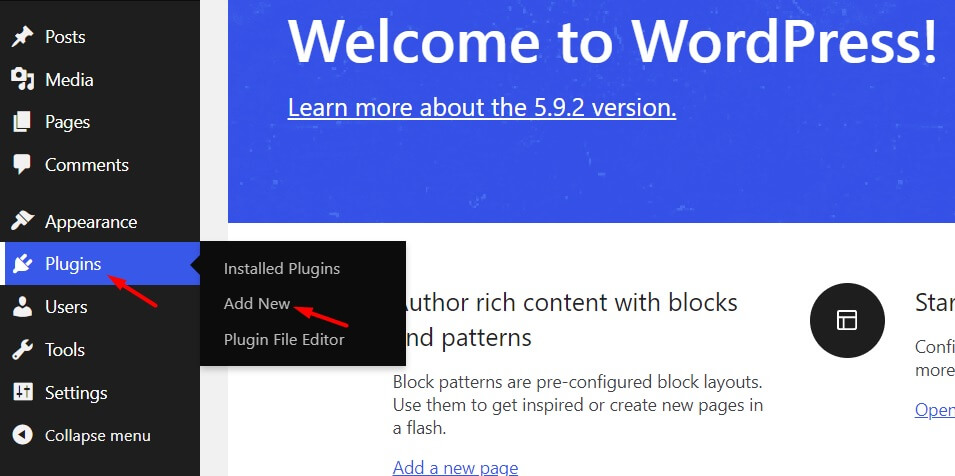
- Go to your WordPress dashboard and go to Plugins>Add New.
2. Next, search FluentCRM and click Install Now.

3. After the installation, click Activate button to activate the plugin.
That completes the installation. With FluentCRM activated, you now have to run the setup wizard to configure the basics.
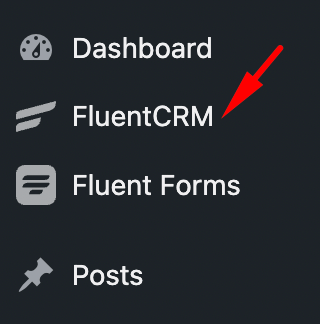
4. Head over to your WordPress dashboard and find FluentCRM from the sidebar.
5. Click on the plugin to run the setup wizard and click the Let’s Go button to start configuring.

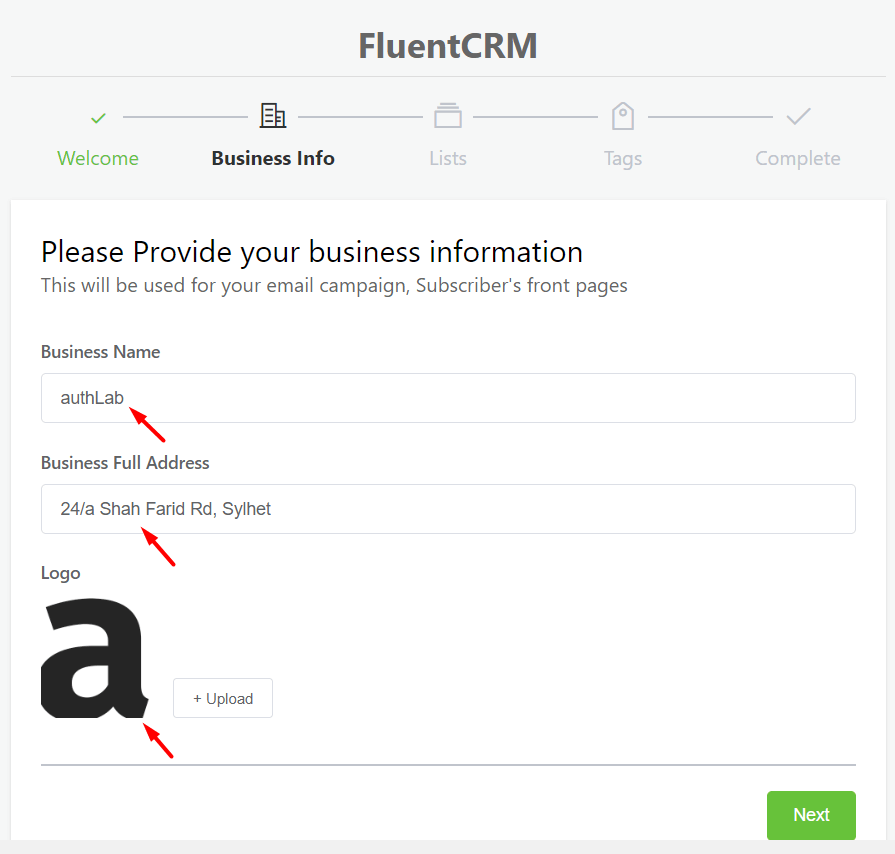
6. First, you need to insert your business information such as name and address. This information should be added to your email footer to comply with email marketing regulations. Additionally, you can provide your business logo for footer branding.
7. Now, create the Lists to segment your contacts. It should be based on the category your contacts belong to. For example, we created two lists for the subscribers of our two products.
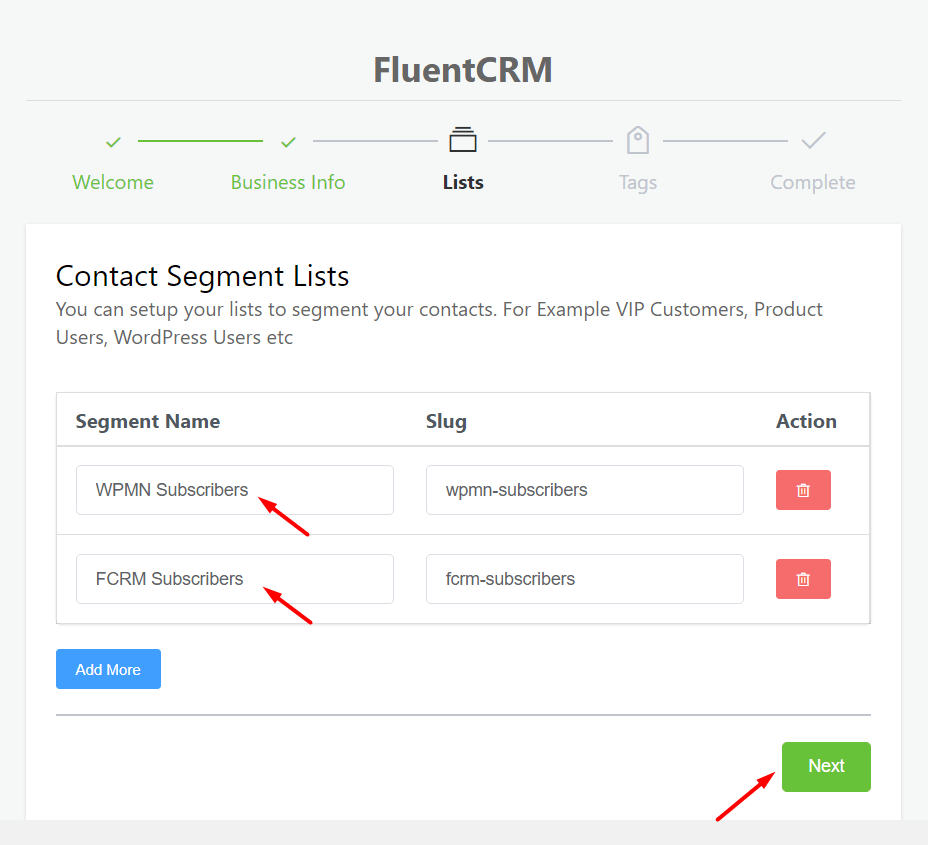
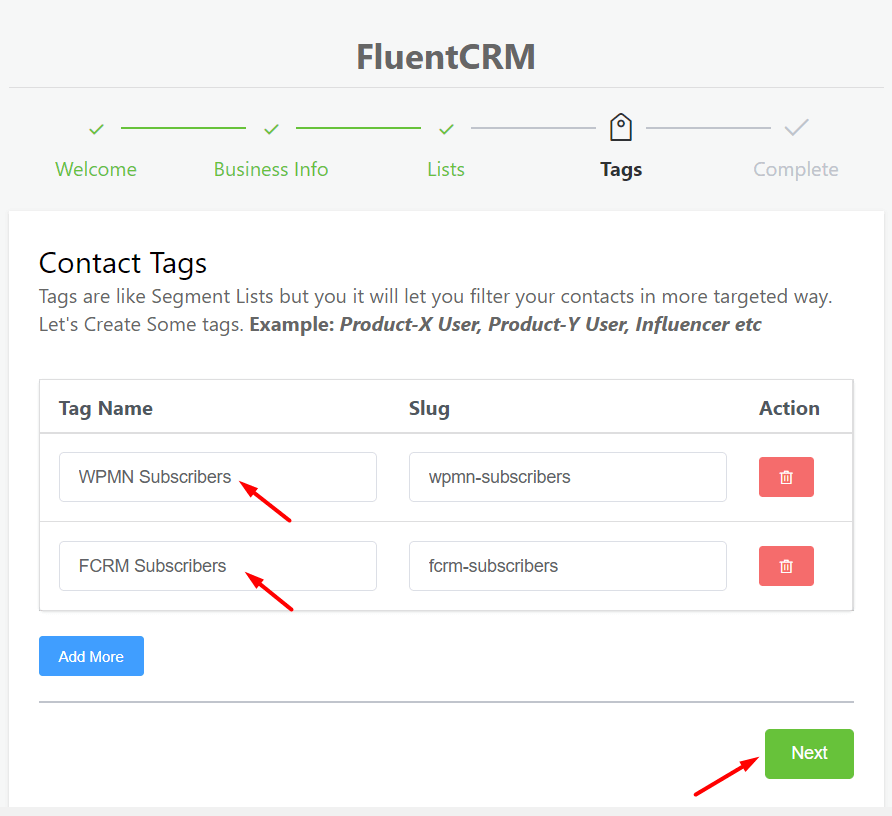
8. You can also create Tags to filter and sort contacts in the same way.
9. You’ll be asked to install Fluent Forms to collect leads at this stage. Keep that option checked to install and activate Fluent Forms automatically.
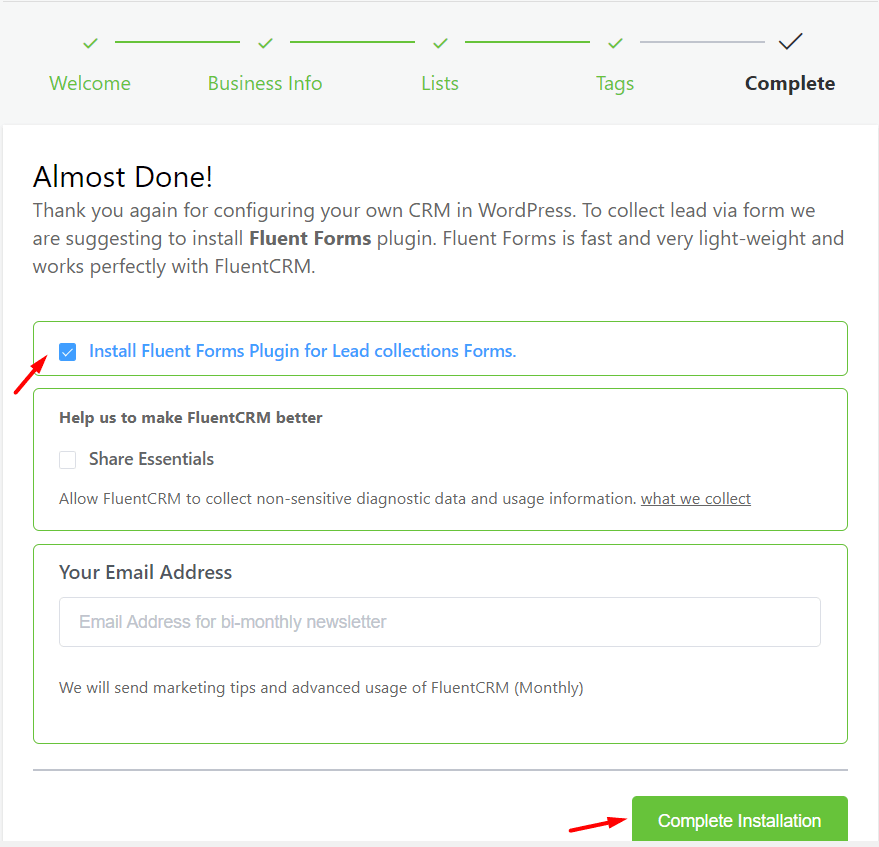
Optionally, you can share anonymous data and your email address so that the developers can improve the plugin.
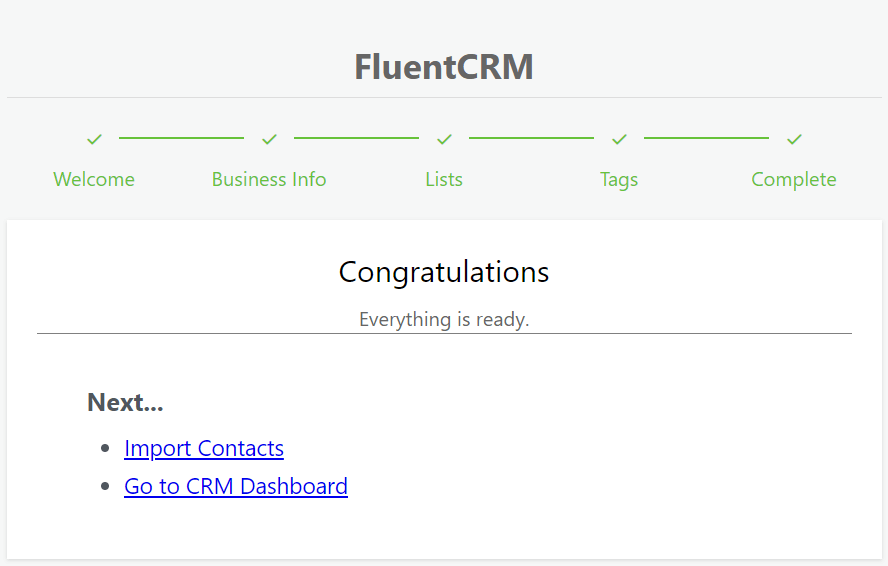
After clicking the Complete Installation button to complete the setup, FluentCRM will show a congratulation message.
If you already own an email list, you can click Import Contacts or go to your CRM dashboard. We’ll go for the second option.
FluentCRM’s dashboard gives a lot of information about your contacts, campaigns, tags, and emails. You can see the completed steps for getting started and a few quick links for various options on the right sidebar.
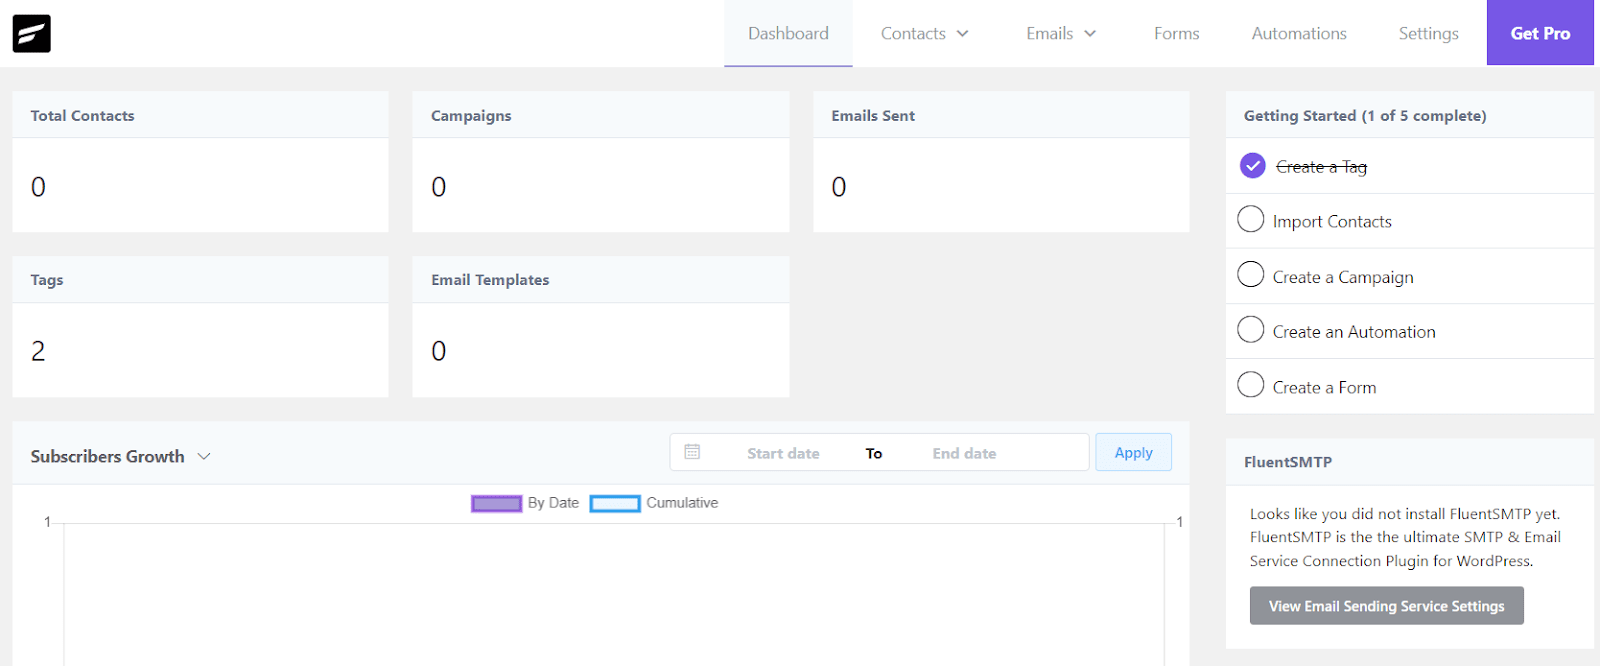
Finally, the FluentCRM setup is completed. We can do a lot of things right from the dashboard however, we need to configure an email sending service before that.
Configure an email sending service
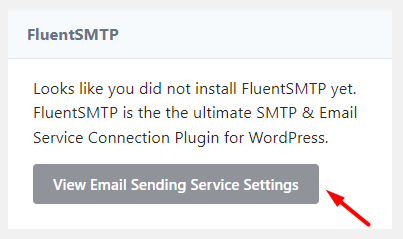
FluentCRM doesn’t have an email-sending service. So we need to use FluentSMTP to connect our site with an email sending service. Another Fluent plugin that lets you integrate external email sending services with WordPress and FluentCRM.
To start off,
- Click View Email Sending Service Settings from the right sidebar in FluentCRM. It redirects you to SMTP/Email Sending Service in FluentCRM.
2. You’ll be asked to install FluentSMTP. Click the button to install and activate FluentSMTP.
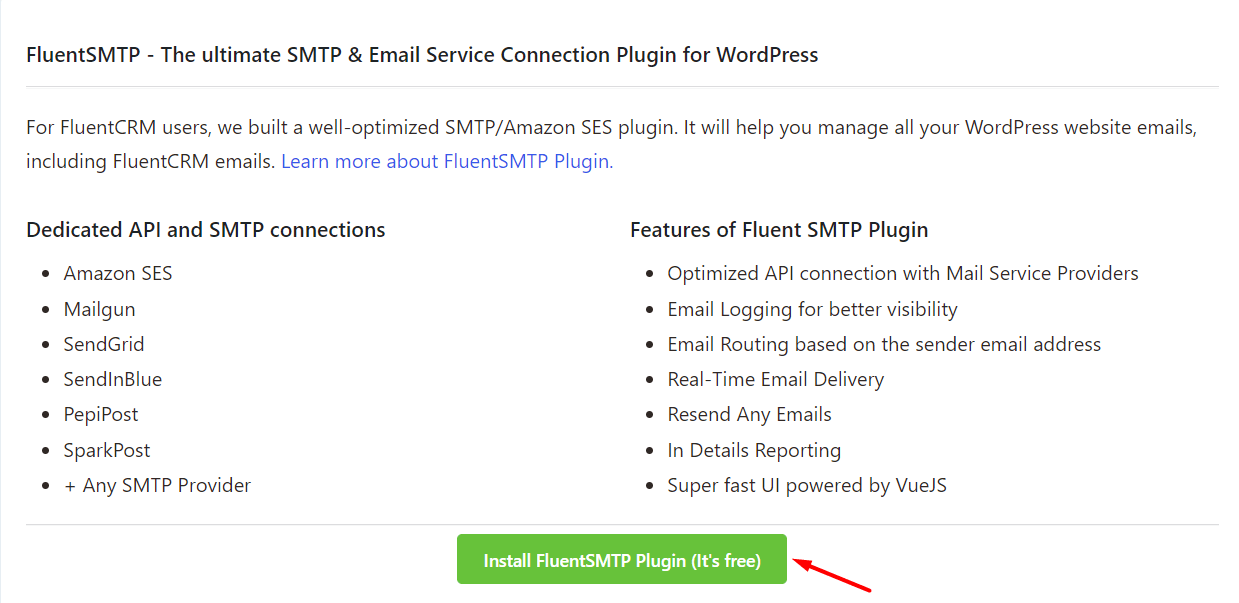
Now, click Configure FluentSMTP.

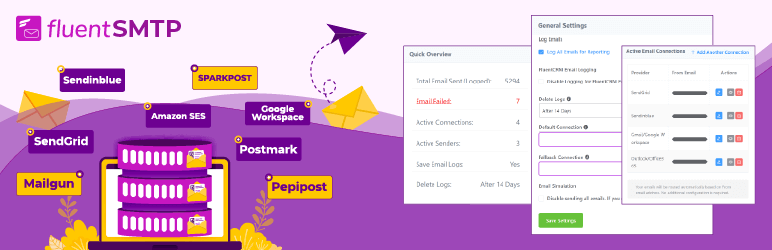
This takes you to the FluentSMTP setup wizard, where you can configure an external email sending service for FluentCRM and your WordPress site. FluentSMTP allows you to configure several email sending services including Google Workspace, SendGrid, Amazon SES, MailGun, and SparkPost.
Most of these email sending services offer a free email sending limit and cost a small amount if you need to send more emails. Check the pricing table below to see the comparison:
| Email Sending Service | Free Email Limit | Pricing |
| Google Workspace | 500/day | $6/month |
| SendGrid | 100/day | 100,000 emails – $14.95/mo |
| Amazon SES | N/A | 1,000 emails – $0.10 |
| SendInBlue | 300/day | 10,000 emails – $25/mo |
| MailGun | 100/Day | 50,000 emails – $35/mo |
| SparkPost | 100/Day | 100,000 – $30/mo |
| Pepipost | N/A | 150,000 – $25/mo |
If you want a reliable email service with high deliverability, we recommend Amazon SES. It’s a significantly cheaper option with excellent email deliverability.
However, setting up Amazon SES can be daunting. That’s why we have a detailed tutorial on setting up Amazon SES. Simply follow the tutorial to configure Amazon SES and
Congratulations, your email-sending service is fully configured with FluentCRM!
Create an email subscription form
Email subscription forms let you collect leads for your business. To create an email subscription form:
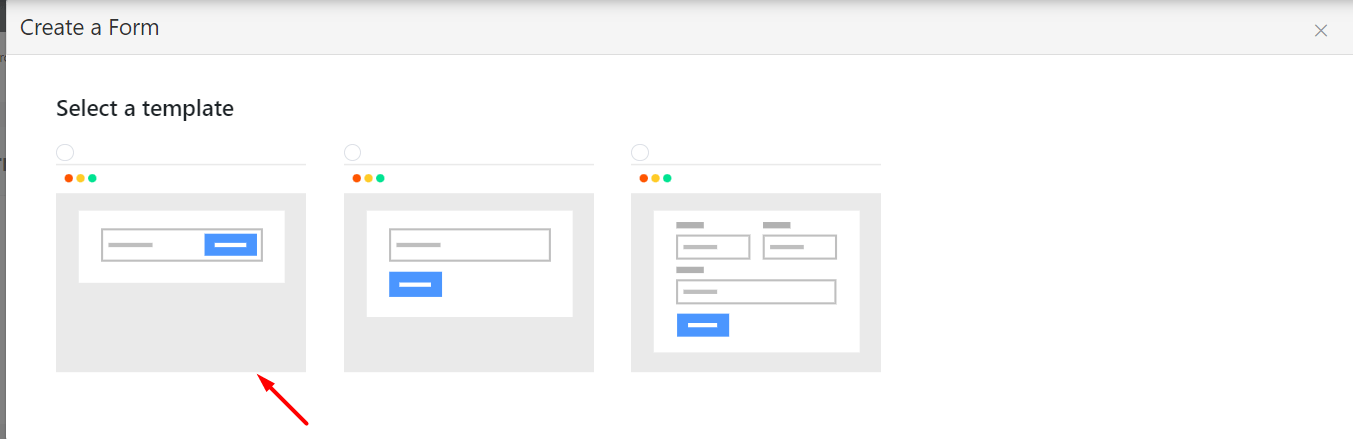
- Go to the Forms tab in FluentCRM and click Create your first form button.

2. In the pop-up, there are three pre-made templates to choose from. We’ll select the first one as it’s easier for the visitors to drop their email with this template.
3. Next, you have to specify your Form Title and segment email subscribers by Lists and Tags. Also, you can enable or disable double opt-in confirmation here.

Note: Double opt-in is used for opt-in marketing. It builds an extra layer of security to the consent collection process and helps avoid spam submissions. FluentCRM will email visitors to confirm their email subscription if the double opt-in is enabled.
4. Click Create Form after you complete setting up the Form. A success message will appear with a shortcode and options to Preview, Edit, or edit the Connection Settings.
5. Copy the form shortcode and close the pop-up if you don’t want any changes.
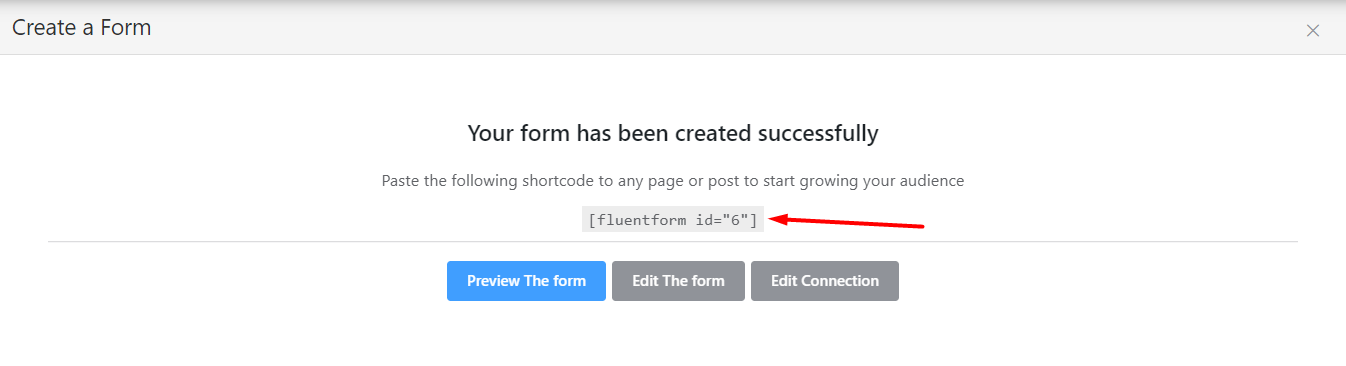
Now go ahead and place the form shortcode anywhere. Add that in blog posts, landing pages, footers-wherever you want! If you feel your visitors would love to leave their emails on a specific page on your website, go ahead and place it there.
Create a welcome email
If you’re asking visitors to leave their email addresses, you can’t ignore the importance of sending a welcome email. It’s like greeting the guests you’ve invited to your party. To create a welcome email:
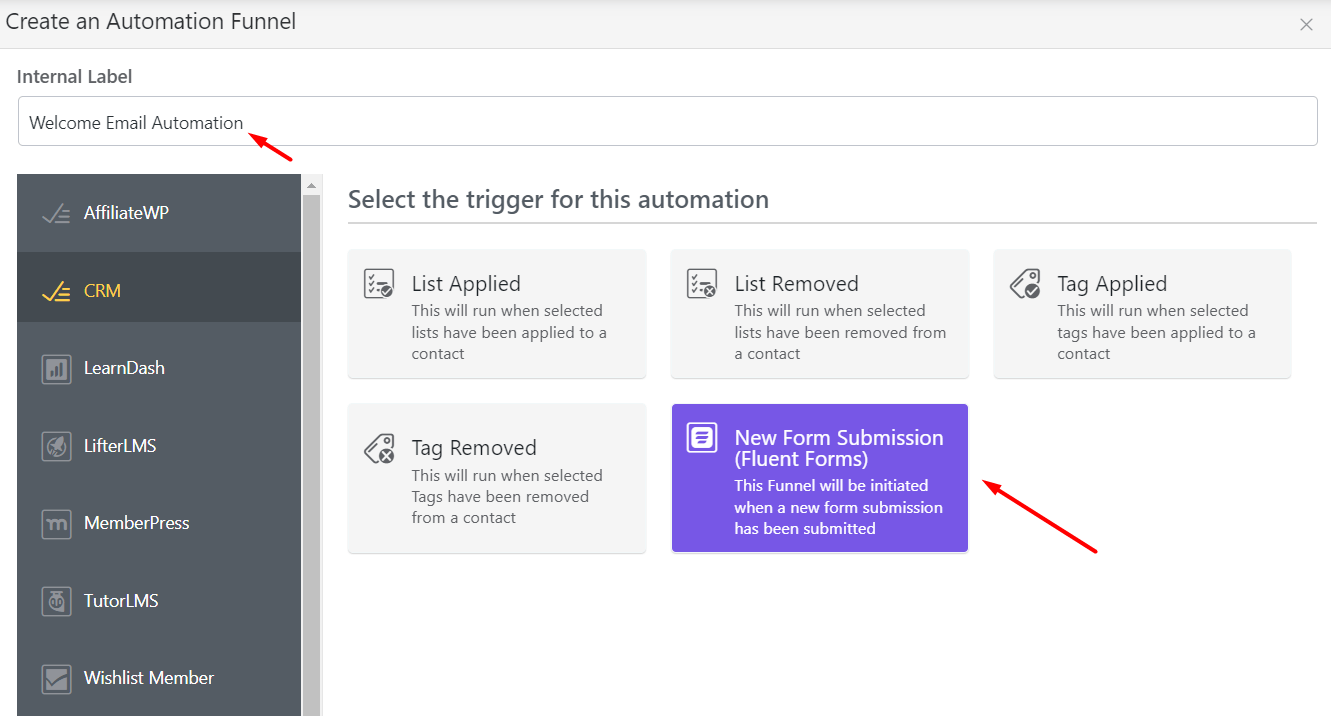
Click the Automation tab and click Create a New Automation to bring up the automation triggers.

What are automation triggers?
Automation triggers are like events on your website, when people visit your site, sign up on your mailing list, buy products, etc. Triggers help you automate tasks when a relevant event happens.
In that case, our visitors are submitting a form. So we’ll set an internal label, choose a New Form Submission trigger, and hit Continue.
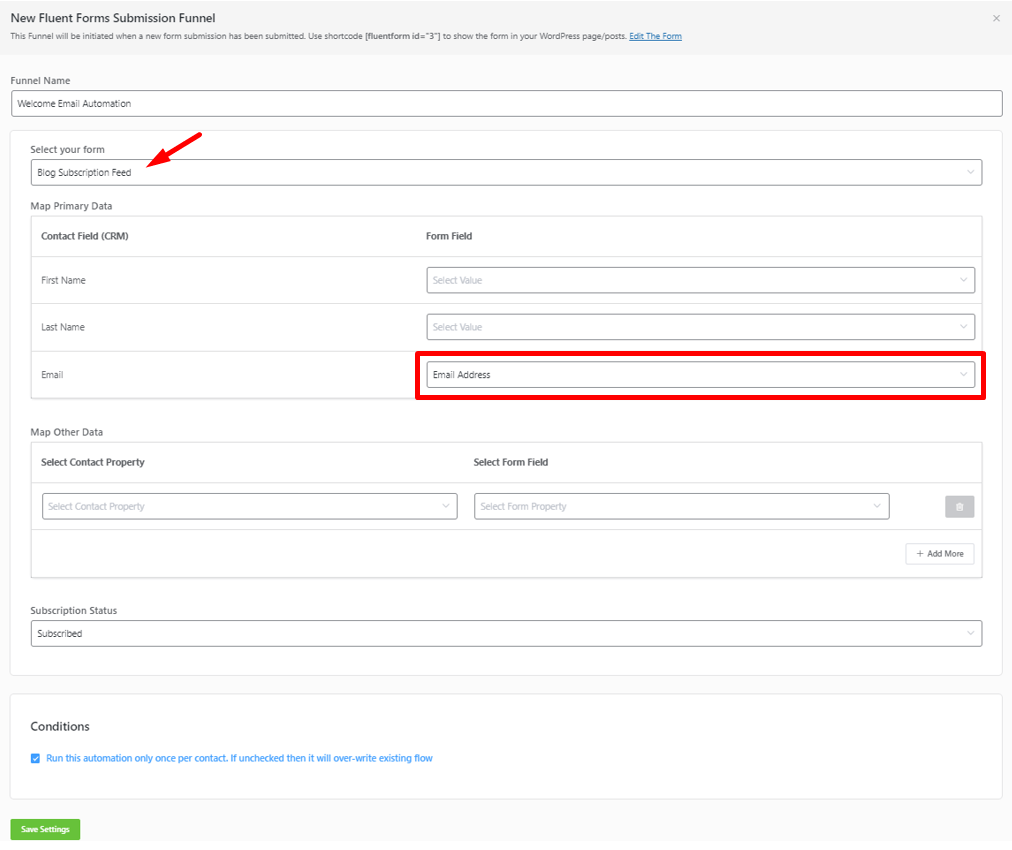
When the automation window opens, you have to configure the trigger. So go ahead and map the fields on your Form. You can leave the rest of the settings unchanged and click Save Settings.
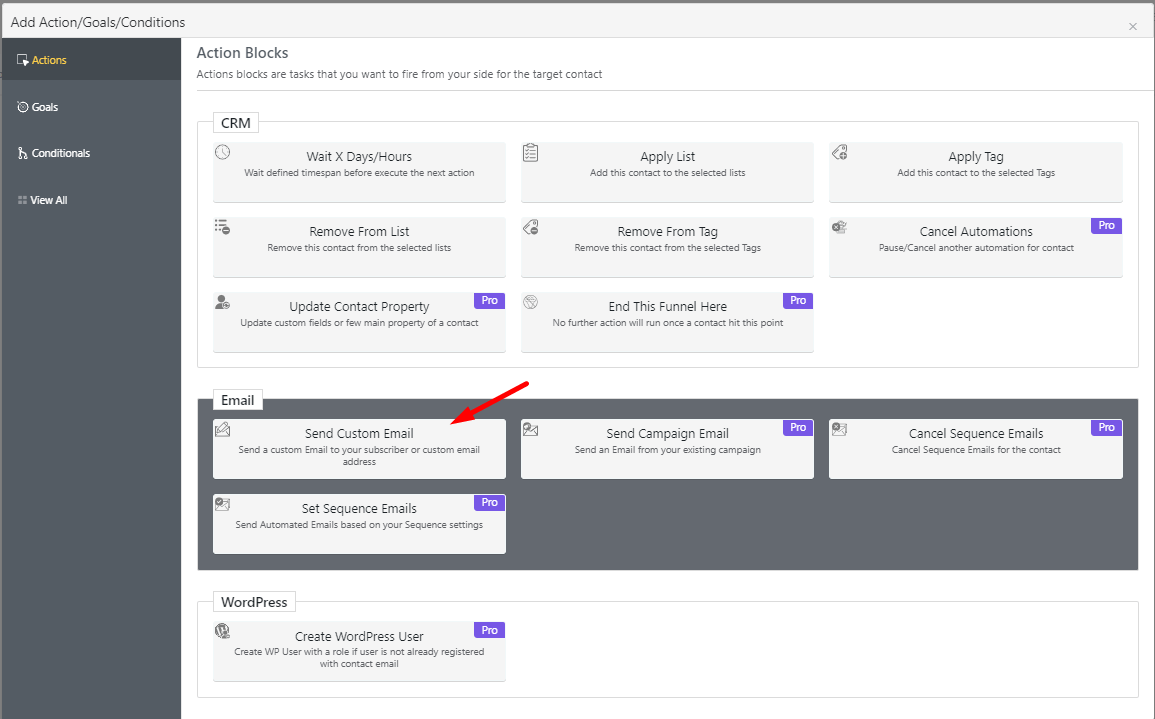
It will create a visual funnel window to automate emails based on various actions and conditions. Click the plus(+) icon to add conditions or actions.
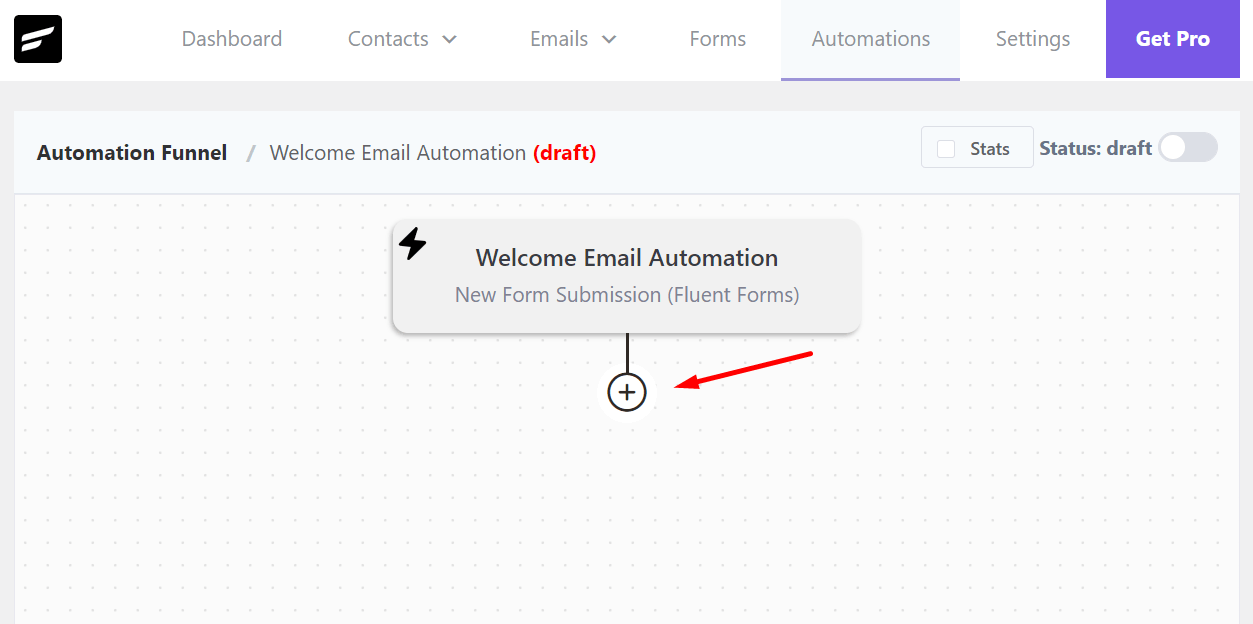
There are many things you can do in this funnel. You can schedule, apply or remove lists and tags, update contact property, send various types of emails, create WordPress users, and a lot more.
Furthermore, there are goals and conditionals buttons to help you create sophisticated automation funnels.
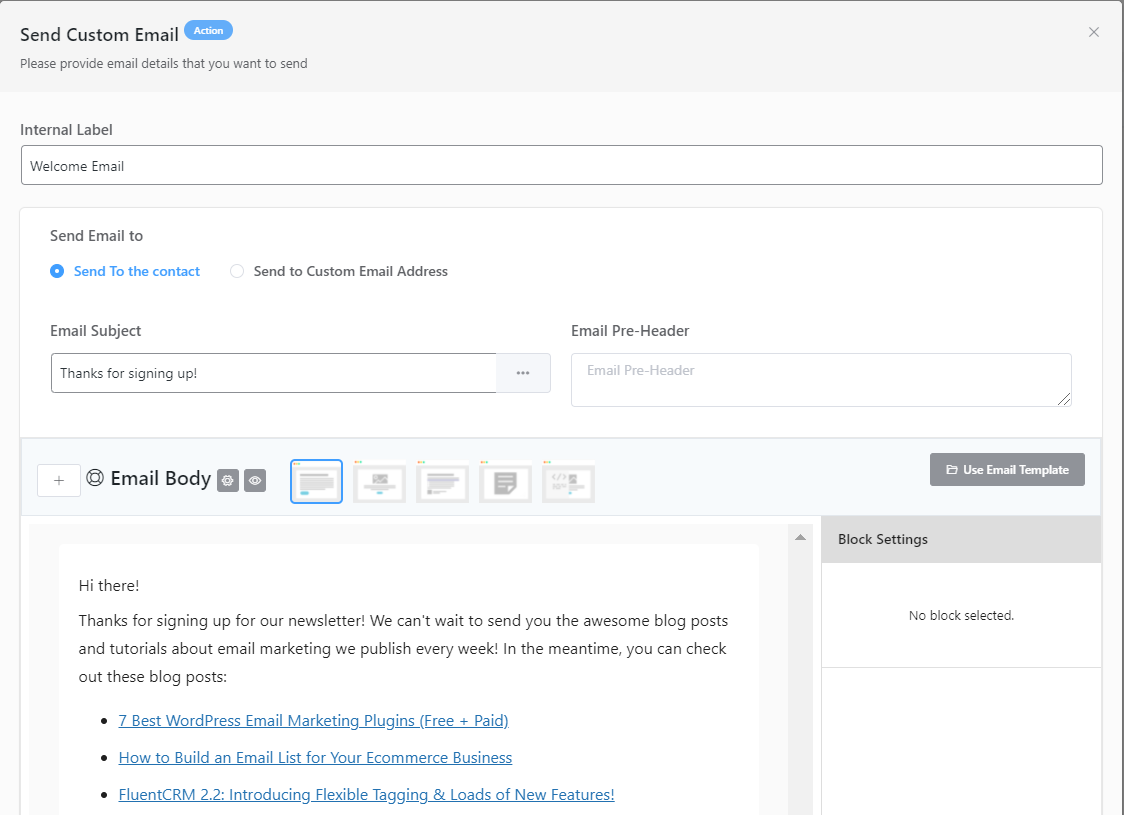
However, we are here to make a welcome email, so we’ll choose the Send Custom Email action.
Start writing your email–fill in your subject line, and any pre-header text you want to show. You can use both a block editor and a classic editor to compose emails. You can even type your message in HTML code!
Then, hit the Save Settings button once, and you’re done automating a welcome email to your new subscribers.
So far, we’ve chosen a form trigger and added a welcome email to the mix. Have you noticed that automation is in draft mode? This prevents the automation from activating. To activate the automated funnel, toggle it to Published.

Our automation welcome email is ready!
Create your first email campaign
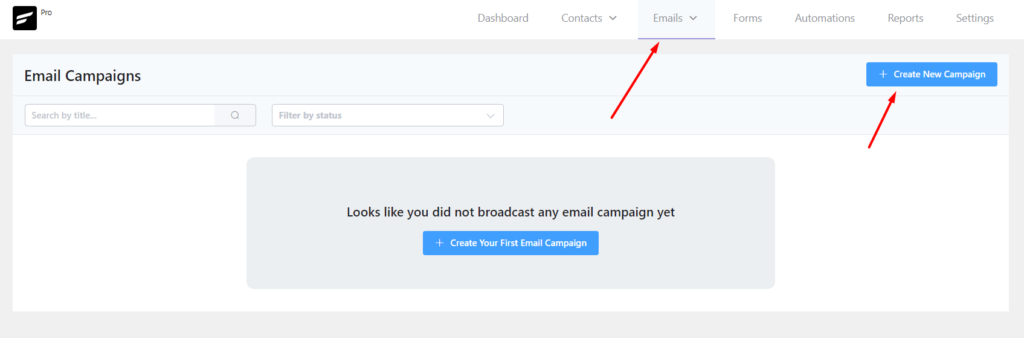
You can create an email campaign once you set your list and forms. You can send campaigns to your subscribers who opted for your marketing emails. In FluentCRM, an email campaign is a bulk email marketing campaign sent to many contacts instantly or in a scheduled time defined by you. It is as easy as adding a template, adding the content, designing the template, selecting your audience group, and then sending it off to your subscribers.
To send an email campaign from WordPress, go to FluentCRM from the wordpress dashboard, and click Emails > All Campaigns. And then click on Create New Campaign to start configuring your campaign.
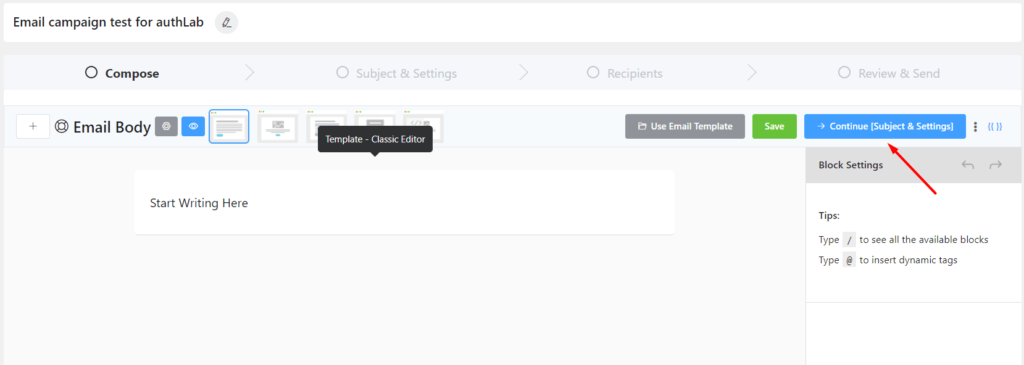
It’s easy to create an email campaign in just four easy steps.
- Begin by using the block editor to compose your email. It’s as straightforward as writing a blog article in WordPress.
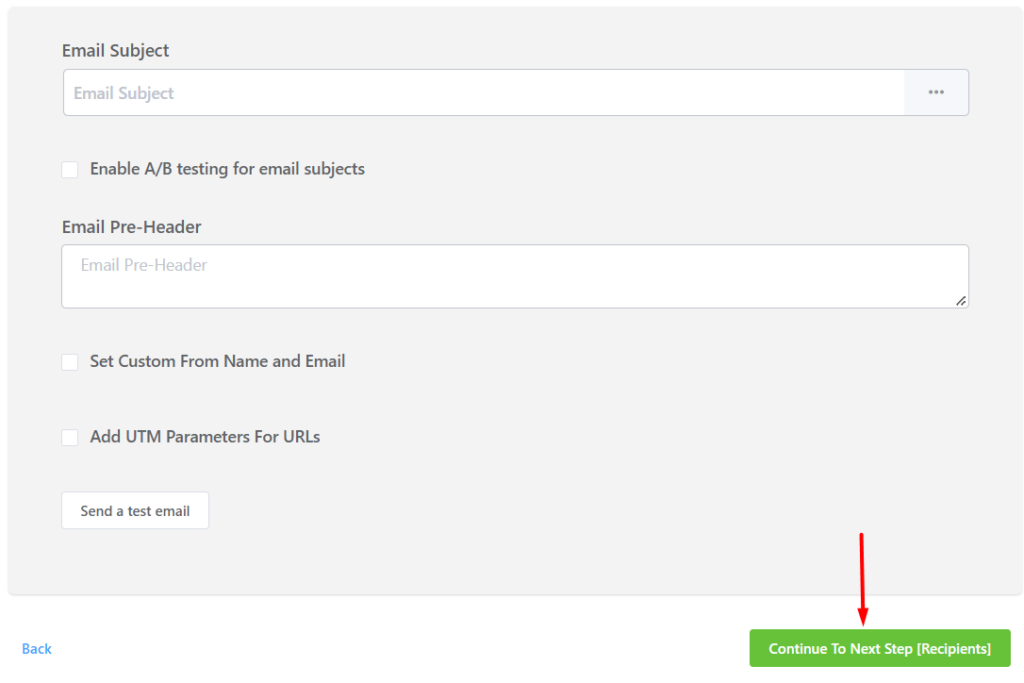
2. In the second step, write the Email Subject and Email Preheader and send a test email to check if your email seems okay.
You can also run A/B testing if you have the Pro version.
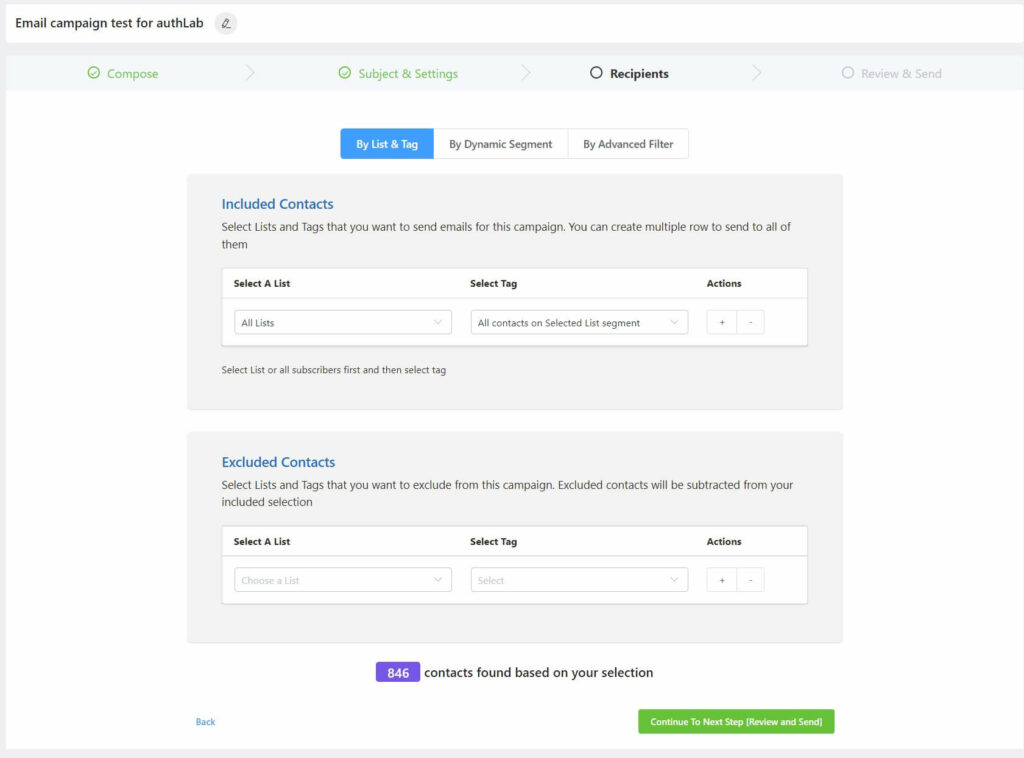
3. Choosing the recipients of the campaign is the third step. You may determine who gets your email and who doesn’t with a segmented email list in FluentCRM.
You can also choose to exclude contacts from the campaign if you don’t want them to be a part of it.
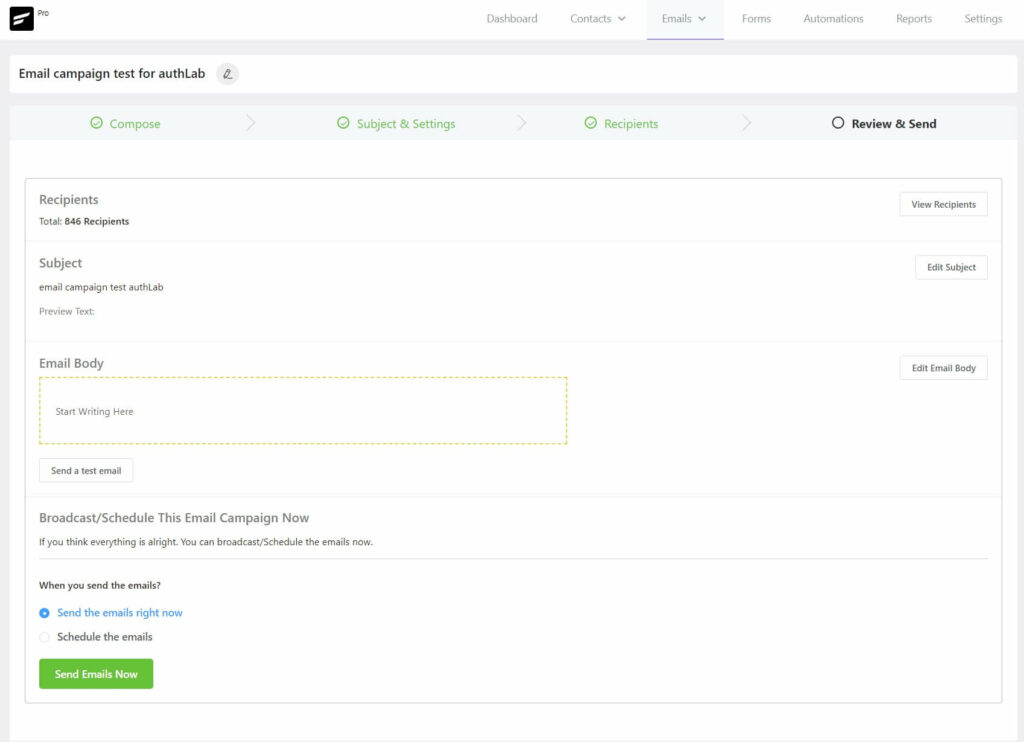
4. Finally, it’s time to review everything and send or schedule the campaign.
Start email marketing from WordPress!
We just went over how you can start email marketing from your WordPress site. If you followed our tutorial, you’ve implemented a complete email marketing system on your website without spending a dime.
But that’s just the tip of the iceberg. The Fluent Trio(FluentCRM-Fluent Forms-FluentSMTP) provides a variety of additional email marketing features. So keep exploring the plugins and maximize your revenue strategically through email marketing!
Start your business at full speed. Make your website content rich, get some rich snippets on Google SERP, generate your leads, and skyrocket your business with email marketing.
We hope you liked reading our article on WordPress email marketing tutorials for beginners. If you need any help, feel free to comment below!

Mohiuddin Omran
Always eager to explore new challenges, I’m passionate about biking and travel, with a background in Mathematics. As a digital marketer and strategist, I combine creativity with strategy to drive results.
Table of Content
Subscribe To Get
WordPress Guides, Tips, and Tutorials


Leave a Reply