
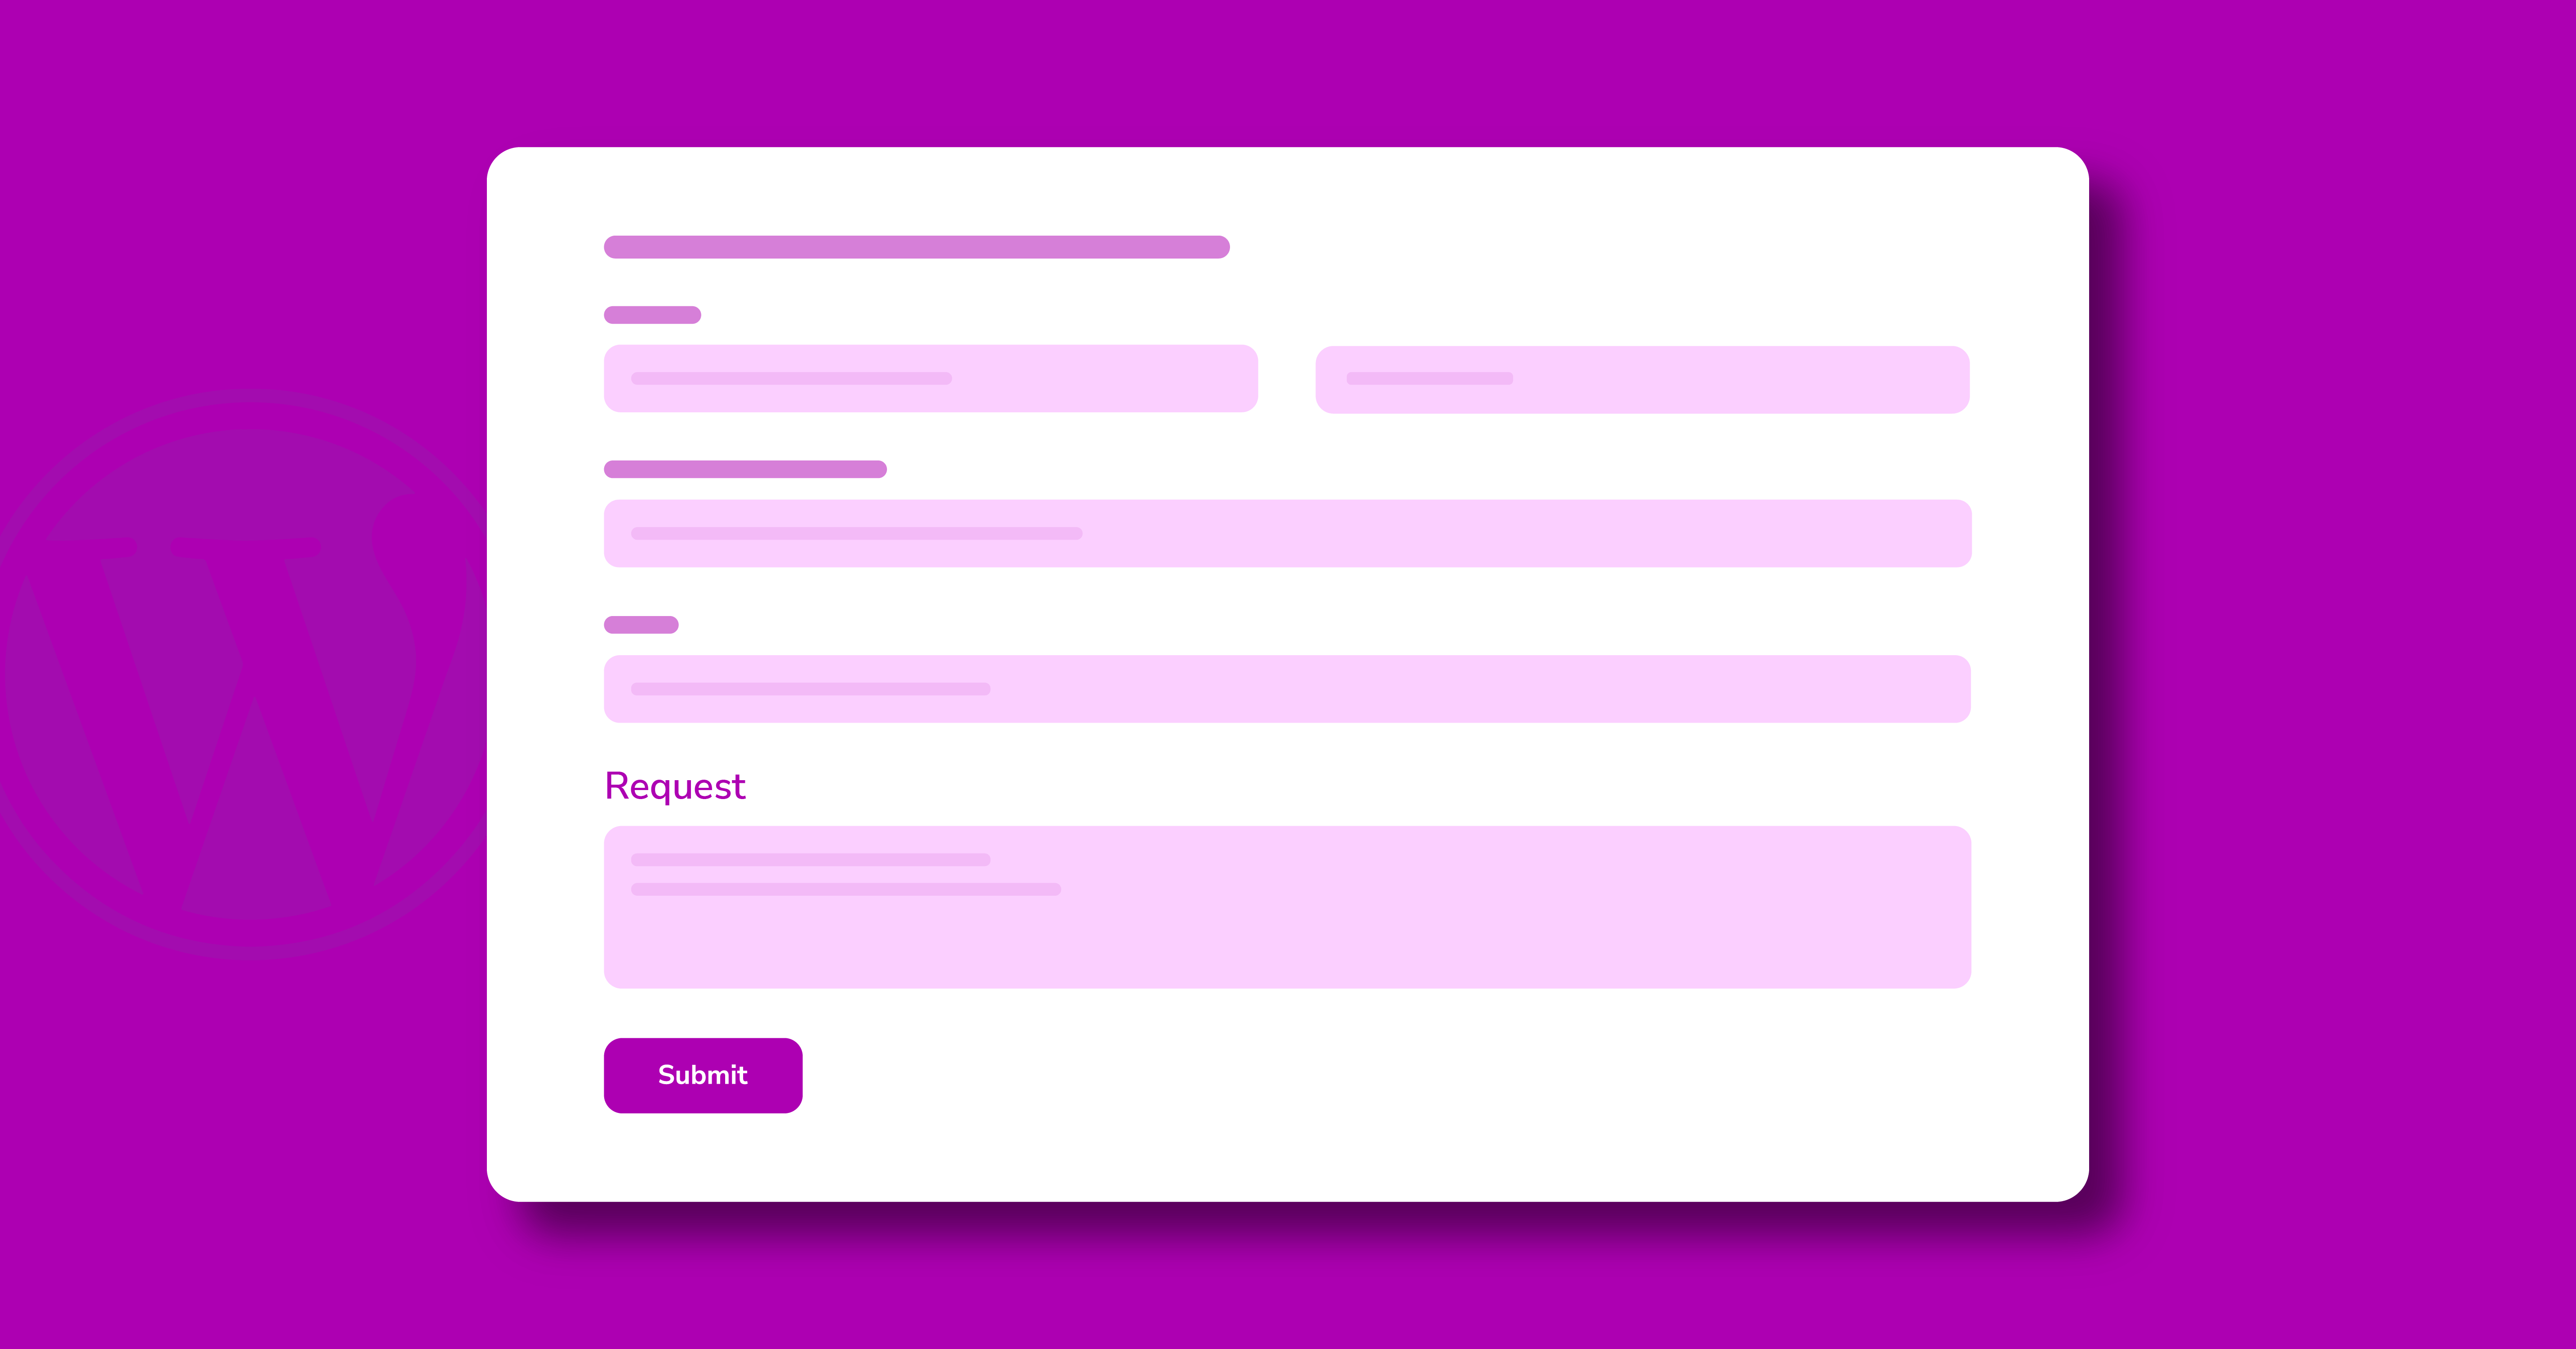
Easily Create a Quote Request Form on WordPress


Selling a product or service online?
If your product’s price varies depending on your customer’s needs, you’ll need a quote request form.
A quote request form will allow you to provide customers with a way to inquire and ask for the price of your product or service. Moreover, you’ll be able to send the data to your CRM system where you can view and manage customer conversations efficiently.
While some people still tend to call businesses to inquire about a service, having a quote request form on your website can help you optimize the process.
The below tutorial is all about creating a quote request form on WordPress. Before that, let’s check out why you should create a quote request form.
Benefits of a WordPress Quote Request Form

Perhaps the most significant benefit of having a quote request form is that it is available 24/7. A quote request form is not like your office employees. It is available 24 hours a day, seven days a week. This eliminates the need to have someone on the phone at all times and cuts down on the amount of hands-on work you have to do.
The following are the top three advantages of having a quote request form:
The client’s convenience: It’s all about convenience when it comes to running a business. This also includes presenting them with estimates. Your customers don’t want to waste time and effort on back-and-forth phone calls and texts.
This difficulty is eliminated for both you and your customers when you have a user-friendly online quote that can be accessed from any device with an internet connection. This process might even be totally automated on your part if you use a quote request form.
Records that are comprehensive: All conversations made via a quote request form are maintained in an online database that can be viewed at any time. You’ll save time in the back office and have all of your communications neatly categorized in your program if you automate your record-keeping in this manner.
It provides valuable input: You know you’ve done it right if the majority of your clients are happy with your pricing. You may need to change your price strategy if you receive a lot of pushback or if your clients are extremely satisfied with your pricing.
That’s why smart business owners use quote request forms to automate the processes and grow their business.
Requesting a quote form allows you to get specific information from potential customers and use smart logic to customize the form to meet your needs. It improves your credibility and helps improve the customer experience.
Creating a quote request form on WordPress
If you don’t know what tool you need and how to use it, creating a quote request form on WordPress can be daunting. We recommend Fluent Forms.
Fluent Forms is the ultimate solution for creating all kinds of forms on your WordPress site. It is a robust form builder plugin with a drag-n-drop feature. It comes with 40+ input fields, 60+ pre-built templates, and 40+ third-party integrations.
The premium version of this plugin also comes with advanced fields, payment fields, GDPR consent fields, reCAPTCHA, hCaptcha, and so on.
So let’s get to creating a quote request form with Fluent Forms.
Install Fluent Forms
Installing Fluent Forms is pretty straightforward, like installing any other plugin. To install Fluent Forms on your WordPress site;
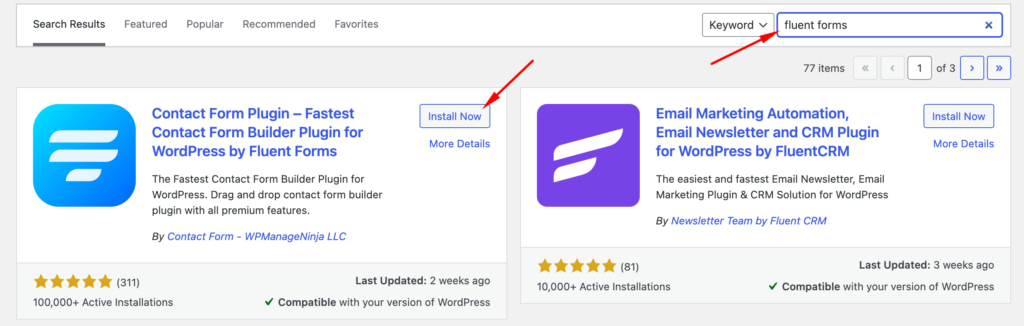
- Go to your WordPress dashboard, hover over Plugins and click Add New.
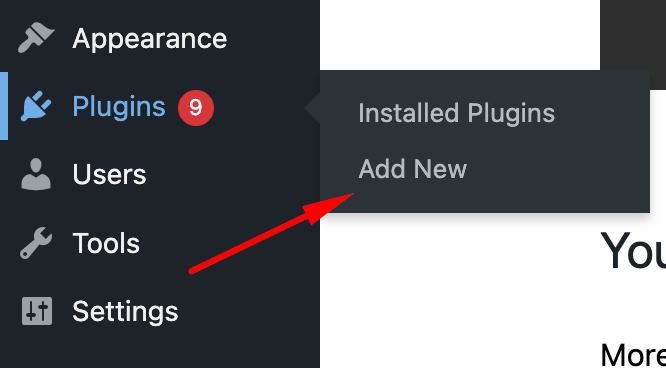
- Search for Fluent Form and click Install. Once installed, click activate.
You are all set to create your quote request form for your users. Let’s proceed to the next part, where we elaborated on creating a quote request form.
Create your quote request form
Creating a quote request form is relatively easy with Fluent Forms. It gives you a pre-made quote request form that you can customize according to your needs. To create a quote request form:
- Go to Fluent Form. Then hit the Add a new form button.

- Search for Request For Quote. When the template appears on the search result, click Create Form.
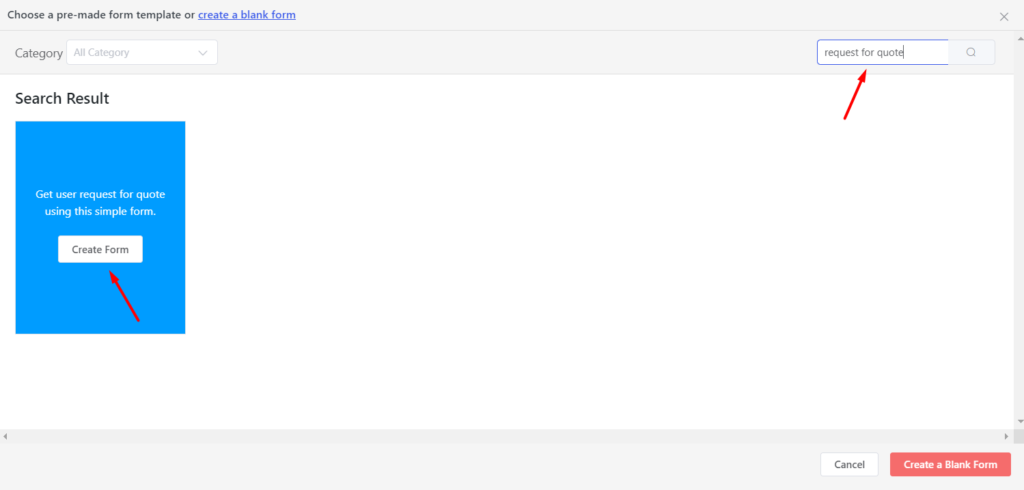
- A pre-built template will show up. On the right sidebar, you’ll see the drag and drop form builder as well.
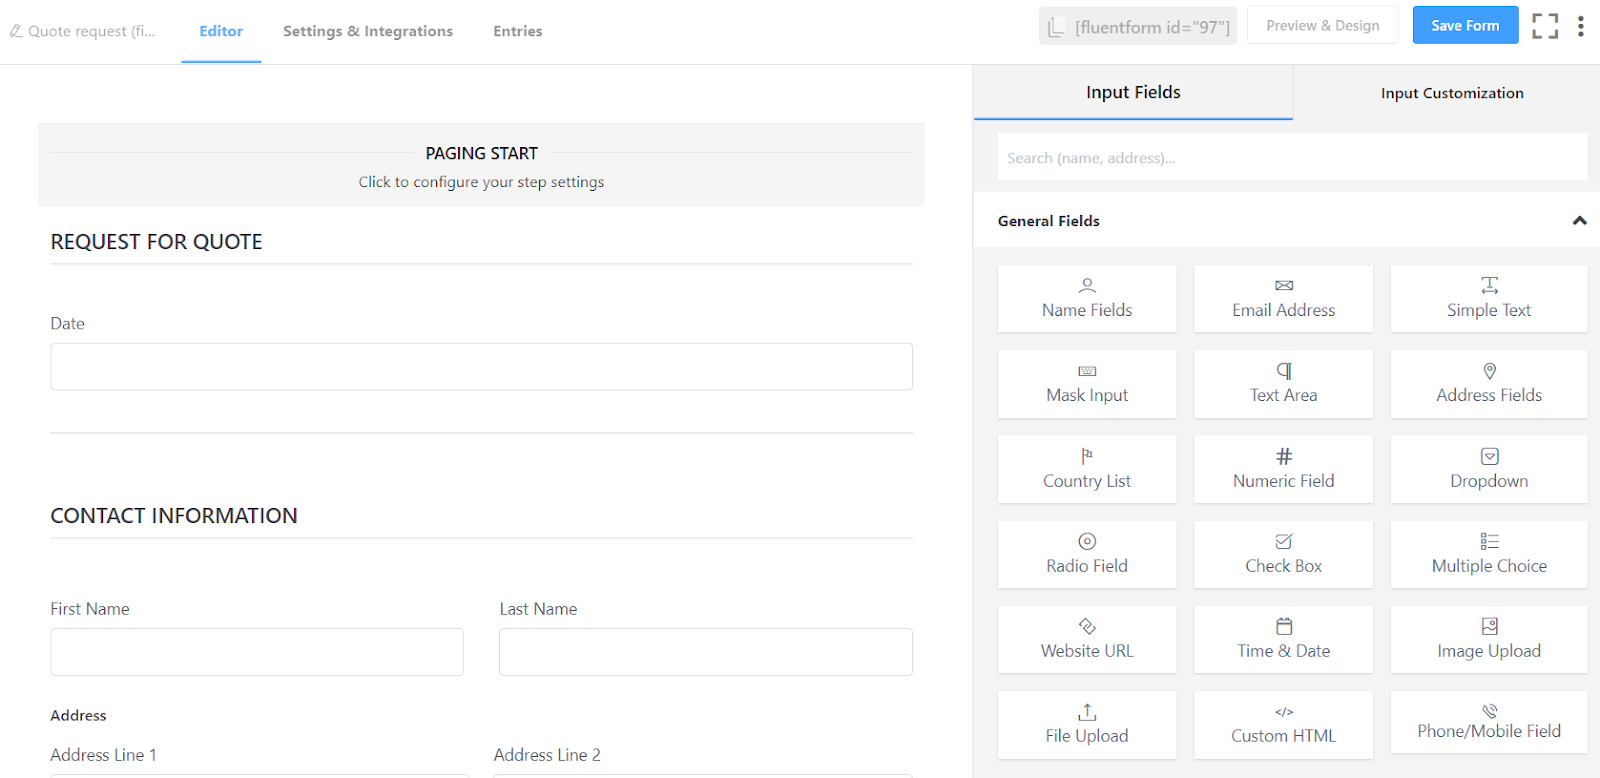
You may now proceed to edit the fields on your form. By selecting the Input Fields tab and dragging and dropping your desired field into your form, you can quickly add or delete fields.
Make changes to the form fields by clicking on them. You may also move fields around to modify the order.
Once you’re done creating your form, click Save Form.
Customizing the form
Fluent Forms makes it easy to collect all of the data you need to build a personalized quotation for your customers.
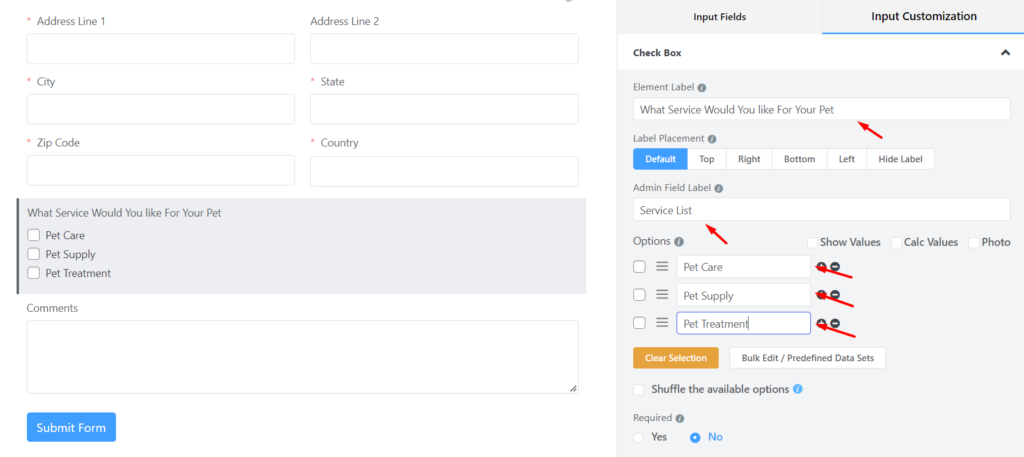
We’ll teach you how to add checkboxes to your request for quotation form so clients can select the services they want quotes for to help you with some expected changes you might want to make.
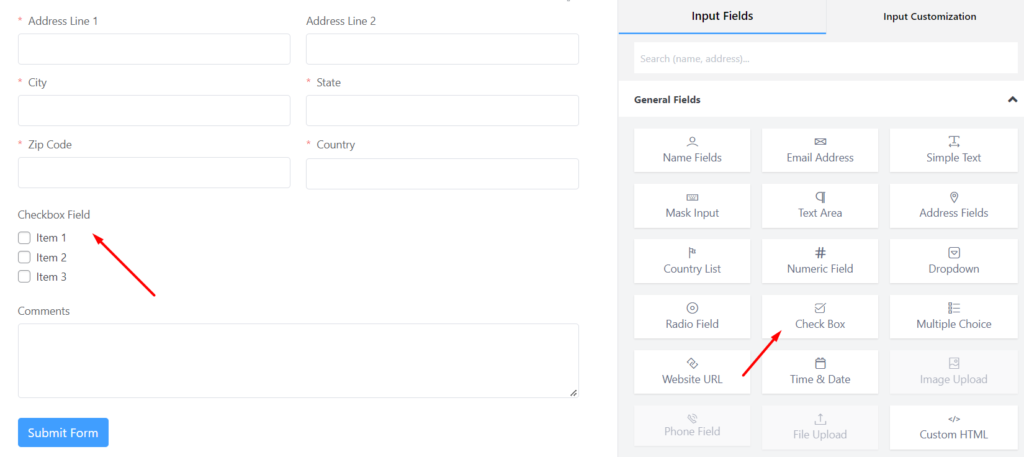
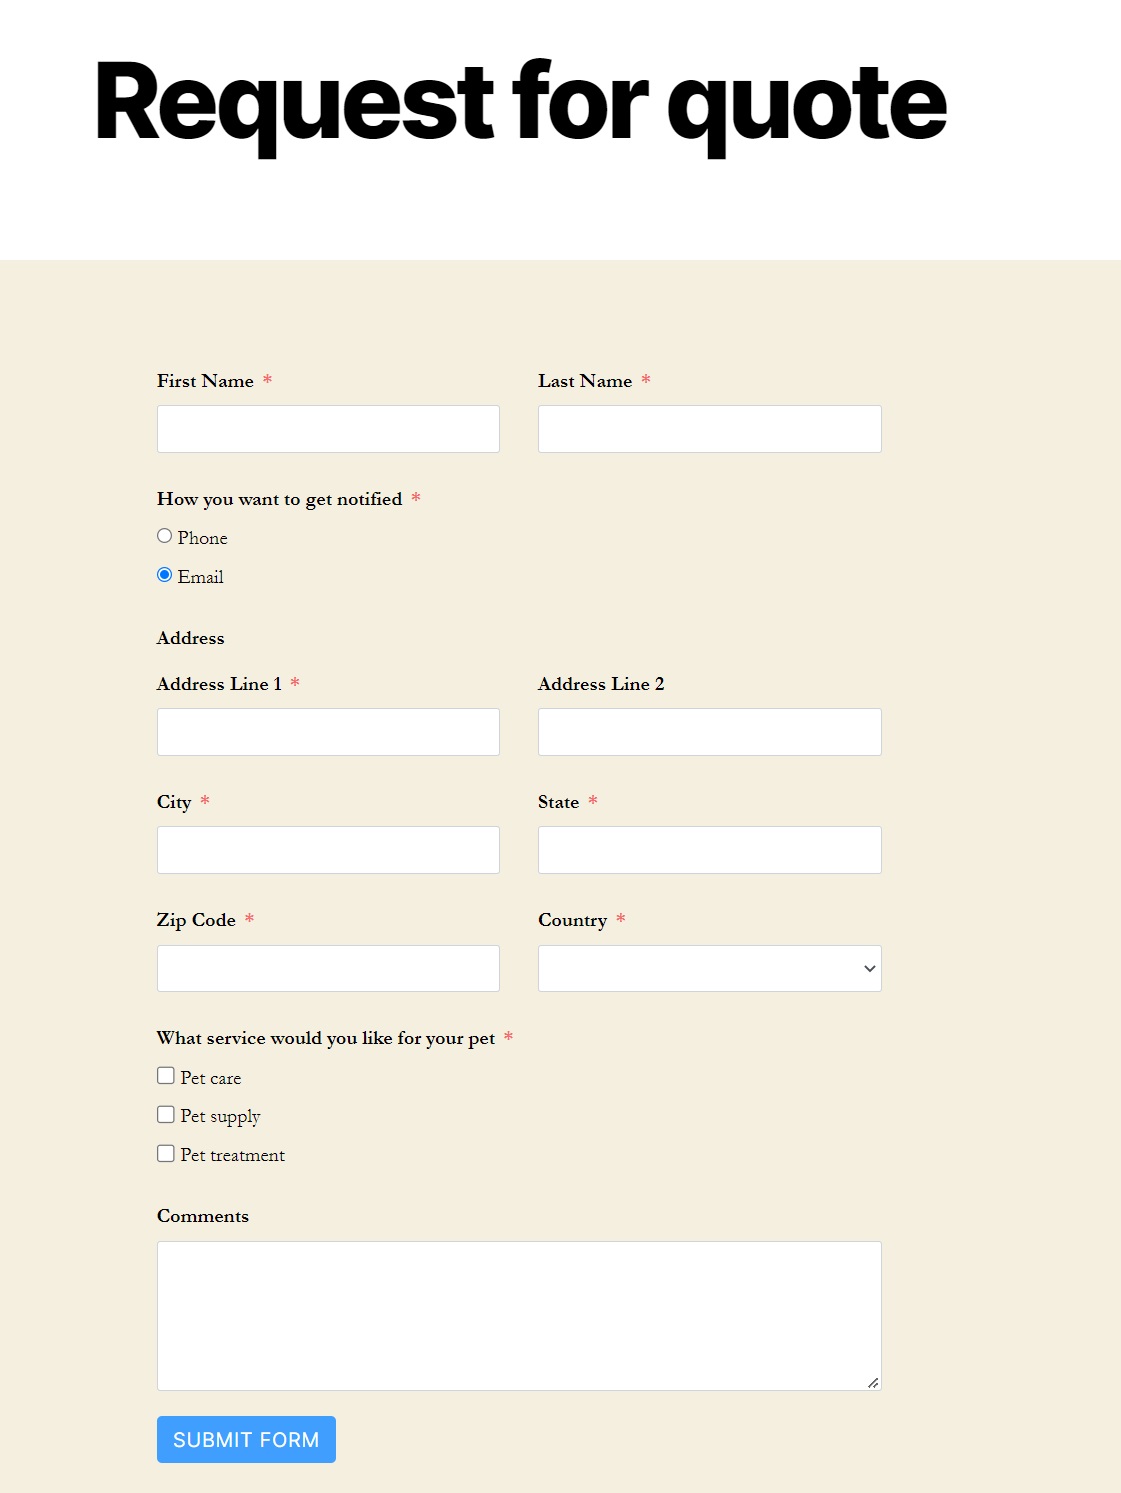
We’ll use a request a quote form for pet shop services as an example. We’ll include a checkbox for pet care, pet supplies, and pet treatment services.
You can add checkbox fields by following a few simple steps.
- Go to Fluent Forms Form editor, find the input field on the right side of the window and check out under the General fields.
- Drag the field “Checkbox” to the left-hand panel of your form.
- Click the checkboxes field in the preview panel to make changes.
- Label your field, set the placements, label the admin field, add the service options, and select if the field is required or not.
Once you’ve finished customizing your form, don’t forget to click the Save button at the top of the screen to save your changes.
Adding conditional logic
Conditional fields are those dependent on users’ actions on other inputs. Suppose the defined actions are not triggered. These conditional fields will not come into being.
Fluent Form’s smart logic allows you to show or hide form fields based on what the user selects, which is helpful when you need more information to prepare the estimate but don’t want to bog down site customers with form fields that don’t feel their need.
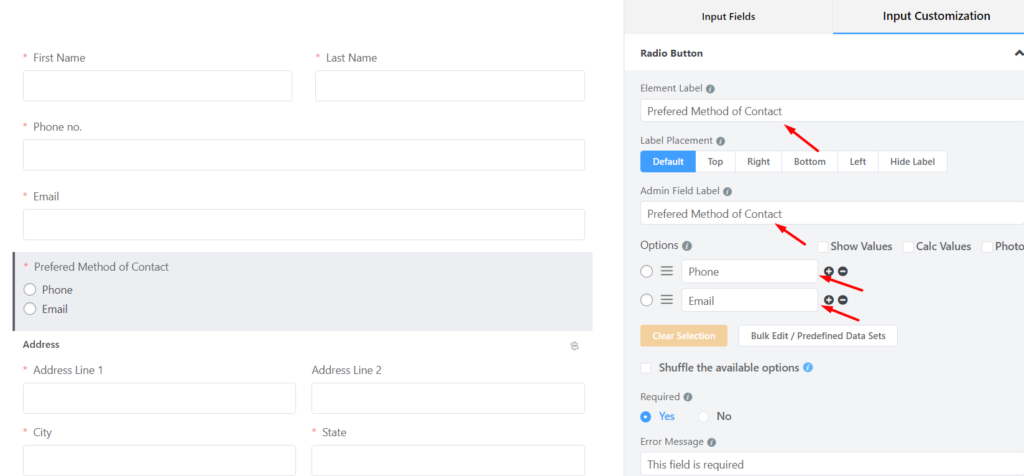
Firstly let’s remove the phone and email fields from our templated form. Now add a radio field under the name field, which will dictate the conditional input.
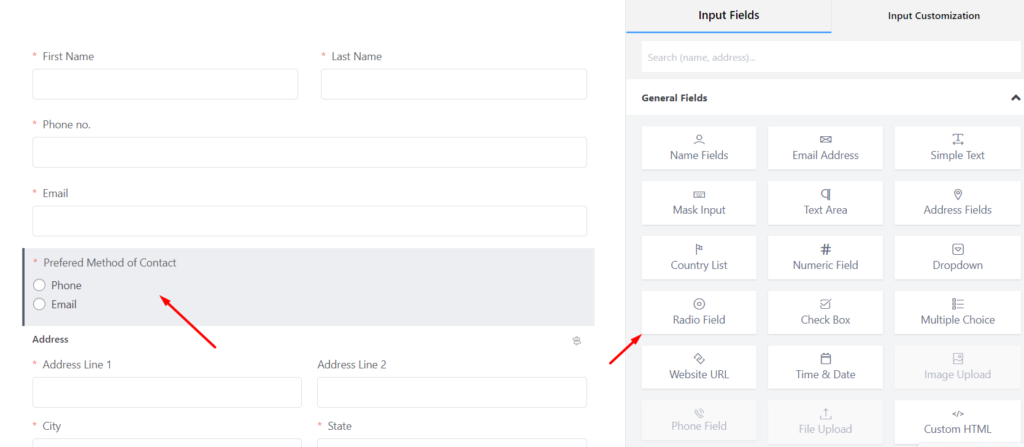
Follow the below steps to configure the radio button and apply conditional logic.
- Add a radio button from the input fields. Label the field, place it and customize the options. Like in our example, those are email and phone.
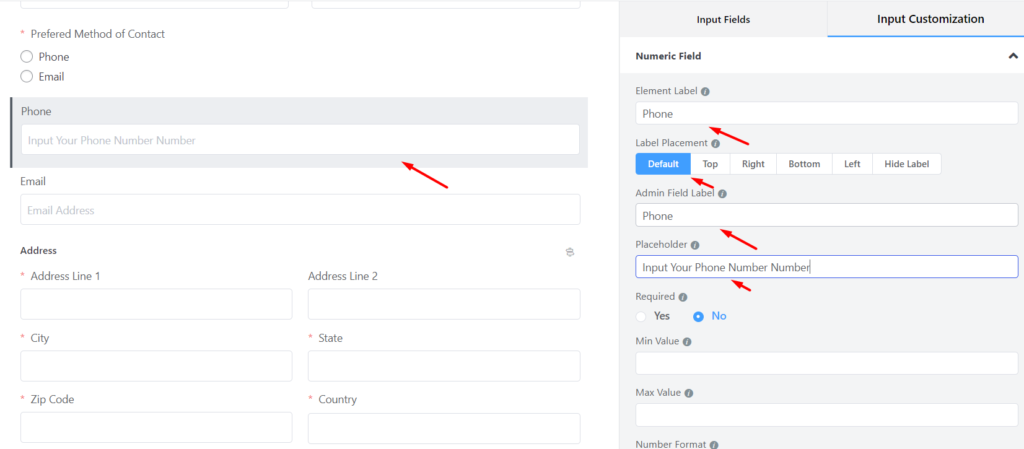
- Add conditional input fields that will react to certain user activities. Such as an email field and a numeric field. You can add a fully featured phone field if you are only upgraded to the pro version of the Fluent Form.

- Now customize those newly added email and numeric fields. We labeled the numeric field as the phone field. And added the admin field level and the placeholder.
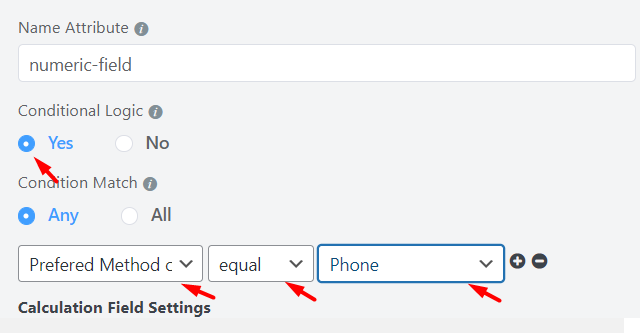
- At this stage, Go to Advanced Options and choose Yes in the conditional logic option.

- If the conditional input field requires responding to a single conditional action, select Any in the conditional logic part if the field requires multiple conditions to be met, select All.
- Define the input fields used by the conditional field, define equal or not equal.
- Define on which options the specific conditional input field will respond.
Note: must follow the 4th, 5th, 6th, and 7th steps for both email and phone fields.
Finally, Save form once the conditional logic is set.
Configure your quote request form’s settings
The next step is to configure your quote request form’s settings. To set up, you have to go through multiple stages. Here’s how you can change the confirmation emails:
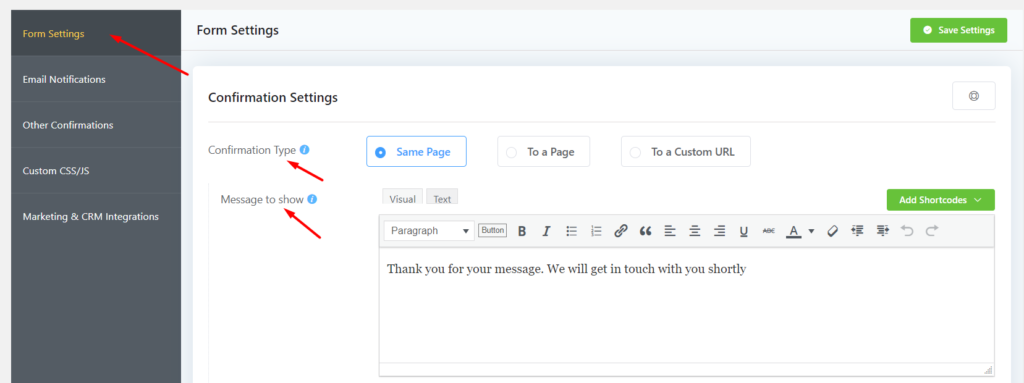
Changing the confirmation emails
When potential customers request a quote, they’ll see the default confirmation email.
“Thank you for your message. We will get in touch with you shortly.”
Changing this confirmation message is very easy.
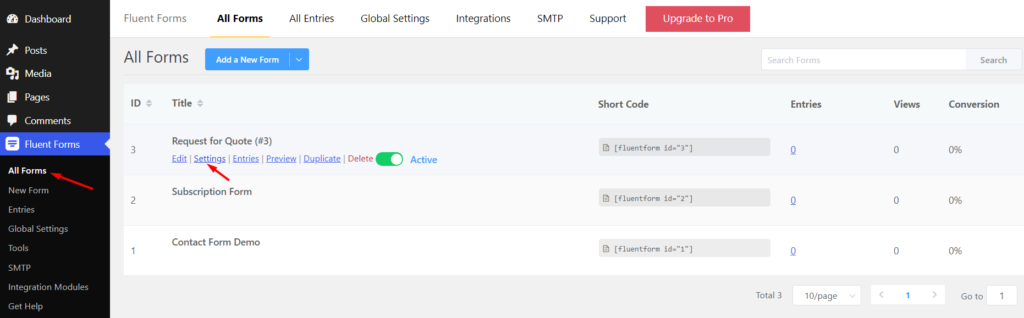
Go to the Fluent Forms » All Forms page in your WordPress dashboard, then click on the Settings button under your newly made request for the quote form to edit it.
Next, click the Form Settings from the left sidebar.
There is a confirmation message box where you can edit and customize the default message.
There are many other things to configure like form layout, schedule & restrictions, advanced form validation, survey result, compliance settings, etc.
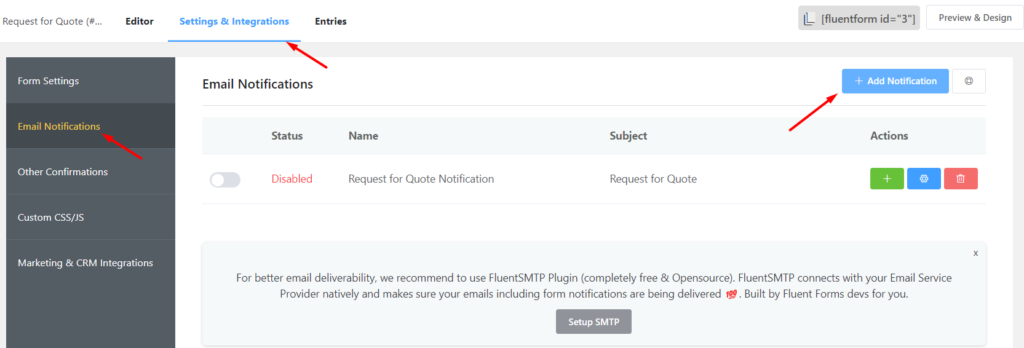
Configuring email notification settings
With Fluent Forms, get notified every time someone fills up a form by email notifications. To enable email notification, go through the following steps.
- Go to Settings of the form you want email notification enabled. Click on Settings & Integration at the top bar.
- Then click on Email Notifications at the sidebar. Click Add Notification button.
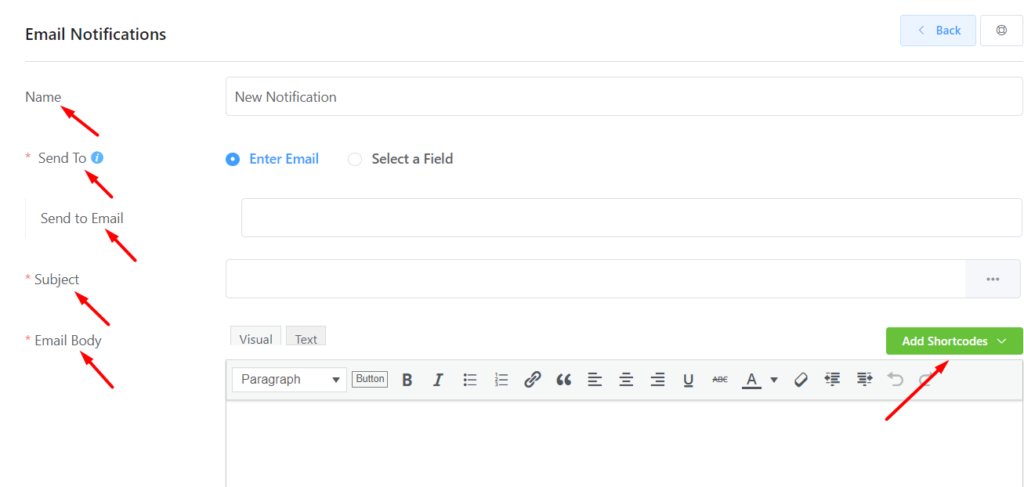
- Name the email notification.
- In the Send To field, select Enter Email and define the admin or other email address to which you want your email notifications to get delivered.
- Add the Subject of the notification email.
- Rewrite the Email Body according to your needs.
- Use the Add Shortcodes dropdown to add shortcodes depending on your needs.
- Also, edit the email body in HTML codes in the text tab for advanced customization.
- You can configure the Advanced Email notification settings if someone else also needs to be notified of an entry submission (your teammates or support staff). Define the From Name, Email Address, Reply-To, BCC, and CC where you want to get notified. You can also add shortcodes from the dropdown menu here.
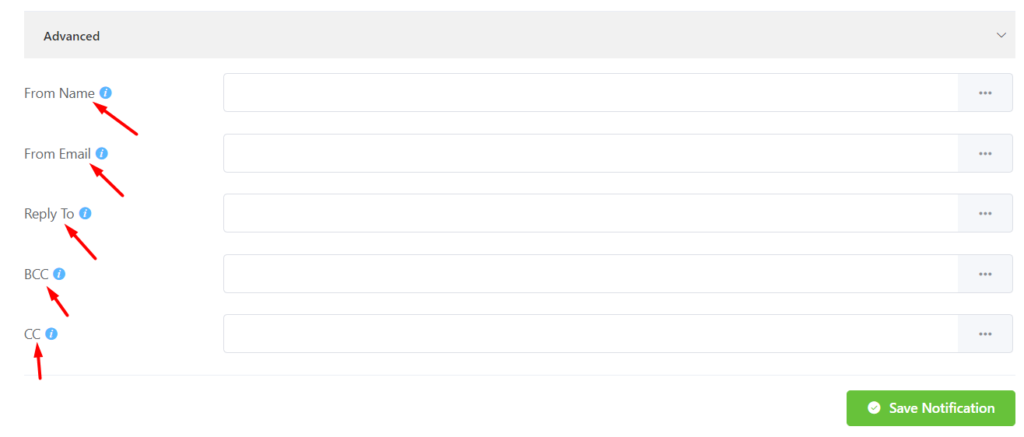
When everything is in place, click the Save Notification button. Otherwise, WordPress will not carry out the configuration.
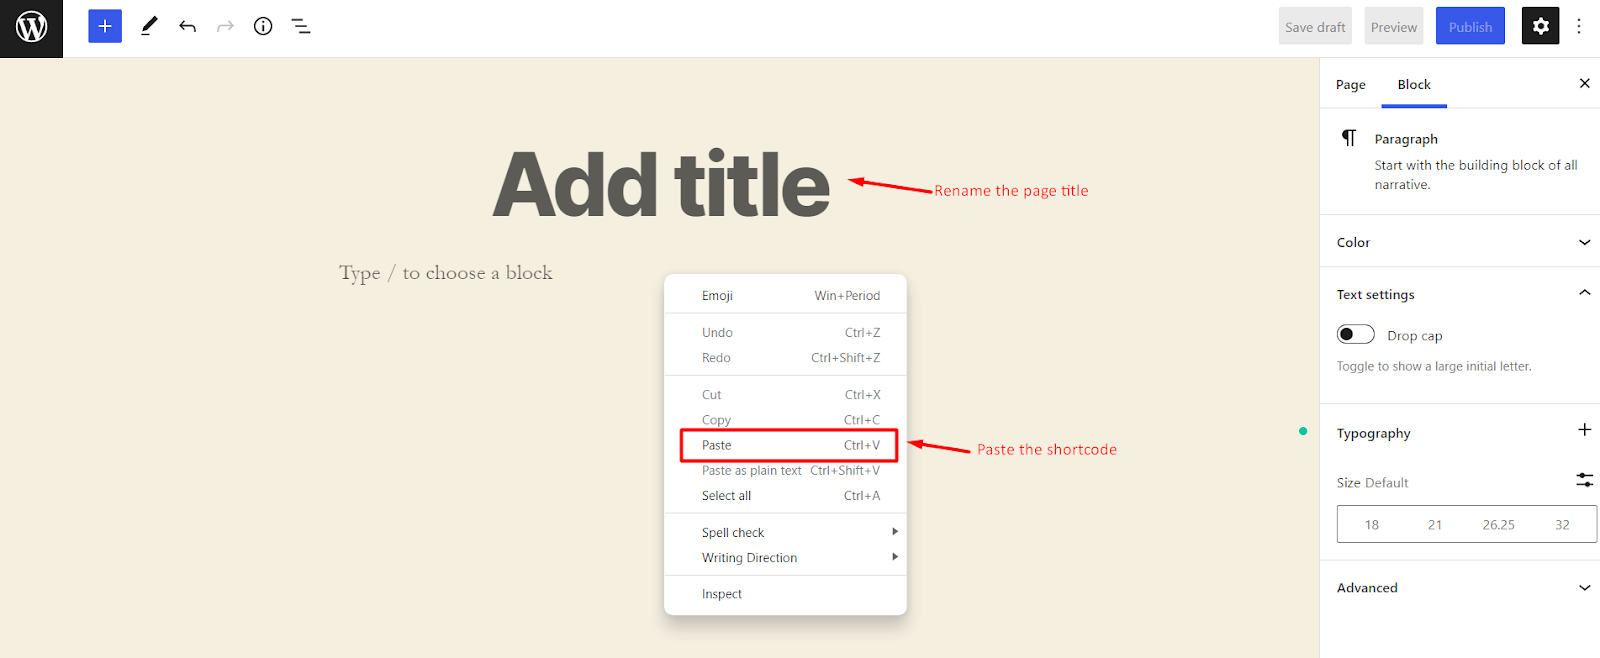
Add the form to your website.
When all the settings are done, save the form, copy the shortcode, and paste it onto the page where you want it to be visible.
That’s it. You have successfully created a quote request form on your WordPress site that lets you quickly gather the requirements and information of your customers.
Final Words
So there you have it, a quote request form created at no cost. You can customize the form as much as you like.
By having a quote request form, you’ll save a lot of time and effort. You’ll also stay organized and have better control over your business.
Do you ask a lot of questions as part of the quote request process? Consider using a multi-step form to split a multi-page question with navigation options. There are a lot of templates and other premium options included in Fluent Forms Pro!
Sounds like you’ve found what you need?
Have questions?
Feel free to comment below!

Mohiuddin Omran
WordPress, automation, eCommerce and growth marketing specialist, a WordPress Core Contributor and Media Corps member blending storytelling with technology to craft strategies in SEO, email marketing, and beyond.
Table of Content
Subscribe To Get
WordPress Guides, Tips, and Tutorials


Leave a Reply