

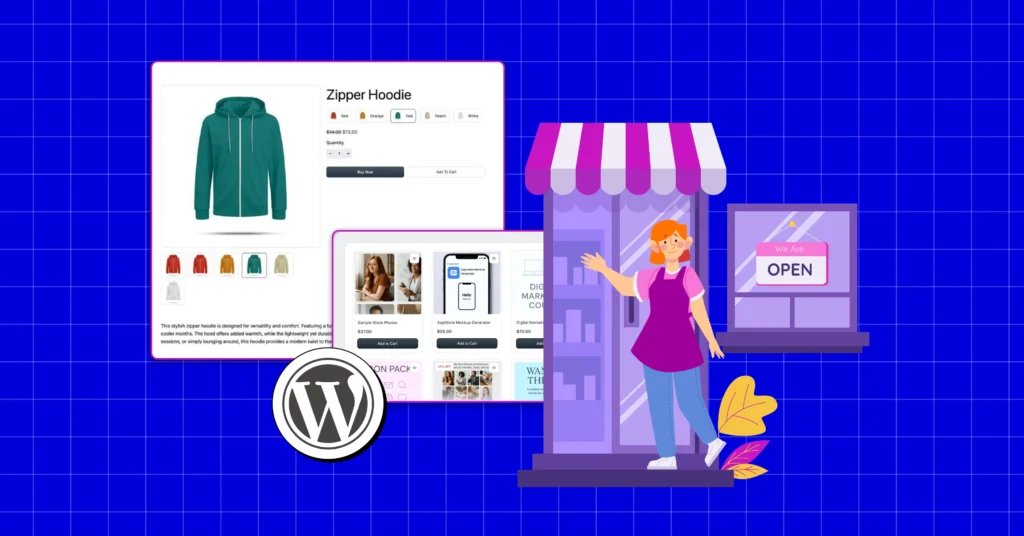
How to Sell Digital Products in 2026: A Step-by-Step Guide


Selling digital products online can be exciting and overwhelming at the same time. You worry about managing tools, keeping costs low, and making everything work together smoothly. Many creators assume they need a dozen tools just to make a profit.
The truth is, you do not. WordPress gives you a flexible, reliable foundation where creation, sales, and growth come together seamlessly. And the whole system can run smoothly just with a few tools.
So, in this step-by-step guide, we will show how to sell digital products online with WordPress, from setting up your store to managing products, payments, and growth.
Common Pain Points of Starting an Online Business
When people search for how to sell digital products online, they often face the same challenges early on. These pain points slow down setup, increase costs, and create confusion.
Some of these pain points are:
- Too many disconnected tools when trying to sell digital products online
- High setup and monthly costs before your first digital product sale
- Confusing process for product delivery, licensing, and customer access
- Limited control when relying on marketplaces instead of selling digital products online
- Difficulty building trust with first-time digital product buyers
- Poor scalability, requiring platform changes as sales grow
- Lack of clear sales and customer insights
- Manual workflows that make selling digital products online harder than it should be
Addressing these problems early makes it easier to build, manage, and scale a successful digital product business.
Why Selling Digital Products with WordPress Makes Sense
Selling digital products lowers friction at every stage of an online business. You build once, sell repeatedly, and deliver automatically.
Selling digital products gives you some benefits over physical products:
- Instant delivery without manual fulfillment
- High margins with predictable costs
- Global sales without location limits
- Easy to update, improve, or relaunch products
Now the question arises, “Why is WordPress the right choice?”
Well, this is why:
- Ownership of your website, products, and customer data
- Many SaaS platforms create long-term dependency and rising fees
- Flexible product models, including one-time purchases, subscriptions, and licenses
- Seamless integrations across marketing, payments, and support tools
- Scales naturally, from a single product to a full digital product ecosystem
- Built for trust, with your own domain, branding, and checkout experience
This control and flexibility make WordPress ideal for anyone learning how to sell digital products online with sustainable growth.
How to Sell Digital Products with WordPress: Step-by-Step Guide
Now that you have the foundation, let’s walk through setting up your store, creating products, and preparing to sell online.
Step 1: Getting Started with WordPress
Every clear roadmap starts with a solid foundation. Before learning how to sell digital products online, make sure your WordPress site is ready with a domain and reliable hosting.
Once WordPress is set up, install FluentCart and complete the basic setup. This includes your store name, currency, default pages, etc to give you smooth delivery from day one.
Once the basic setup is complete, you’re ready to create your first digital product.
Step 2: Set Up Your Store to Sell Digital Products Online
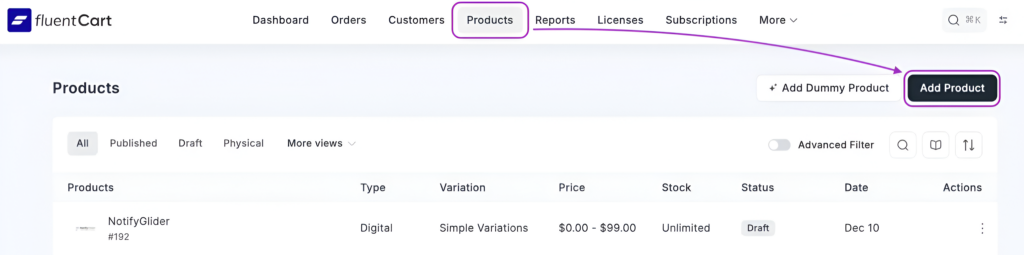
Once your store setup is ready, the next step is adding your physical products. For that, follow the steps below serially.
Enable Licensing
Before adding your digital product, enable Product Licensing.
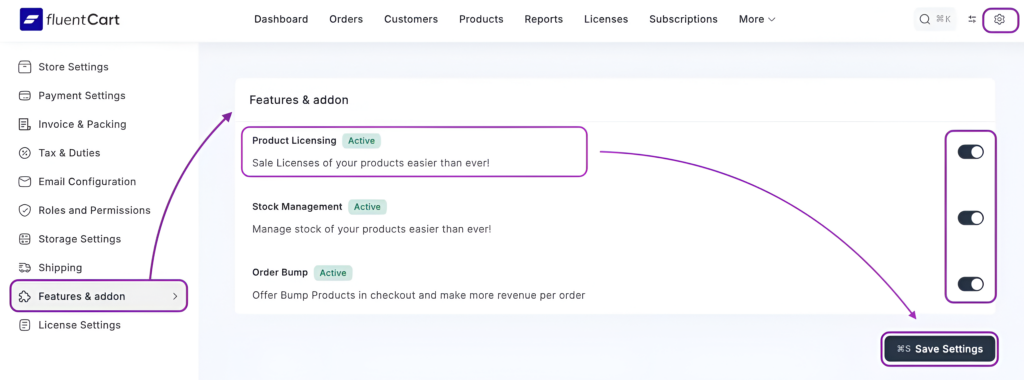
Licensing your digital product protects your work, controls usage, and lets you offer tiered plans with different activation limits, which are essential for plugins, software, and subscription-based digital products.
From your FluentCart dashboard, go to Features & Add-ons and toggle Product Licensing on.
Once licensing is active, you’re ready to create and configure your digital product.
Quick Tip: While you’re here, you can also enable related features like Stock Management or Order Bump if your pricing or sales flow needs them.
Create Your First Digital Product to Sell Online
Start with the essentials. These details shape how your product appears across the shop, cart, and checkout.
- Product title: Use a clear, brand-ready name. For example, the name ‘NotifyGlider’ instantly signals a notification-focused product.
- Short description: This is your quick pitch. Explain what the product does, who it’s for, and why it matters, without technical overload.
- Long description: Use the Classic Editor or Builder to outline features, use cases, and benefits. Break content into readable sections so users can scan and understand value fast.
Configure Pricing and Variants
Digital products often come with multiple plans. FluentCart lets you set this up cleanly using variants.

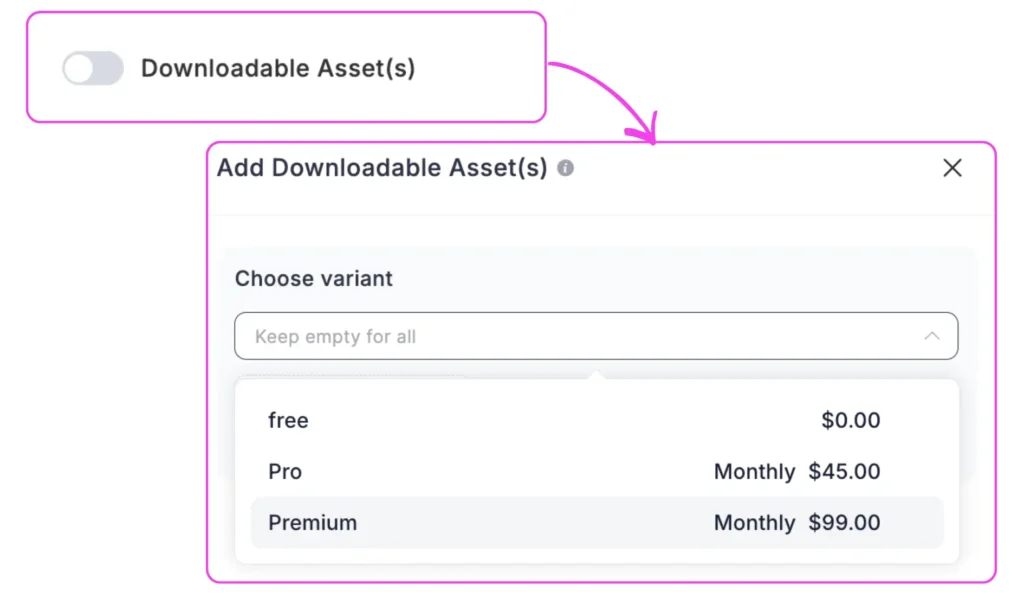
You can create plans like Free, Pro (monthly), and Premium (monthly), each with its own price, billing cycle, and compare-at price to highlight value.
This structure makes it easy for customers to choose while giving you flexibility in how you monetize.
Add Downloadable Assets and Media
Next, upload your digital files, such as plugin ZIPs or assets, and assign them to the appropriate variants.
You can also add product images and set a featured image to represent the product visually. Even for digital products, strong visuals increase trust and perceived quality.
Step 3: Enable Inventory Management
It’s an optional step, but very effective for digital products.
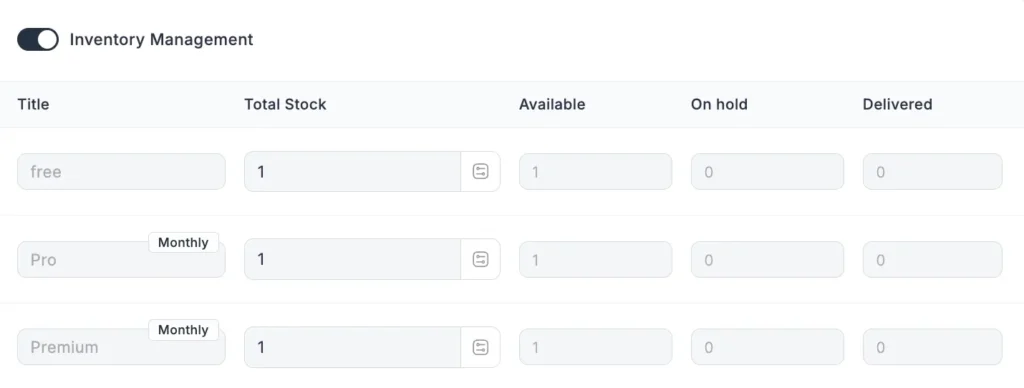
Inventory management isn’t just for physical products. For digital products, it helps you control how many times a plan or license can be sold, which is especially useful for limited releases, beta access, or restricted licenses.
Once enabled in FluentCart, inventory is tracked per variant (Free, Pro, Premium) using four clear indicators:
- Total Stock: The maximum number of purchases allowed
- Available: Remaining licenses that can still be sold
- On Hold: Pending purchases not yet completed
- Delivered: Successfully sold and activated licenses
This creates intentional scarcity, prevents over-distribution, and keeps access aligned with your product strategy, without needing extra plugins or manual tracking.
If you don’t need limits, you can skip this step. But when control matters, this feature gives you a clean and native digital product tracking system, without any extra plugin.
Step 4: Finalize Product Settings and Publish
Before making your digital product live, review the settings on the right side of the product editor. These controls decide how your product appears, behaves, and is discovered in your store.
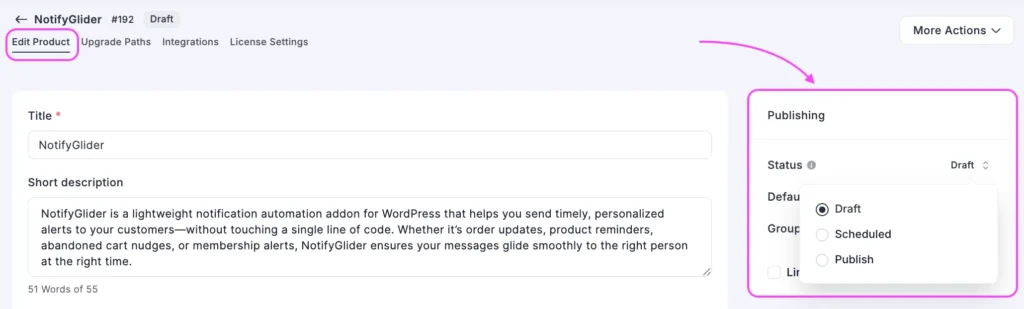
Status
Set the product as Published to make it live, or keep it as Draft if you want to review it later.
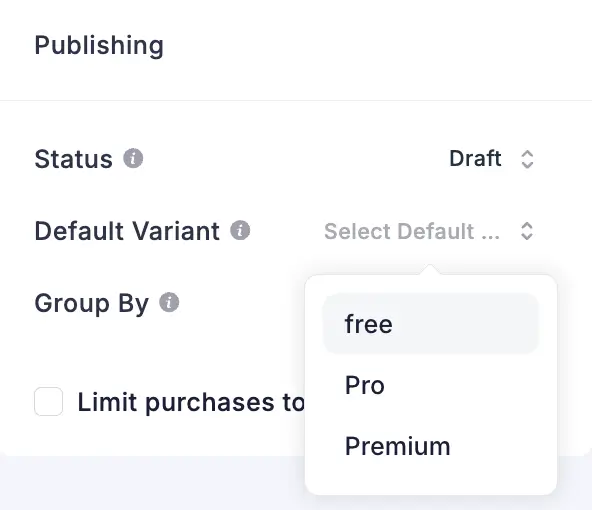
Default Variant
Choose which plan (Free, Pro, or Premium) is pre-selected when customers land on the product page. This subtly guides buying decisions.
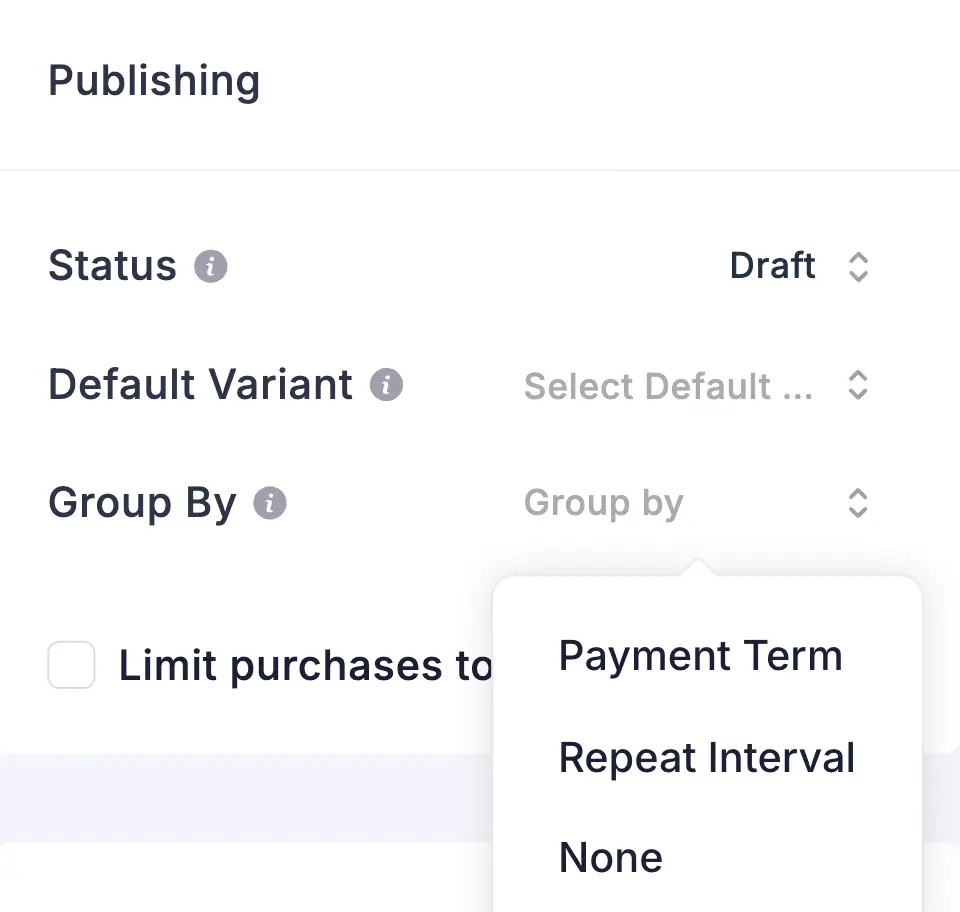
Group By
Organize variants in a clear structure, such as grouping plans by billing type or access level, to make comparisons easier.
Media / Featured Image
Add a featured image to represent your product visually. Even for digital products, visuals increase clarity and trust.
Categories
Place the product under relevant categories (for example, Plugins) to keep your store organized and searchable.
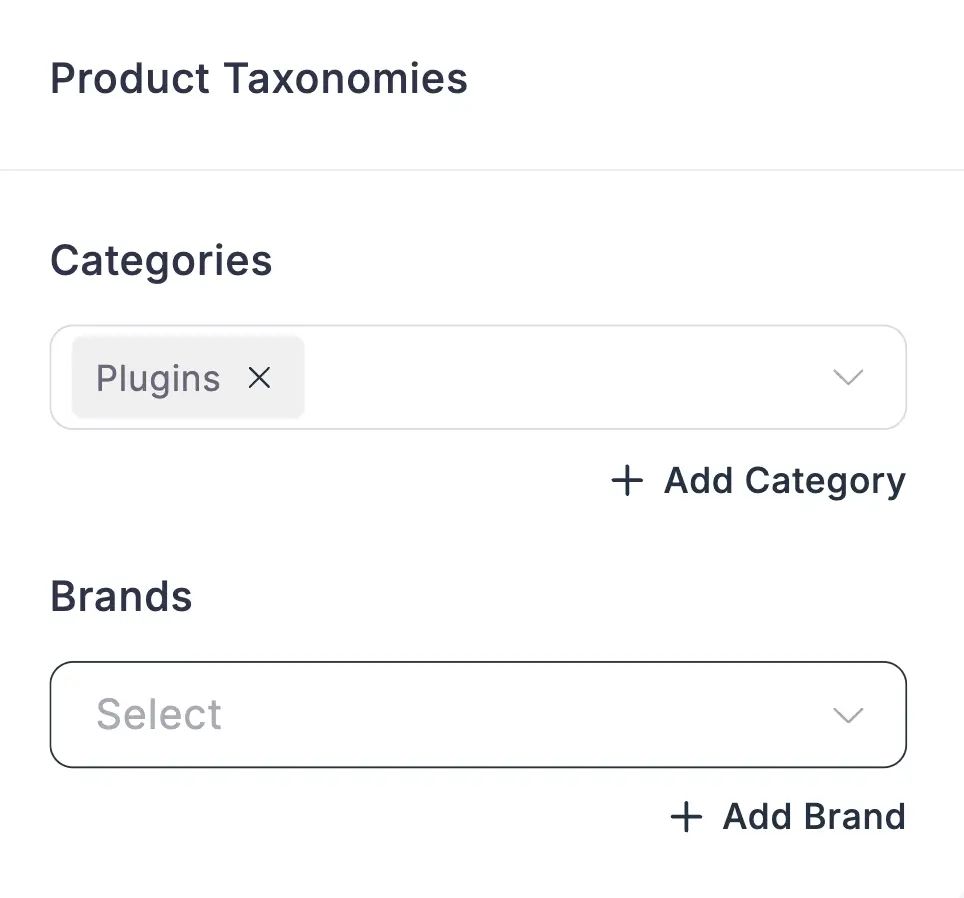
Brands
Assign a brand if you use branding for product grouping or recognition.
Once everything looks right, click Save or Update. Your digital product is now ready to be discovered, purchased, and delivered, without any extra setup or third-party tools.
New to online selling? If you’re launching your first store, this beginner-friendly guide can help you get started 👉 A Beginner’s Guide to Selling Digital or Physical Products.
Step 5: License, Integration Management
After adding your product and managing inventory, the next step is to secure your product and guide customers to higher plans.
These settings ensure your digital products are protected, professional, and set up for growth.
Enable Licensing
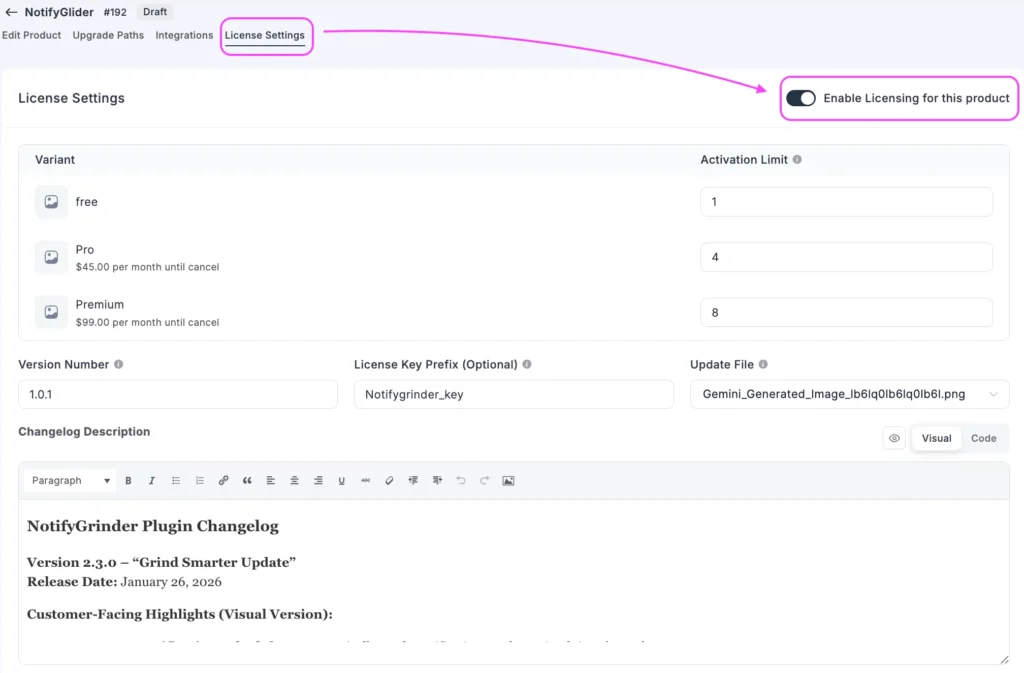
Licensing lets you control how many activations each product variant allows and protects your digital assets.
- Enable Licensing: Turn this on per product.
- Variants & Activation Limits: Set how many times each plan can be used. For example:
- Version Number & License Key Prefix: Track updates and generate unique keys for each variant.
- Update File & Changelog Description: Keep your customers informed about product improvements.
This ensures controlled access, reduces misuse, and maintains the integrity of your digital products.
Set Up Integrations
Integrations connect your product to other tools, automating actions that would otherwise require manual work.

- CRM Integration: Automate customer follow-ups, notifications, and subscription workflows. You can use FluentCRM as it is tightly integrated with FluentCart.
- Triggers: Define actions based on events like Order Paid or Order Status Changed to Canceled.
- Global Integration Settings & Documentation: Ensure your connections are configured correctly and refer to documentation for advanced automation.
Integrations solve the operational gaps that appear after you start selling, connecting your store to tools that handle customers, emails, licenses, and recurring actions at scale.
Configure Upgrade Paths
Upgrade paths help you guide customers from one plan to another smoothly. This is especially useful for subscription or multi-tiered digital products.
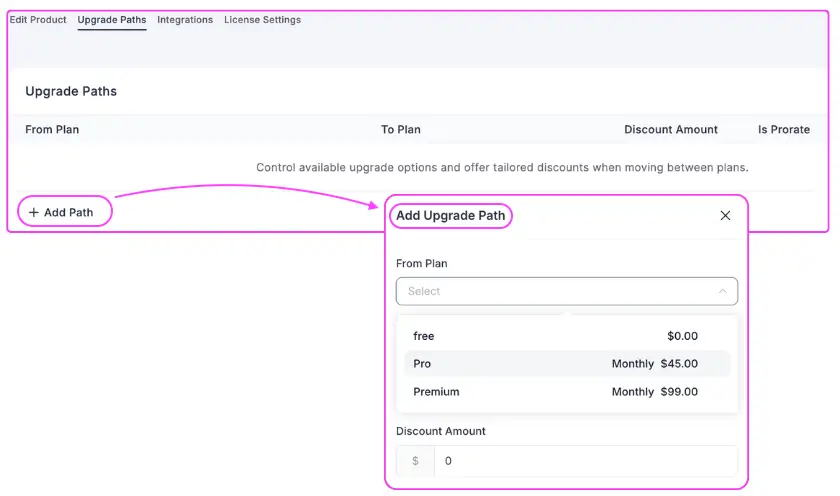
- From Plan to Plan: Define the path a user can take when upgrading.
- Discount Amount & Prorate: Offer tailored pricing and manage billing adjustments automatically.
- Control which upgrade options are available for each product variant to optimize conversions and maximize customer value.
With licensing, integrations, and upgrade paths configured, your digital product is ready to sell securely, scale efficiently, and delight customers with seamless automation.
Step 6: Set Up Payment Methods for Online Digital Products
Before selling your digital product, you need to make sure payments work smoothly. A seamless checkout builds trust, reduces abandoned carts, and ensures customers get instant access to your product.
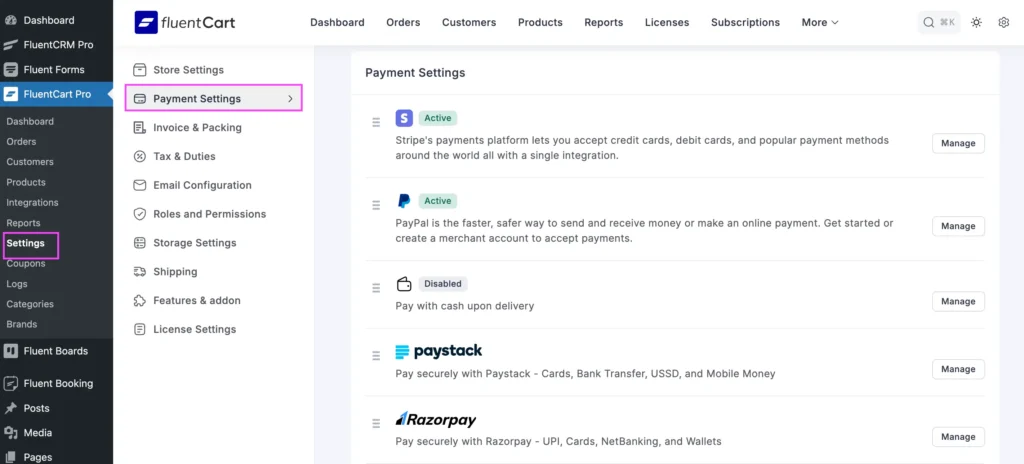
FluentCart integrates with multiple payment providers to give you flexibility and global reach:
- Stripe / Credit & Debit Cards: Accept all major cards plus Apple Pay, Google Pay, and other local options.
- PayPal / Pay Later: Let customers pay via PayPal, Venmo (US only), or financing options.
- Multi-Currency Support: Sell globally without worrying about conversions.
Quick Tip: Use the built-in payment dashboard to track revenue, monitor transactions, and handle refunds, all from one place. You don’t need multiple plugins or marketplaces; a single, integrated system keeps your process clean and cost-efficient.
Once payments are active, your product is ready to deliver automatically and securely, letting you focus on growth instead of manual processing.
Step 7: Enable Integrations and Email Automation
With your payment system configured and your digital product ready for sale, the next step is preparing how your store will handle customers once selling begins.
This is where integrations and email automation ensure every purchase, upgrade, or subscription change is managed smoothly from day one.
Create Integration Feeds
To sell your digital product online smoothly, without any extra hassle, you need a good CRM tool. For that, you need to integrate that fromthe Integration option from each product of your store.
We have already shown how to enable integration in the Set Up Integration segment.
FluentCRM is built to work natively with FluentCart. Orders, subscriptions, upgrades, renewals, cancellations, and everything syncs instantly. So, we are using FluentCRM here.
- Go to FluentCRM → Integration Feeds → New Feed
- Name your feed and select lists, tags, or contacts to add or remove based on user actions.
- Choose your trigger event, such as purchase, subscription expiry, or plan upgrade.
This ensures every customer action automatically drives the right response, without any manual work.
Automate Customer Communication
For subscription-based or multi-plan digital products, sending email newsletters manually can quickly become overwhelming. Order confirmations, onboarding emails, renewal reminders, and cancellation notices all need to happen on time.

Automation solves this by:
- Starting email sequences automatically based on key triggers.
- Ensuring timely delivery of relevant messages.
- Maintaining engagement and trust without constant manual effort.
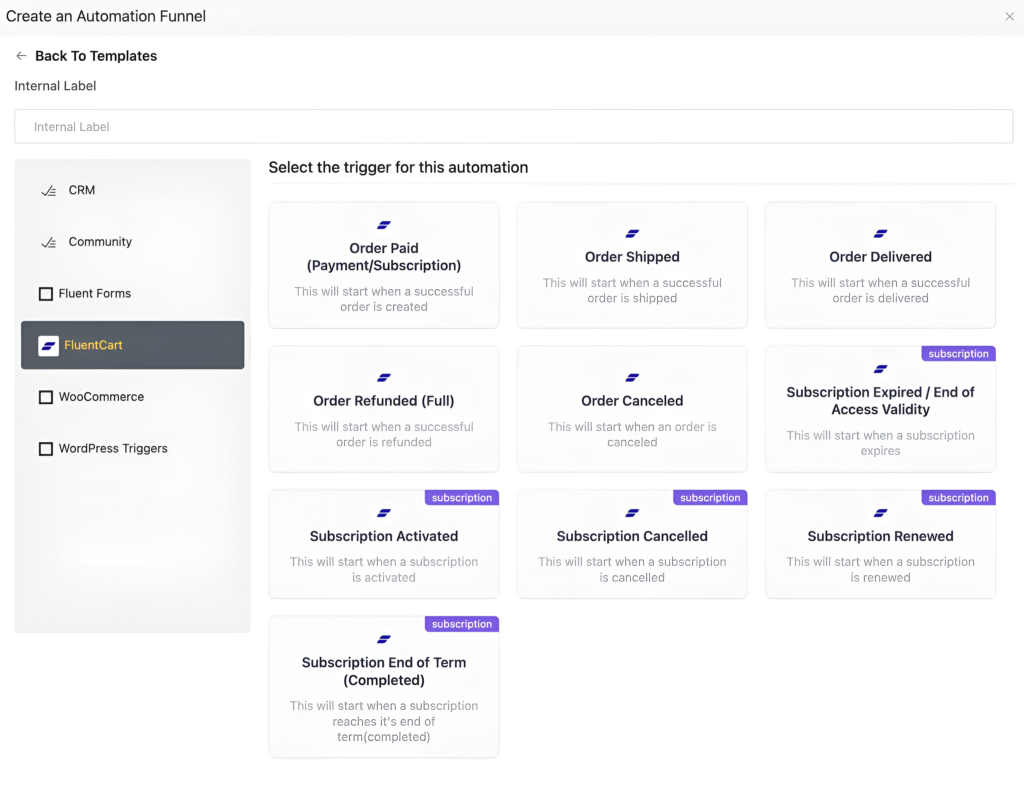
How to Set Up an Automation:
- Click New Automation in FluentCRM.
- Select a trigger from the FluentCart category (e.g., Order Paid).
- Create the automation sequence. You can use templates or customize messages as needed.
With payments set and automation running, your digital products are now fully ready to sell, deliver, and engage customers automatically, all from a single, integrated ecosystem.
Quick Tip: Segment your audience by behavior. For example, treat first-time buyers differently from repeat customers. This keeps communications relevant and improves conversions.
Step 8: Monitor Performance with Reports & Insights
Once your digital products are live, tracking performance is what helps you grow with confidence. FluentCart gives you a clear, real-time view of how your store is performing, without digging through scattered data or external tools.
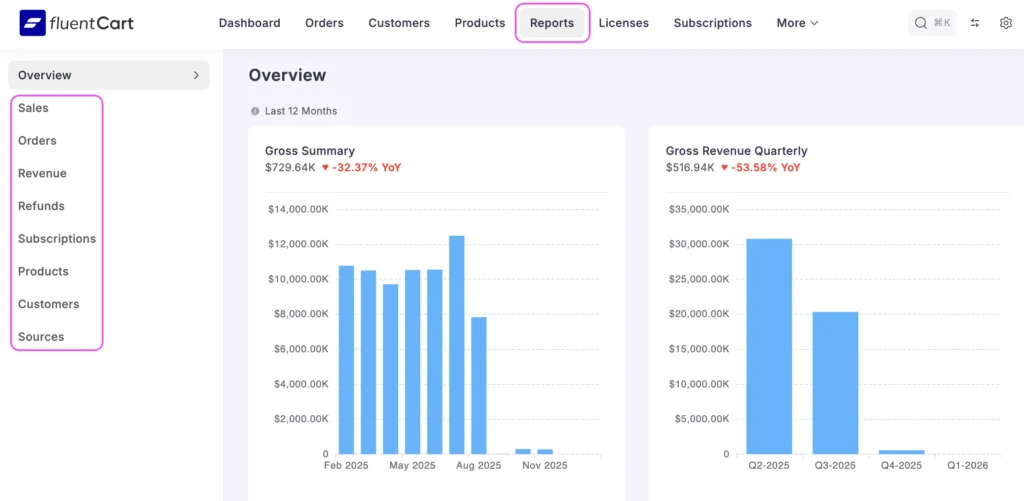
From the Dashboard, you can quickly see overall sales, revenue trends, active subscriptions, and product performance. This overview helps you understand what is working and where attention is needed.
Key Reports to Watch:
- Sales Overview
Track total sales, revenue, refunds, and subscriptions in one place. This helps you spot growth patterns and slow periods early. - Orders Report
Analyze orders by date, customer, or source to understand when and how people buy your digital products. - Revenue Report
Get a breakdown of gross sales, net revenue, refunds, discounts, and recurring income, so you always know your actual earnings. - Subscriptions Report
Monitor active subscriptions, renewals, cancellations, and retention if you sell recurring digital products or licenses. - Products Report
See which digital products or plans perform best, including top sellers and underperforming offers.
By reviewing these reports regularly, you gain clarity on your business health. These insights help you refine pricing, improve onboarding, reduce churn, and make smarter decisions as you scale your digital product business.
To scale a WordPress business faster, every business owner uses specific tools. You may need some of those tools for your online business. Here are the top business tools every WordPress business needs to scale their business faster.
Boost Your Digital Product Revenue: Proven Growth Practices
Once your digital products are live, growth comes from trust, clarity, and smart automation, not constant manual effort. These best practices help you increase conversions, retain customers, and scale sustainably.
- Clarify Value on Product Pages
Use clear copy, screenshots, short demo videos, and feature highlights. For digital products, clarity replaces physical touch and removes buying hesitation. - Leverage Social Proof
Add testimonials, embed social reviews, and case studies on your website. Trust grows when buyers see others succeeding with your product. - Use Automation to Increase Revenue
Apply automation to increase revenue by responding to customer actions at the right time. This boosts lifetime value and retention without adding manual work. - Track Reports and Optimize
Monitor sales, subscriptions, licenses, and customer behavior. Use insights to refine pricing, onboarding, and retention strategies. - Build an Affiliate Program
Create an affiliate program to promote your digital product for a commission. It expands reach without upfront marketing costs. - Collect Feedback Continuously
Use surveys, support requests, and reviews to spot friction points and improve your product. - Offer Reliable Support and Documentation
Offer Clear FAQs, guides, and fast customer support to reduce churn and increase renewals. - Create a Product Community
Create a membership community to engage users through discussions, updates, and a roadmap. Involving customers in the product journey builds loyalty and long-term growth. - Automate Your Emails: Use email automation to welcome new customers, send order confirmations, and recover abandoned carts.
With the right systems in place, selling digital products becomes repeatable, predictable, and scalable.
After a business starts running steadily, the next concern is ‘Growth’. Works the same way for a digital product as well. To learn how to grow your business in WordPress, check out this article.
From First Sale to Sustainable Growth
Your first digital sale proves demand. Sustainable growth comes from building systems that turn one-time buyers into long-term customers. Owning your platform lets you understand behavior, refine offers, and scale without adding operational weight.
When delivery, payments, licensing, automation, and reporting work together, growth becomes repeatable. You stop reacting and start optimizing, improving retention, increasing lifetime value, and making smarter decisions.
With the right foundation, growth happens steadily, predictably, and on your terms.
Samira Farzana
I’m a marketer and blog writer who loves data science. With a strong focus on analytics and strategy, I create content that helps brands understand their audience, improve performance, and grow with confidence.
Table of Content
Subscribe To Get
WordPress Guides, Tips, and Tutorials


Leave a Reply