

What is SPF Record and How to Setup SPF?


Did you know that emails are the first line of attack for over 90% of all cyberattacks? Danger lurks everywhere in the ever-changing world of email. Over the past few years, the number of phishing attempts and domain spoofing assaults has increased dramatically. And this is where adding an SPF record can be helpful.
With the help of SPF (Sender Policy Framework), senders can designate which IP addresses are permitted to send emails on behalf of a specific domain. As a result, spam filters are less likely to ban it because hackers find it less appealing. Enhanced email deliverability is another guarantee provided by SPF authentication.
In this blog, we’ll tell you what SPF is, its importance, and how you can easily set it up for your domain. Let’s begin.
What is SPF Record?
SPF, or Sender Policy Framework, is like a security guard for your emails. Just like DMARC and DKIM, It helps prevent spam, spoofing, and phishing by ensuring that only approved senders can send emails on behalf of your domain.
Let’s break it down with a simple example. Let’s say you use Amazon SES for your transactional emails and FluentCRM for your marketing emails. You can set up an SPF record in your DNS settings to inform the world that these services are authorized to send emails on your behalf.
Here’s what that might look like:
v=spf1 a mx include:spf.mtasv.net include:_spf.createsend.com ~allThis SPF record informs receiving mail servers that Amazon SES (spf.mtasv.net) and FluentCRM (_spf.createsend.com) can send emails from your domain.
So, when someone receives an email from you, their mail server can immediately determine whether it came from a server on your approved list. If it did, that is excellent! If not, the server may raise a red signal, marking the email as suspicious or false.
It’s like having a VIP list for your emails, guaranteeing they arrive safely and securely. If you use multiple IP addresses or subdomains for different sorts of emails, you may include them in your SPF record to keep everything organized.
Why Do You Need to Add an SPF Record to Your Domain?
Adding an SPF record to your domain adds more security to your emails. It should always be on top of your WordPress security checklist.
Sure, you can send emails without it, but having SPF in place gives Internet Service Providers (ISPs) a clear signal that you’re serious about email security, increasing the likelihood that your emails will arrive safely in your recipients’ inboxes.
But here’s the thing: SPF isn’t a magical solution for email delivery problems. It’s only one component of the puzzle. Combining SPF with other standards, such as DKIM and DMARC, establishes a stronger barrier against delivery issues and potential exploitation.
Now, let’s discuss SPF’s limitations—
The conventional SMTP protocol offers little protection for an email’s From field. That means anyone may impersonate your bank, boss, or grandmother with little resistance. SPF was designed to address this problem.
However, SPF does not check the From domain. Instead, it examines the return-path value used by receiving servers to communicate with sending servers regarding delivery issues. An email can pass SPF even if the From address is entirely bogus.
And here’s the kicker: even if a message passes SPF, it may still arrive in someone’s mailbox. The receiving ISP makes the final choice on delivery.
So, SPF is not perfect. But it’s a sensible, simple solution that makes it more difficult for malicious actors to spoof your domain. In addition, you have other tools such as DKIM (which ensures messages are not tampered with during transit) and DMARC (which adds an extra layer on top of SPF and DKIM to deter spammers).
When you employ these technologies together, you provide your brand and recipients with additional protection against dishonest persons.
Read: What is DMARC Record & How to Setup DMARC Record for Your DNS
How Do SPF Records Work?
Now that you’ve seen the big picture of SPF let’s look at an SPF policy in action and see how the process works.
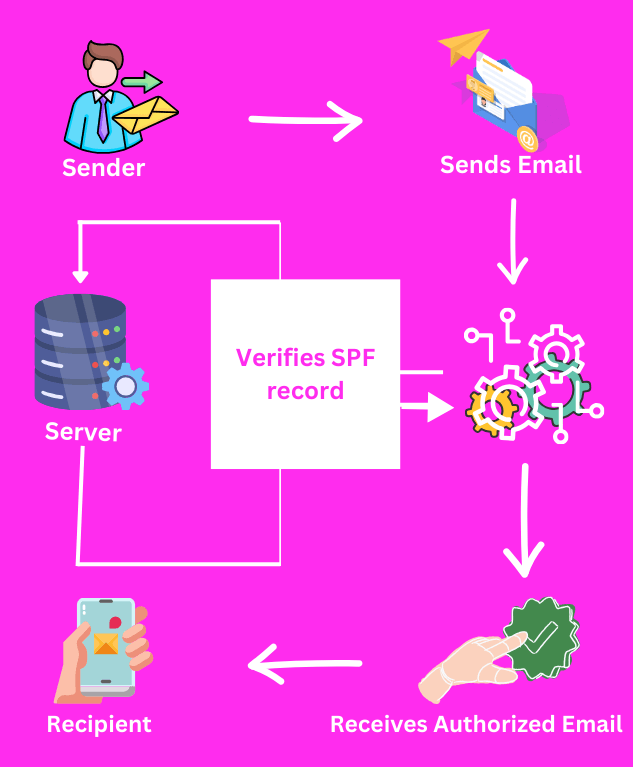
Let’s say you are sending an email from a server named 1.2.3.4. Now, this email isn’t just going out into the void—it’s got a return address, like [email protected].
When this email reaches its destination, the receiving mail server works.
First, it looks at the return address domain, in this case, example.com. It’s similar to looking up a contact in your phonebook—it checks the domain’s DNS records to determine if an SPF record exists.
Once the system finds the server in the SPF record, it examines the list of IP addresses permitted to send emails, such as .com, as specified in the SPF record.
The sending IP 1.2.3.4 corresponds to one of the permitted senders specified in the SPF record. SPF offers a giant thumbs up, suggesting that everything is well. However, if the IP addresses didn’t match, SPF would raise an eyebrow.
It’s similar to a bouncer at a club—if you’re not on the list, you might not get in. In email terms, this could mean that the receiving server becomes suspicious and deletes the email.
How to Setup SPF: Step-by-Step Process
Now that you know how critical it is to set up SPF records, it’s time to learn how to do that. And before we start, let’s just address the fact that it’s not one of the simplest security features. But it does not have to be rocket science, either. Here’s what you need to do. a
Step 1: Understand the Return-Path
Don’t forget that SPF is only concerned with the domain you use in the Return-Path, not the domain you use in the Form field. Now, you need to find out what Return-Path is used when you send emails.
Google is one of the email-sending services (ESPs) that will use your name in the Return-Path. In this case, you’ll need to set up SPF for your name.
In the Return-Path, some ESPs, like Amazon SES, will use their own name. In this case, your ESP must set up SPF; you don’t need to do anything else!

Step 2: Create Your SPF Record
Setting up an SPF record gets even easier if you use an email service provider. Most of the time, you can look through their support material to obtain the specific SPF information you require for your sending services.
Take Amazon SES, for example. Your SPF record for them can look like this:
v=spf1 a mx include:spf.mtasv.net ~allAssume you’re sending emails via numerous services—transactional emails, newsletters, and help desk emails from various sources. Regardless of the number of services, don’t forget to add all of them to the SPF record.
But the problem is a domain can only have one SPF text record. So, if you want to add another sender, tack them onto your existing record. Don’t make a completely new one—this is a typical mistake that might confuse genuine servers and interfere with SPF.
So, if you include three senders—let’s say FluentSMTP, Campaign Monitor, and FluentCRM—your SPF record will look something like this:
v=spf1 a mx include:spf.mtasv.net include:"_spf.createsend.com includes: fluentcrm.com. ~allEasy peasy, right? Add those senders to your SPF record, and you’re ready to go!
Step 3: Update Your Domain’s DNS Settings
You’ll have to upload your new SPF record to your domain’s DNS settings! This is accomplished by navigating to your hosting provider and adjusting the DNS settings there. This method may appear slightly different depending on your hosting provider. We’ll use Namecheap as an example.
Log in to your hosting provider and enter your domain’s DNS settings.
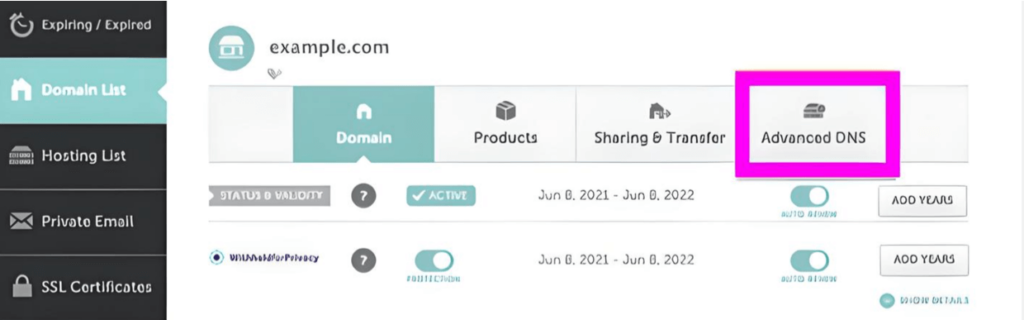
Here’s where you’d alter your DNS settings for a domain hosted on Namecheap.
You can create a new DNS record here. Select TXT record as the Type, enter a @ in the Host box, then paste your SPF record from above into the value field.

And that’s it! You have successfully added FluentSMTP as an authorized sender to the example.com domain!
How Does SPF Record Syntax Work?
SPF record syntax may appear convoluted and confusing initially, but it is relatively simple once you understand the fundamentals.
Here’s a breakdown of the essential aspects (also known as “mechanisms”) in an example SPF record entry of v=spf1 a mx:spf.mtasv.net includes _spf.createsend.com ~all.
The first thing to consider is the syntax of the SPF record. It is divided into the version prefix and one or more mechanisms:

The version prefix is rather simple. Because a domain can have many TXT records, this is how parsers determine which record to use for SPF validation.
The mechanisms make up the second section of the SPF record. These describe different rules for checking for SPF.
What are the SPF Qualifiers?
The methods can include a prefix specifying what action to perform when a sending IP address fits the qualifier. The default qualifier is +. So, the FluentSMTP SPF record is identical to:
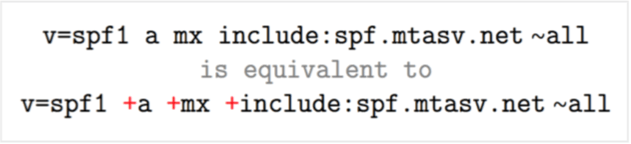
Let’s look over the available qualifiers:
- Pass: If an IP addresses a mechanism with this qualifier, it passes SPF. It’s like providing a stamp of approval.
- Fail: SPF fails if an IP address matches a mechanism with this qualifier. Consider it a red flag—it implies that the email may not be legitimate.
- SoftFail: SPF fails softly when an IP address matches a method with this qualifier. The host should still receive the email, but it is marked as an SPF failure. It’s a polite caution.
- Neutral: The scales do not tip in either direction if an IP matches a mechanism with this qualifier. It is a neutral posture, with neither passing nor failing SPF.
So, these qualifiers contribute to the outcome of SPF checks by indicating if an IP’s alignment with a mechanism fits the criteria for passing, failing, soft failing, or remaining neutral in SPF validation.
What are the SPF Mechanisms?
The “A” Mechanism

Say you’re sending an email from IP address 1.2.3.4, and the domain is “example.com.” Now, this approach will succeed if “example.com” has an A record that points to the same IP address, 1.2.3.4.
In layman’s words, it’s like saying, “Hey, I’m sending this email from this IP address, and guess what? The domain I’m sending from likewise points to the same IP address.” SPF certification confirms a perfect match, indicating it’s ready to go!
The MX Mechanism

Imagine that each domain that handles email has its own set of rules contained in MX (Mail Exchange) records. These records notify which email servers can handle emails from that domain.
Let’s imagine you manage your emails with a service like Google Apps. Instead of manually entering each Google server’s IP address into your SPF record, utilize the MX technique. This ingenious little method automatically green-lights all the servers specified in your MX records, saving you from manually updating your SPF record every time Google adds or updates a server.
It’s like getting a VIP pass to Google’s email servers. Once you’ve correctly configured your MX records, the mx mechanism in your SPF record acknowledges them all, ensuring that your emails arrive at their destination without issue. It’s a convenient approach to keep things going correctly without continually fiddling with your SPF configuration.
The Include Mechanism

Consider this scenario: You are the proud sender of an email, and it is coming from the IP address 1.2.3.4, which represents the domain “example.com.” Assume the SPF record for “example.com” has a reference to spf.mtasv.net.
Here is the magic: If the IP address 1.2.3.4 matches and passes the SPF check against the SPF record for spf.mtasv.net (as indicated in the SPF record for “example.com”), this procedure is successful. In layman’s words, it’s like saying, “Hey, I’m sending this email from 1.2.3.4 to ‘example.com,’ and you know what? The SPF record for ‘example.com’ confirms my identity by pointing to spf.mtasv.net, and my IP address also matches that.”
In SPF jargon, this process receives a green light and passes. It’s all about verifying that the IP addresses match and work well with the relevant SPF record.
The All Mechanism

It functions similarly to the catch-all rule, matching everything that prior processes have not matched in the SPF record.
When all mechanisms are activated, it is equivalent to saying, “Okay, if none of the other rules apply, here’s what we’ll do.” In this situation, if an email reaches all mechanisms without being matched by earlier rules, it is normally marked as SoftFail.
Consider this scenario: an email arrives and has reached the end of the SPF record without discovering a specific rule that applies to it. The all mechanism takes over and says, “Well, we’re not sure about this one, so let’s mark it as a SoftFail.” It takes a careful approach—it does not reject the email outright but indicates that it may not match SPF criteria.
The all function works as a safety net, handling emails that do not fit neatly into other rules with caution.
Conclusion
We can’t emphasize enough the importance of ensuring proper website security. And that concern can be answered if you set up an SPF record for your DNS.
We hope you found this blog helpful in enlightening you about setting up SPF. If you face any difficulties setting up SPF for your DNS, don’t forget to reach out in the comments.
Sakhawat Showrabh
Table of Content
Subscribe To Get
WordPress Guides, Tips, and Tutorials


Leave a Reply