

How to Upload WebP Images in WordPress (with/without Plugin)


Page loading speed plays a key role in a website’s SERP rankings. As a result, marketers and SEOs pay special attention to website speed optimization.
Now, a website’s speed depends on several factors, such as technology used, hosting, CDN, etc. However, images can affect individual page speed significantly.
Most marketers use low-resolution images, minify images, and so on, to speed up page loading speed. However, it’s best to serve images in WebP format.
WebP is a modern image format that can shrink image size by 25–35% without sacrificing quality. According to Google developers, while WebP reduces image size by up to 34% compared to other common formats we commonly use, it doesn’t reduce the image quality as others do.
Want to know how to upload WebP images in WordPress?
We’re here to assist! Read this article for complete information on WebP images and how to add one.
Let’s start with the fundamentals!
Frequently asked questions about WebP images
Compressing images to lower their size and speed up the website is a very common technique. However, in most cases, compressing results in a decrease in image quality. WebP can be a boon in this regard!
How?
Let’s look up the answers to a few frequently asked questions regarding WebP!
What are WebP images?
WebP is an advanced format created by Google that allows images, including blog-featured images, to be compressed without compromising quality. Google first introduced the WebP image format in September 2010. On January 30, 2021, Google launched a polished and upgraded version of WebP.
Since the WebP images are tinier, they will help your webpage run better. You can quickly convert JPEG, PNG, and GIF files to a 25–34% smaller WebP format. Furthermore, the WebP image format supports:
- Lossy compression: Lossy compression shrinks files by simply removing certain data. For example- JPEG format
- Lossless compression: Lossless compression minimizes file size while preserving raster values. For example- LZ77
- Transparency: Lossy RGB supports the use of the Alpha channel, a feature that is currently absent in all other formats
- Animation: It supports animated images in true color
- Metadata: WebP accepts EXIF and XMP metadata
- Color Profile: WebP includes an embedded ICC profile for the color profile
What are the advantages and disadvantages of using WebP images in WordPress?
The following are the major benefits of using WebP images on your WordPress website:
- Speed up site loading: WebP images will help your WordPress site load more quickly than other image formats like PNG and JPEG. Furthermore, WebP is served in bytes —which intelligently saves your hosting bandwidth.
- Maintain high image quality: WebP images are up to 34% tinier than PNGs and JPEGs. Despite that, it maintains the quality of the image. As a result, WebP files are a good choice for adding more attractive images to your WordPress website without sacrificing speed.
- Save traffic: Using more images on a page can sometimes take longer to load, which is bad for the user experience. You can speed up your WordPress website’s loading time and attract more traffic by using WebP images.
Many popular platforms, such as Twitter and Safari, still don’t support the WebP image format. Apart from that, some social media platforms, software, and web hosting providers don’t support WebP.
However, the good news is that WordPress began to support WebP image files since its 5.8 version update!
Subscribe to Our Newsletter
Get our blog articles, tutorials, and information delivered to your inbox!

Which web browsers support WebP?
WebP typically offers better quality and compression than JPEG, GIF, and PNG. It scores 92 on the browser compatibility test. Here is the list of well-known browsers that supports WebP:
- Chrome
- Firefox
- Safari
- Opera
- Safari on iOS
- Chrome for Android
- Opera Mobile
- Firefox for Android
- Samsung Internet
WebP vs. JPG vs. PNG
Google is always searching for new ways to improve the browsing experience. As part of their mission, they chose to release a smaller image format because page size is a major component of total processing time.
Since smaller images use less bandwidth and battery power, they are more crucial when a reader accesses your website on a mobile device.
Google estimates that WebP images are roughly 30% smaller than PNG and JPEG images at the same visual quality. Compared to PNGs and JPEGs, WebP images are 26 and 25-34% tinier.
Now that you know how WebP can improve the browsing experience and boost your search engine rankings let’s get to how to upload WebP images in WordPress.
Upload WebP images in WordPress without using a plugin
While you can’t upload WebP images directly on WordPress, there’s an easy way to enable WebP image uploads by editing your function.php file. Simply follow the steps below to enable WebP image uploads on WordPress:
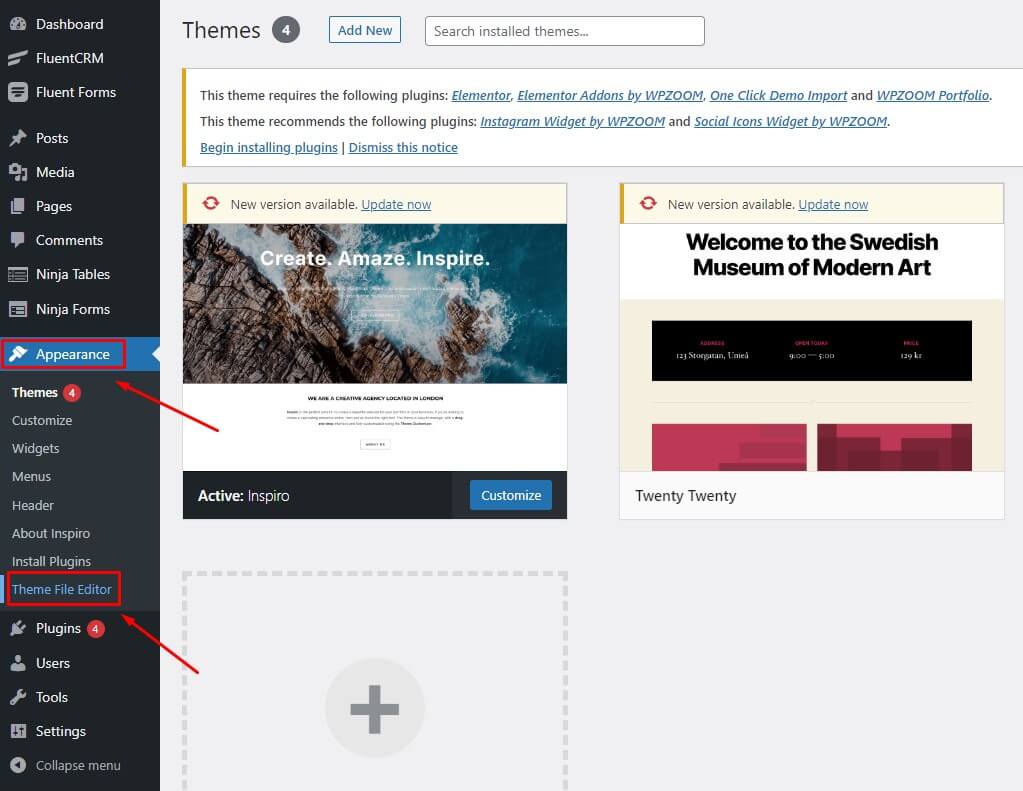
Step one: Go to your WordPress Dashboard.

Step two: Select ‘theme file editor’ from the ‘Appearance’ menu.
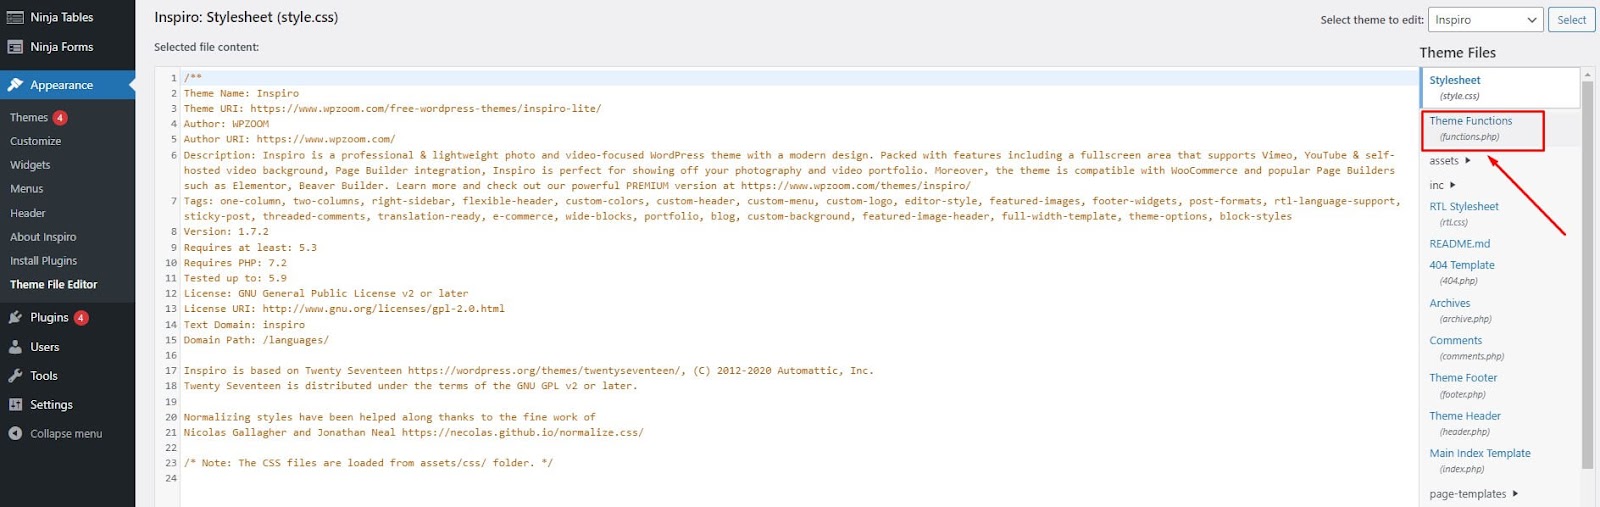
Third step: Access functions.php by clicking Theme Functions.
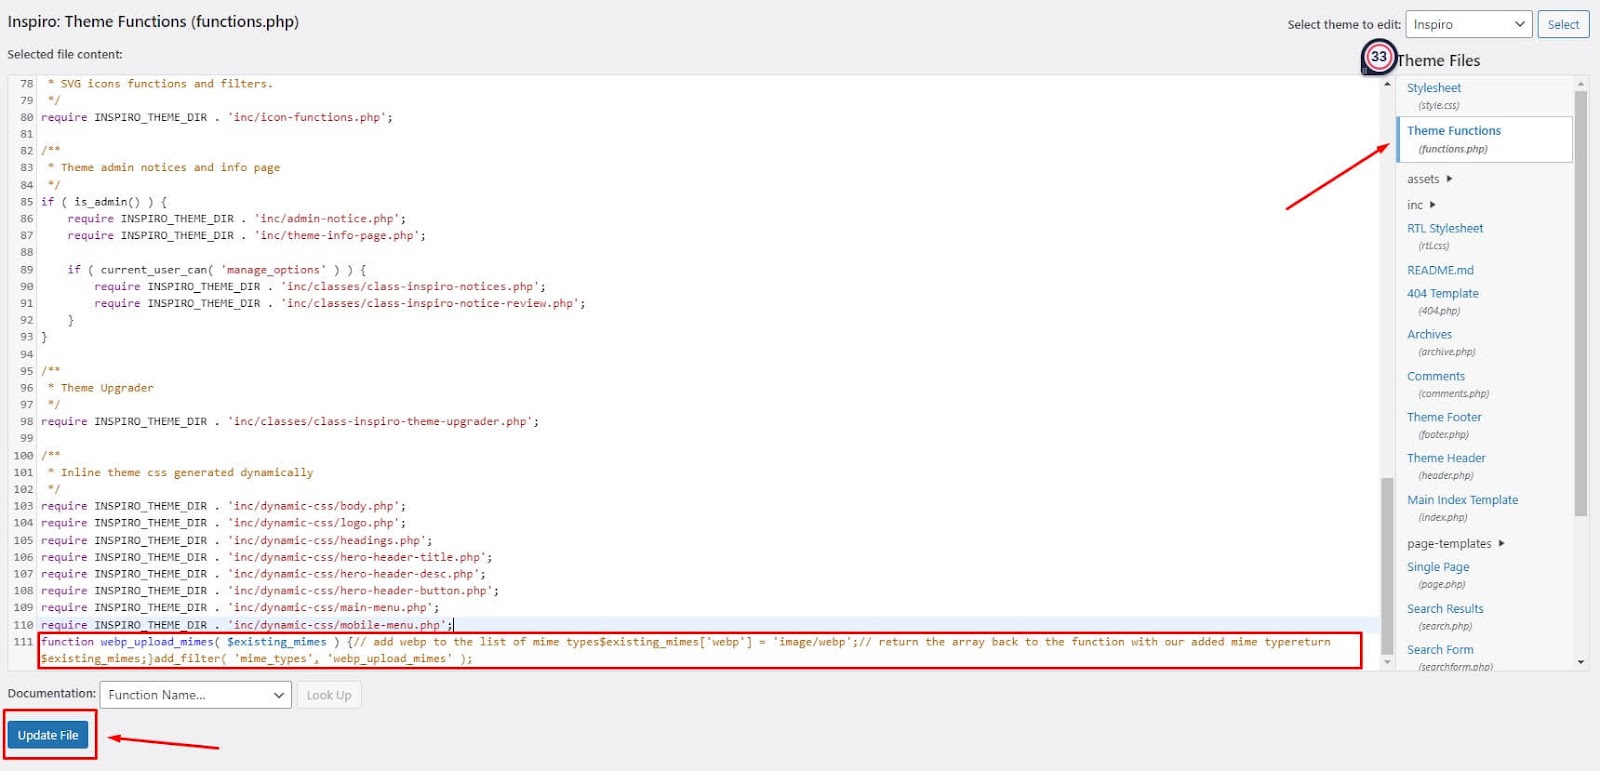
Step four: At the end of the file, copy and paste the code below and save it.
function WebP_upload_mimes( $existing_mimes ) {// add WebP to the list of mime types$existing_mimes[‘WebP’] = ‘image/WebP’;// return the array back to the function with our added mime typereturn $existing_mimes;}add_filter( ‘mime_types’, ‘WebP_upload_mimes’ );
Congratulations! Now, you can upload WebP images in WordPress very easily, just like JPEG and PNG.
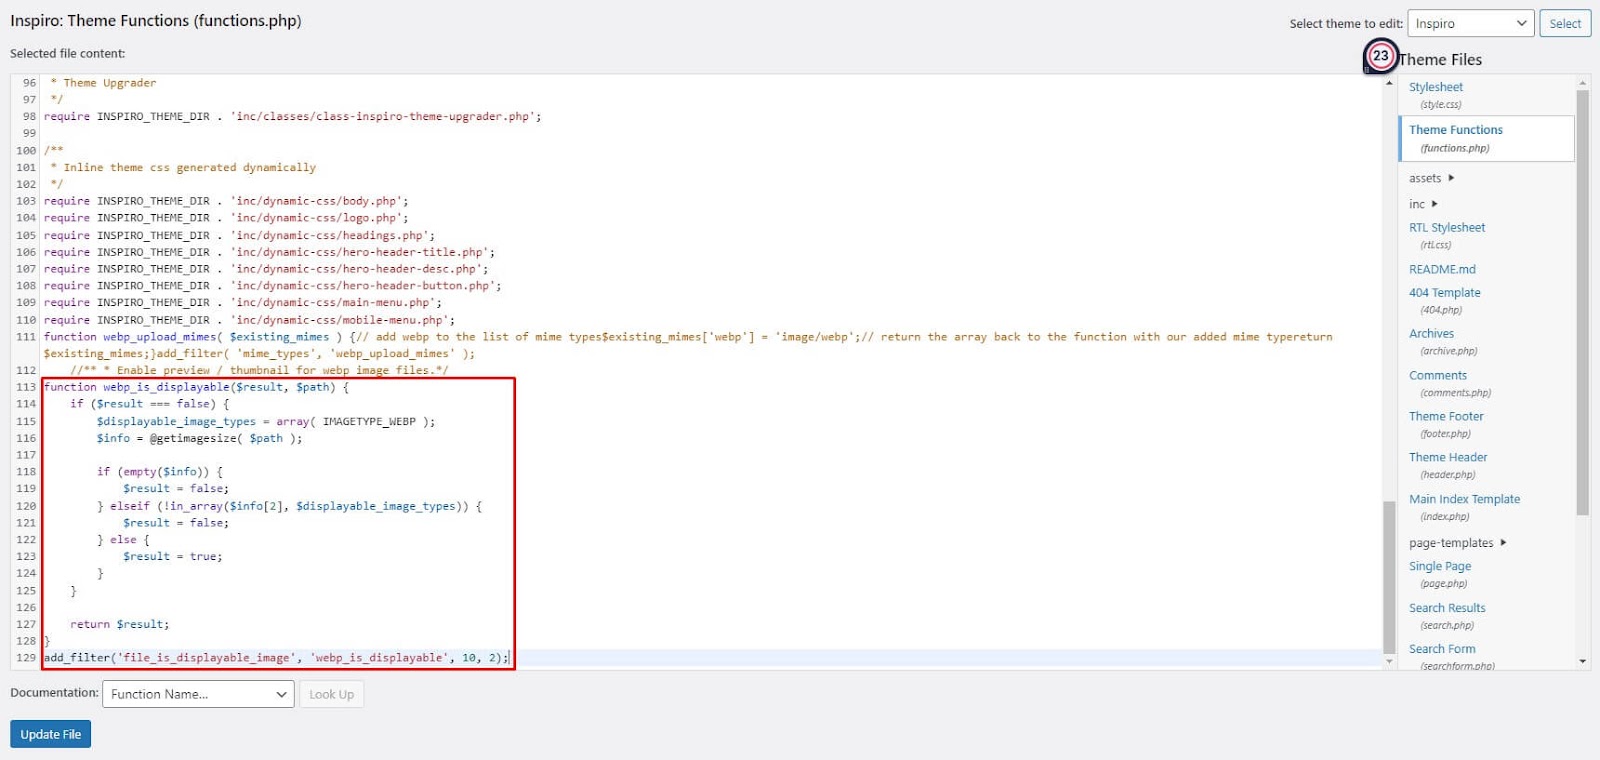
- Note: If you want to see the preview when selecting Media / Library, you need to include the following code in the same functions.php file:
//** * Enable preview / thumbnail for WebP image files.*/function WebP_is_displayable($result, $path) { if ($result === false) { $displayable_image_types = array( IMAGETYPE_WebP ); $info = @getimagesize( $path ); if (empty($info)) { $result = false; } elseif (!in_array($info[2], $displayable_image_types)) { $result = false; } else { $result = true; } } return $result;}add_filter(‘file_is_displayable_image’, ‘WebP_is_displayable’, 10, 2);
Upload WebP images in WordPress using a plugin
The most straightforward way to upload a new WebP image or convert your existing images into WebP Format is by using a plugin for your WordPress website. If you are new to WordPress, we strongly advise you to use a plugin rather than do it manually.
To upload WebP images into WordPress, follow these steps:
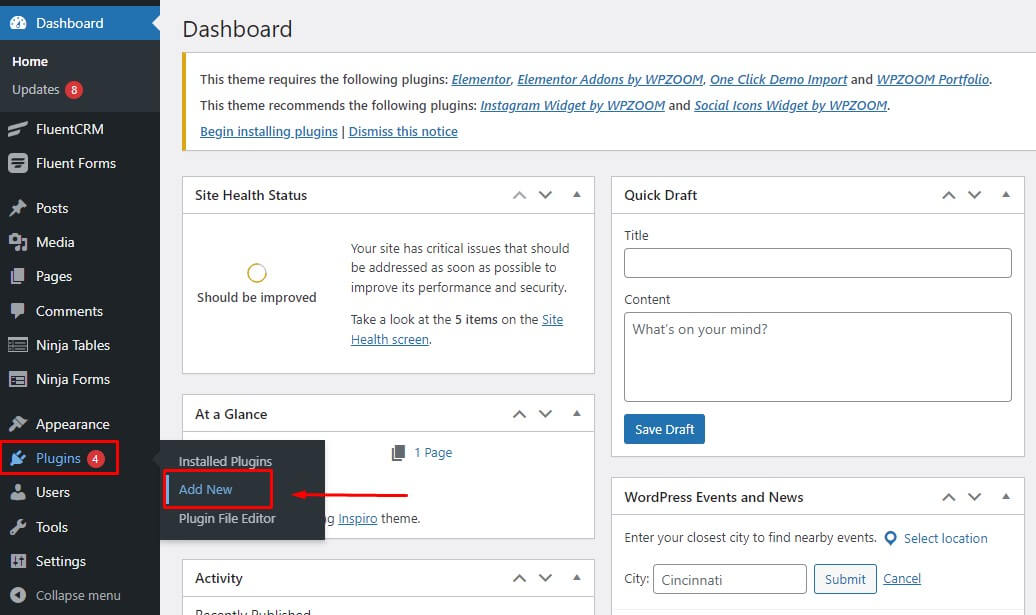
Step one: Go to the Plugins option on your WordPress dashboard and select ‘Add New Plugin’.
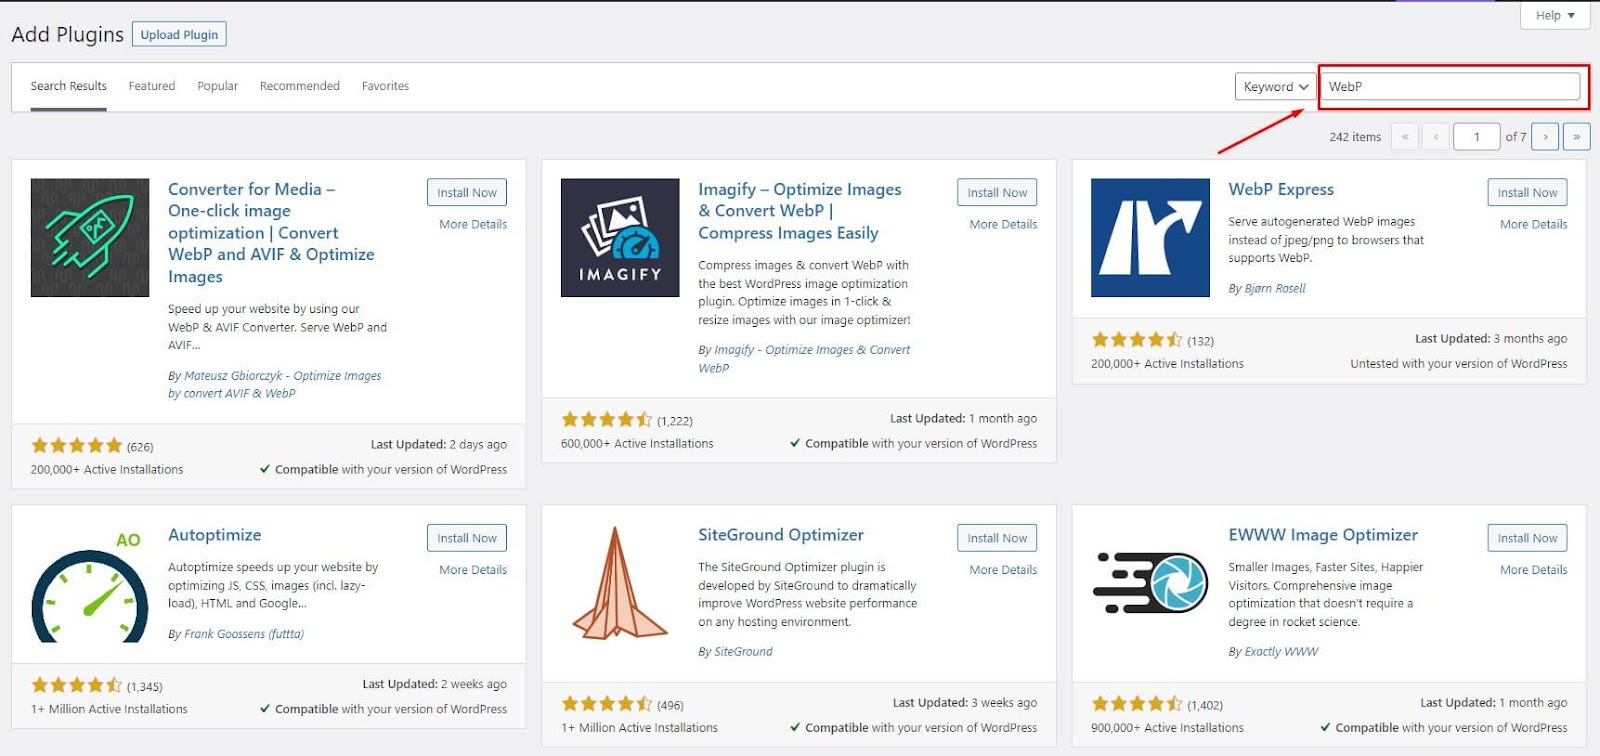
Step two: In the search box, search WebP.
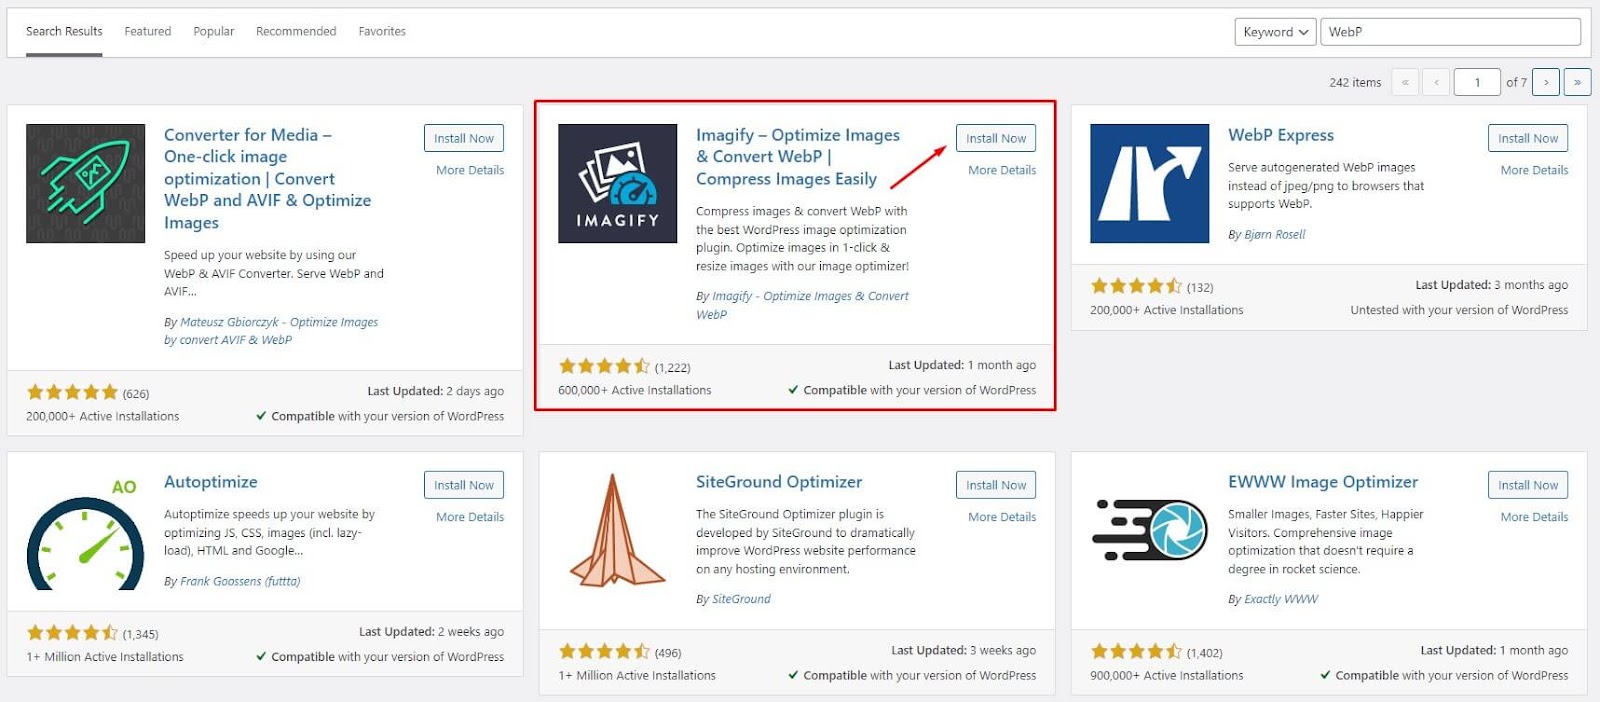
Step three: Choose one of these Plugins and click the Install button. We’ve decided to use Imagify this time.
Now, it’s time to configure this plugin.
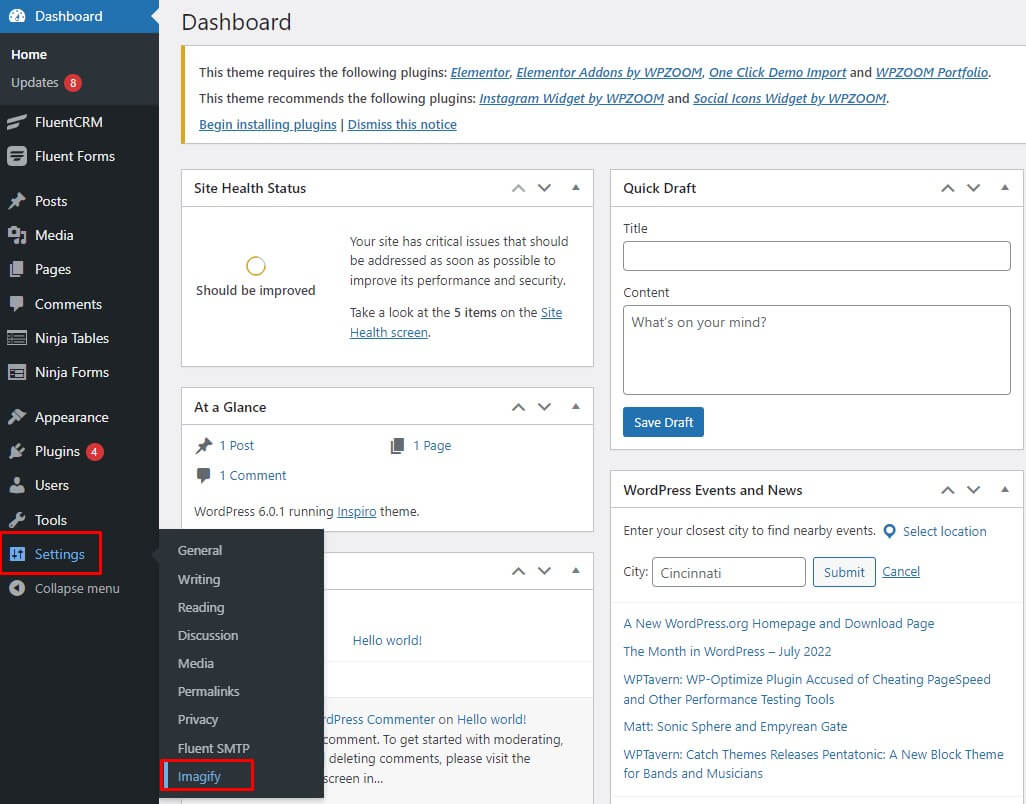
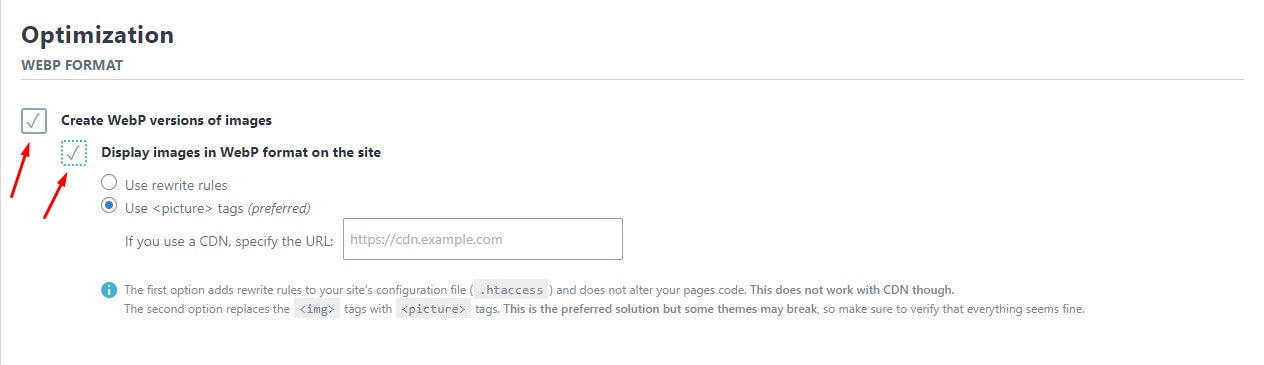
Step four: Go to your WordPress dashboard’s settings and select Imagify, which will take you to a page similar to the one below.
Step five: It will first request an API key. You can easily obtain one by clicking the ‘Create A Free API Key’ button.

Step six: Now, scroll down to the “Optimization” section and check the boxes displayed below. Don’t forget to hit the save button.
Well done! You can now upload WebP images to your WordPress website.
Wrapping up
This was our small attempt to guide you through the process of uploading WebP images in WordPress, both with and without using a plugin. Before using a WebP image on your WordPress website, weigh its advantages and disadvantages. And don’t forget to let us know if we missed anything in the comments section.
Have a wonderful day!
Download FluentSMTP
(100% Free)
Get the most powerful SMTP plugin for free and hit the recipient’s inbox with your WordPress emails

Nader Chowdhury
Table of Content
Subscribe To Get
WordPress Guides, Tips, and Tutorials


Leave a Reply