2 Easy Methods to Create Table in WordPress Without Plugin
WordPress powers 43.2% of all websites on the internet. Thanks to its inherent simplicity and various advantages, many people are building WordPress websites every day.
People use WordPress for everything, including blogging, operating an online store, and collecting donations for charities. However, to showcase different information precisely and professionally on their websites, they often need tables.
Although various plugins are available to assist them with this, most of these tools are not free! And many small businesses can’t even consider this as an option!
So, is it possible to create a table in WordPress without plugins and for free?
— Yes, it’s very much possible! In this blog, we’ll show you two of the easiest ways of building a table that doesn’t require any plugin.
Method 1: Using WordPress table block user
This method is for those who want to avoid going through the trouble of using any other software.
WordPress has a built-in table builder; using this method, you can build a table without leaving your WordPress dashboard.
But how?
Well, follow the following steps to add a table using WordPress table builder.
Step 1: Go to the page or post where you want to create a table. Click on the ‘+ icon,’ search for the Table, and select it.
Step 2: A block will appear where you can set the number of rows and columns. After putting in the numbers, click on ‘Create Table.’
Step 3: Congratulations! Your Table is now ready, and all you’ve to do is fill it with the required pieces of information.
However, once your Table is ready, you can do a bit of customization, add or remove columns and rows, etc., using the table block editing toolbar.
How?
Let’s proceed to the next section to discover!
How to use the toolbar of the table block in WordPress?
The toolbar of the table block editor lets you do versatile table customizations.
Let’s start with how you can add or remove columns and rows. Click on the area shown in the picture, and you can choose what to do from the drop-down menu.
Next comes alignments. After filling the Table, you’ll see that the texts are aligned from left to right. To change that, click on the marked area in the picture below.
You can even change the alignment of the Table itself by clicking on the Change Alignment button.
Check out the right side to style the Table and customize other settings. Click on the ‘Block’, and you’ll get a few styling options. Play with those until your Table looks exactly what you want.
Method 2: Using Google Docs
You’re probably familiar with Google Docs already. It may be one of your most frequently utilized tools for creatively crafting your thoughts and sharing them with your readers or clients.
Won’t it be cool if we assure you that you can design a table in WordPress using Google Docs?
- Well, you can certainly create a table using Google Docs in WordPress, and we’ll show you how!
For those unfamiliar with Google Docs, it is one of the best online word processors, if not the best. You can create and customize many things in Google Docs, including a table.
Let’s see how to create a table in Google Docs and use it in WordPress.
Step 1: Go to Google docs and click on ‘Blank‘ to start a new document.
Step 2: Give the word document a name. Now, to add a table, click ‘Insert’ and select ‘Table.’ You can also choose the number of columns and rows from here.
Step 3: You’ll find a blank table on your Google Docs page. Fill the Table with the necessary information.
Step 4: If you want to add or remove a column or row, you can do that by right-clicking on the Table.
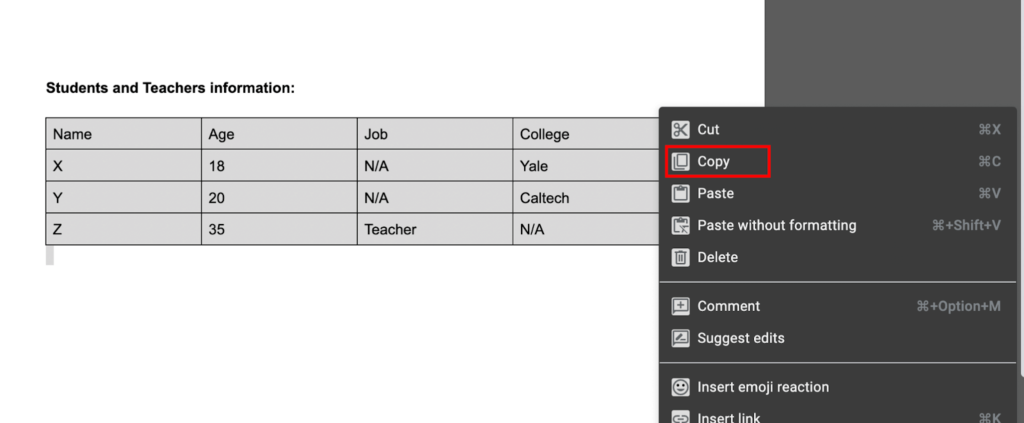
Step 5: Once you are happy with the Table, simply copy it—Press Ctrl+a, then Ctrl+c to copy the Table. You can also copy by double-clicking and then selecting Copy.

Step 6: Next thing you need to do is paste the copied Table into your desired WordPress page.
Double-click on where you want to paste the Table and click on Paste. You can also paste the Table by pressing the Ctrl+v buttons.
Congratulations! You’ve successfully added a table to your WordPress website with the help of Google Docs!
Too basic?
Hopefully, now you’ve realized that you don’t need a plugin to create a table on WordPress. The default features are enough for a basic table. However, if you want to create an advanced table with a lot of data and advanced designs, you need to use a plugin.
There are several table plugins for WordPress, but we recommend Ninja Tables. Ninja Tables is the most popular WordPress table plugin with over 70K active installations.
Ninja Tables offers various features such as drag-and-drop, advanced customization, unlimited colors, import-export, multimedia insertion, custom filtering, conditional formatting, value transformation, Fluent Forms integration, WP Post integration, WooCommerce integration, Google Sheets integration, etc.

Interested in Ninja Tables?
The lifetime deal is now available at a massive discount! Grab it before it expires!
Now, go and create your eye-catching tables and present exact facts to your readers or customers more professionally. All the very best!
Sakhawat Showrabh
Table of Content
Subscribe To Get
WordPress Guides, Tips, and Tutorials


Leave a Reply