

How to Sell Physical Products Online: Proven Strategies for Modern Businesses [+ Pro Tips]


Selling physical products online sounds exciting until you actually try to set everything up. From managing products and inventory to handling payments, shipping, and customers, things can quickly feel overwhelming, especially when you’re just getting started.
The good news is, you don’t need a complex or expensive system to build a successful eCommerce business. With WordPress, you can create a flexible online store that gives you full control over your products, data, and growth, without juggling multiple third-party tools.
In this step-by-step guide, you’ll learn how to sell physical products online with WordPress, from setting up your store to managing products, payments, and reports.
Let’s start.
Why Should You Use WordPress for Your eCommerce Business?
Managing an online store often means juggling multiple tools, one for products, another for payments, several third-party plugins for emails, reports, and automation. As your product list grows, this setup becomes harder to manage, more expensive, and prone to errors.
But WordPress simplifies this by bringing everything into one place. From managing multiple products and handling orders to processing payments and tracking performance, you can run your entire eCommerce business from a single dashboard.
This all-in-one approach gives you more control, better flexibility, and a scalable foundation without unnecessary complexity.
Sell Your Physical Products Online with WordPress: Step by Step
WordPress offers several popular options for selling both physical and digital products, including WooCommerce and other third-party services.
In this guide, we’ll walk through the process using FluentCart as the example, as it provides a clean, all-in-one setup for managing products, payments, orders, and reports without adding unnecessary complexity.
Step 1: Getting Started with WordPress
Before selling physical products online, make sure your WordPress website is ready with a domain and hosting. After installing FluentCart and completing the basic setup, such as store name, currency, and default pages, you’ll have the foundation needed to start adding products.
Once this is done, you can move straight to setting up your physical products.
Step 2: Product Types & Creation (Physical Products)
Once your store setup is ready, the next step is adding your physical products. This is where most of your selling success comes from. A well-configured product makes it easier for customers to understand what you’re selling, trust your store, and complete their purchase.
In this step, you’ll learn how to create a physical product properly, from basic details to inventory and shipping.
Add a New Physical Product
From the FluentCart dashboard, go to product>add product, add a product title, and choose Physical Product as the product type. This unlocks important options like inventory tracking, variations, shipping, and taxes, things every physical product needs.
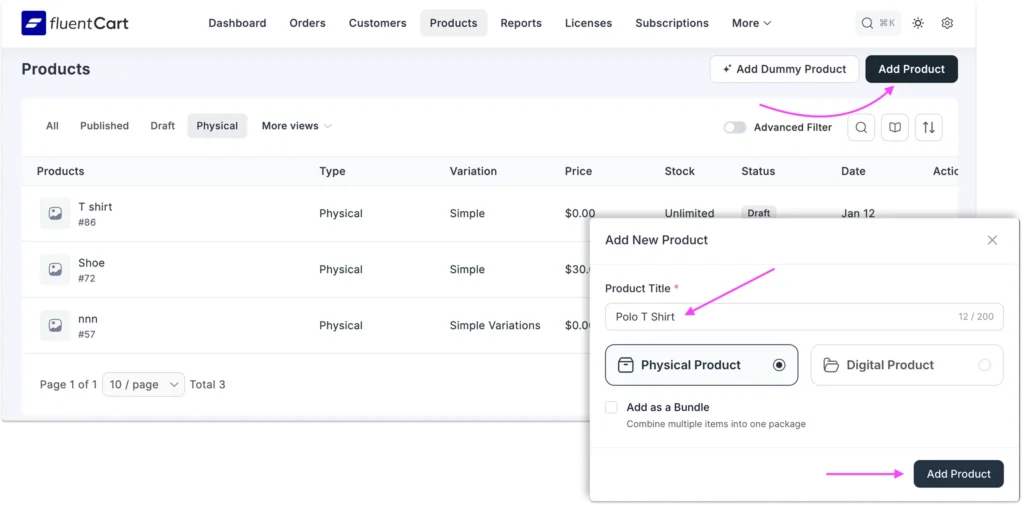
Once selected, you’ll be taken to the product editor, where you can configure all product details in one place.
Add Basic Product Information
Start with the core details customers will see first.
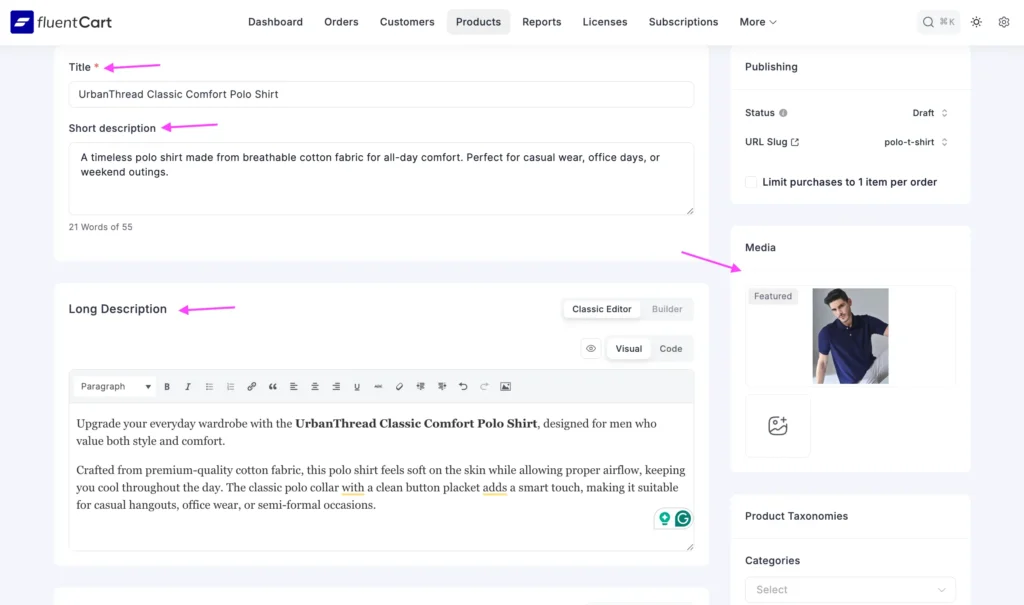
- Product title: Use a clear, descriptive name that tells customers exactly what the product is. This title appears on the shop page, product page, cart, and checkout.
- Short description: Write a brief summary of the product. This should quickly explain what it is and why it’s useful. Keep it simple and easy to scan.
- Long description: This is where you add detailed information, such as: Product features, Materials or specifications, How to use or care for the product. Also, you can format this content visually using blocks like images, columns, lists, or tables, or keep it simple with plain text. The goal is clarity, not complexity.
- Add Product Images and Media: Images play a major role in selling physical products online. You can set a featured image that represents the product clearly. Also, you can add additional images or videos to show different angles, details, or real-life use. High-quality visuals build trust and reduce buyer hesitation.
Organize Products with Categories and Brands
To keep your store easy to browse, organize products properly.
- Categories help group similar products (for example, “Men’s Shoes” or “Accessories”)
- Brands help customers identify products from a specific manufacturer or label
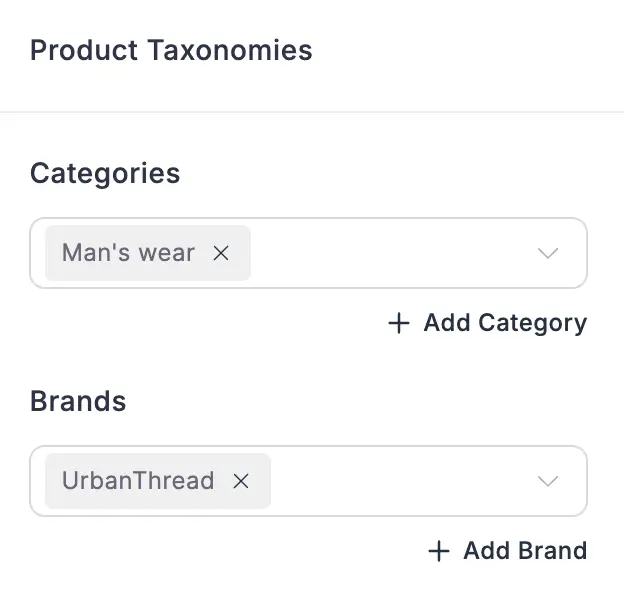
A good organization improves navigation and helps customers find products faster. Next, you’ll set the price for your physical product. How you do this depends on whether your product has multiple versions, like different sizes or colors, or is a single item.
Set Pricing and Product Variations
Choose it simply from the dropdown on the top right corner in the pricing section. If your product doesn’t have variations, you can set a single price. For example, a coffee mug or a book usually has only one price.
Here’s what to configure:
- Price: The main selling price of the product
- Compare at price: Optional; shows a higher original price with a strikethrough to indicate a sale
- Cost/profit tracking: Optional; lets you enter the cost of the item so your system can calculate profit automatically
On the other hand, if your product comes in different options, like t-shirts in multiple sizes or colors, you can create variations. Each variation can have its own price, image, and stock level.
For example, a red medium t-shirt could have a different price than a blue large t-shirt. You can also:
- Assign a unique image for each variation
- Set a sale price for a specific variation
- Track inventory for each version separately
This way, customers can easily select the version they want, and your store can manage stock and pricing for each option accurately.
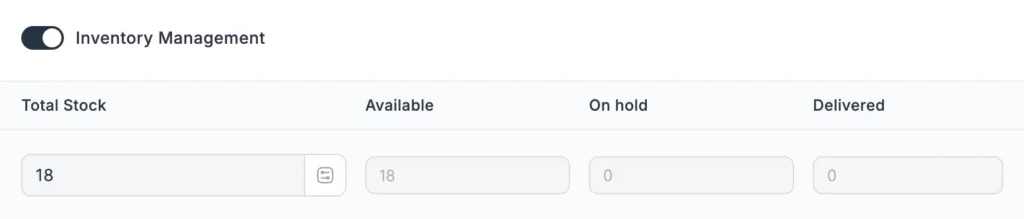
Manage Inventory
Inventory tracking is essential to avoid overselling.
- Enable stock management for the product or each variation.
- Set the total stock and update it as inventory changes.
- Track available stock, items on hold (pending orders), and delivered units.
You can also manually adjust stock at any time if new products arrive or items are removed.
Assign a Shipping Class
A shipping class helps you apply location-based shipping costs for your products. This is especially useful if you ship to multiple regions with different rates.
For example, you might create a shipping class for “NYC Zone” with one cost, and another for “Other States” with a different rate. Once assigned, the shipping cost will automatically apply at checkout for customers in that region.
Shipping classes work together with your store’s shipping zones and methods to control where and how your products are delivered, ensuring customers always see the correct delivery cost.
If you want to dive deeper into shipping setup and see all the options, you can check out the shipping classes guide for more details.
Apply Taxes (If Required)
A tax class lets you apply specific tax rules to your product. This ensures the correct tax rate is automatically added during checkout based on your store settings.
You can either select an existing tax class or create a new one if needed. For more details on how tax works in your store, you can check out the tax documentation.
Publishing Your Product
Before your product goes live, you can control its visibility and key purchasing rules from the upper-right corner of the same page.

- Status: Choose whether the product is live (Published) or saved as a Draft to continue editing later.
- URL Slug: This is the product’s web address. It’s automatically created from the product title, but you can edit it if needed.
- Default Variant: If your product has multiple options (like size or subscription plans), you can pre-select one for customers when they first visit the page.
- Group By: Organize how variations are displayed. For example, group subscription plans by “Monthly” or “Yearly” to make comparisons easier.
- Limit Purchases to 1 Item: You can restrict customers to buying only one of this product per order, useful for exclusive items or event tickets.
Once everything is set, click Save or Update to make your product live. You can also preview the product page to see how it will appear to your customers before publishing.
New to selling online? If this is your first time launching an online store, you may find this guide helpful 👉 A Beginner’s Guide to Selling Digital or Physical Products.
Step 3: Manage Your Store
Once your physical products are live, you need to keep your store organized. Managing your store doesn’t have to be complicated; just focus on the essentials.
- Track Orders: View all incoming orders, update their status (Processing, Completed, or Cancelled), and make sure customers get notifications.
- Manage Customers: You can easily manage customers by checking customer details and purchase history. Send updates or follow-ups if needed.
- Orders Management: View, filter, and update all customer orders. You can simply manage orders, process payments, issue refunds, and track order status to make sure everything runs smoothly.
- Monitor Inventory: Keep an eye on stock levels and update when necessary to prevent overselling.
- Check Store Settings: Ensure payment, shipping, and tax settings are correct for smooth operations.
A simple daily check of orders, stock, and customer queries will keep your store running efficiently without overwhelming you.
Step 4: Payment Setup
After your products are ready and your store is live, the next step is setting up payments so customers can buy your products smoothly. FluentCart makes it easy to manage payments and customize the checkout experience.
Go to FluentCart settings > Payment settings, and you will find all the payment gateway settings for payments.
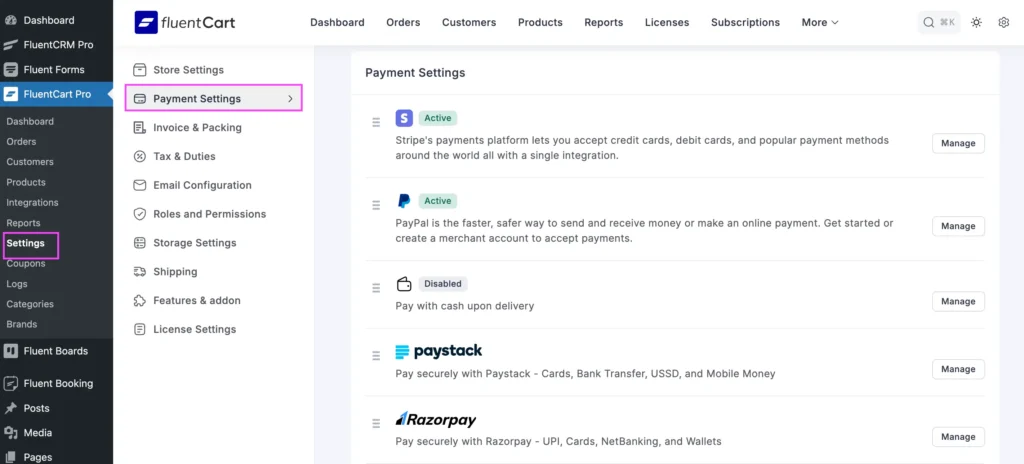
FluentCart supports multiple payment gateways, giving your customers flexible options to pay. You can enable:
- Stripe: Accepts credit/debit cards and global payments.
- PayPal: Secure online transactions and money transfers.
- Paddle: Complete payment solution for worldwide sales.
- Mollie: Popular in Europe, supports cards and local payment methods.
- Paystack: Helps businesses in Africa accept payments from anywhere.
- Cash on Delivery (COD): Let’s customers pay when they receive the order.
Once your payment gateways are enabled, make sure to set accepted currencies, configure payment confirmation emails, and adjust checkout rules to create a smooth experience for your customers. Before going live, test the payment process to ensure everything works correctly.
A proper payment setup is important because it allows customers to pay securely and easily, reduces abandoned carts, builds trust, and creates a better overall shopping experience.
Planning to scale beyond one product? Selling physical products is just the start. To learn how WordPress supports long-term growth, automation, and profitability, explore How to Grow Your Business within WordPress in 2026.
Step 5: Monitor Your Store with Reports
Once your store is up and running, it’s important to keep track of how your business is performing. FluentCart provides reports that give you insights into sales, customers, and inventory.
Key Reports to Track
- Dashboard Overview: A quick summary of your store’s key metrics at a glance.
- Orders Report: See sales trends by customer, day, or hour to understand order patterns.
- Revenue Report: Track gross sales, net revenue, refunds, taxes, shipping, and discounts.
- Refunds Report: Monitor refund activity and understand how it affects your store.
- Subscription Report: If you offer recurring products, track active subscribers, revenue, and retention.
- Product Report: Analyze individual product performance, including units sold and top-sellers.
Regularly reviewing your reports helps you understand your store’s health, identify trends, and make data-driven decisions. By using these insights, you can optimize your products, improve customer engagement, and plan for future growth.
Boost Your E-Commerce Revenue: Best Practices and Tips
Once your store is up and running, these strategies can help you increase sales, retain customers, and scale your business:
- Automate Your Emails: Use email automation to welcome new customers, send order confirmations, and recover abandoned carts.
- Invest in High-Quality Visuals: Use professional images and videos to showcase your products from multiple angles. Great visuals increase trust and conversion.
- Leverage Social Proof: Embed customer reviews, ratings, and testimonials on product pages to build trust and encourage purchases.
- Upsell and Cross-Sell Products: Suggest related or complementary items during checkout to increase average order value. Use bundles, discounts, or “customers also bought” sections.
- Monitor Reports and Optimize: Regularly review sales, inventory, and customer behavior reports to make data-driven decisions for pricing, promotions, and product selection.
- Start an Affiliate Program: Let affiliates promote your products by creating an affiliate program in exchange for a commission, expanding your reach without upfront marketing costs.
- Collect Customer Feedback: Regularly ask for reviews or surveys to understand pain points and improve your products.
- Offer Exceptional Customer Support: Provide live chat, detailed FAQs, and fast responses to customer support to improve the shopping experience and encourage repeat purchases.
- Provide Clear Return Policies: A simple and transparent return/refund policy builds customer trust and reduces purchase hesitation.
- Build an Online Product Community: Create an online community where your customers can connect, share feedback, and discuss your products. Communities encourage engagement, loyalty, and word-of-mouth promotion.
Your Journey to Selling Physical Products Starts Here
Selling physical products online with WordPress doesn’t have to be complicated. Once you have your website ready, the process becomes straightforward—add your products, set pricing and inventory, configure payments, manage orders, and track performance with reports.
If you’re just starting out, start small. Focus on a few products, learn how your store works, and improve step by step. As you gain confidence, you can expand your catalog, automate workflows, and scale your business more efficiently.
With the right WordPress tools and a clear setup process, managing physical product sales becomes easier, more organized, and far less overwhelming, allowing you to focus on growing your business instead of juggling systems.
Looking Ahead: If you want to see what successful businesses rely on, check out Top 9 Small Business Tools in WordPress Every Business Owner Needs to Scale Faster to understand how everything fits together as your store grows.

Ratul Ripon
I enjoy turning complex ideas into simple ones and engage with people through my writing. With a background in Oceanography, I create technical content that’s both easy to understand and interesting.
Table of Content
Subscribe To Get
WordPress Guides, Tips, and Tutorials


Leave a Reply