
How to Send an Email Newsletter on WordPress (Without Leaving Your Dashboard!)


Sending a newsletter from WordPress might sound easy. But if you’ve tried it, you know it can get messy.
Sometimes your emails end up in the spam folder, or they don’t reach everyone on your list. If you’re doing business-to-business marketing, these problems can be even tougher.
Maybe you’ve hit send and then wondered if anyone actually got your message. Or maybe you’re confused about how to create a newsletter inside WordPress without getting stuck.
If that sounds like you, this blog is made for you. Let’s begin!
How to Send an Email Newsletter on WordPress (Step-by-Step Guide)
Ready to take control of your email marketing? Let’s dive into a simple, step-by-step guide on how to send a newsletter right from your WordPress site!
Install and Configure an Email Marketing Plugin
To get started, you’ll need a plugin that handles email marketing inside WordPress.
Instead of relying on third-party platforms, you can manage everything inside WordPress using FluentCRM, a powerful plugin built specifically for WordPress users. It keeps things simple, fast, and fully under your control.
Here’s how to get started:
- Install FluentCRM: Go to your WordPress dashboard, head to Plugins > Add New, search for FluentCRM, then click Install Now and Activate.
- Run the Setup Wizard: Right after activation, FluentCRM will guide you through a quick setup wizard. You’ll:
- Add your company info
- Configure your email settings (sender name, email, etc.)
Automate Newsletters, Segment Your List, and Boost Engagement. Connect, Convert, Repeat—All in One Place!
*We have written a complete guide to email marketing using FluentCRM inside WordPress. Feel free to check it out!
Build and Manage Your Subscriber List
Starting fresh? You can create a signup form and start collecting subscribers right away.
You can use Fluent Forms, the process is even smoother. Since it pairs naturally with FluentCRM, you won’t any third-party connectors or complex setups.
Just choose where you want the form entries to go like a specific List or Tag and you’re all set.
- Go to your FluentCRM dashboard and switch to the Forms tab. Then, click Create a New Form

2. Choose a form from the template or create a new one, exactly how you want

You’ll see a success message with a shortcode to embed the form anywhere. You can also preview, customize the layout, or edit integrations as needed.

You can now display the form on your website to collect your visitors’ email addresses. Simply paste the shortcode wherever you want it to appear.

The form will be shown on the website.
Pro Tips: Your website’s landing pages, blogs, footer, and sidebar are some great places where people are likely to leave their email addresses!
But if you already have contact list, then you don’t need to go through this at all. Just:
- Go to Contacts > Import.
- Upload a CSV or import contact data from plugins like WooCommerce, LearnDash, or MemberPress.
- Map fields correctly (Name, Email, etc.).
- Assign them to the correct List or Tag (e.g., “Newsletter Subscribers”).

By the way, you can organize your Lists and Tags by:
- Creating different lists for broad segments (like customers, leads, and blog subscribers).
- Using Tags for behavior or interest-based targeting (like “Download: eBook” or “Product: Perfume A”).
Pro Tips: You can add a tag from your form builder screen by clicking the + icon next to the Tags field while creating the form.
Segment Your Users
You may think this is not a ‘must-do’. But unfortunately, it is. The better you segment your contacts, the better the rate of conversion.
To segment your contacts, you need to go to the dashboard> Contacts>Choose ‘List‘, ‘Tag‘, ‘Status‘> Click ‘Filter‘ Button.

Or, you can enable ‘Advanced Filter’ to get more precisely filtered contacts. You can export those contacts, or out those contacts under another ‘Tag’ or ‘List’.
Design Your Newsletter
Now comes the fun part! Creating your first email!
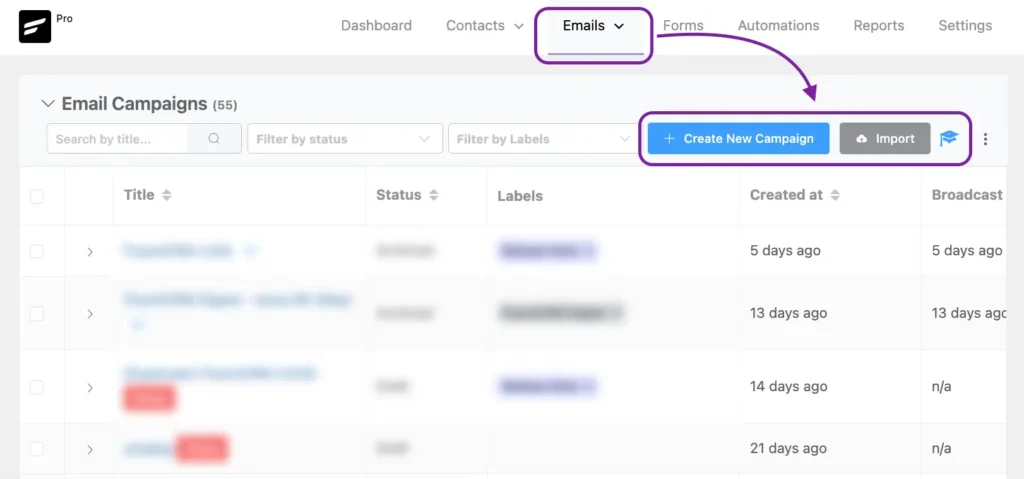
To start off, go to your dashboard > FluentCRM > Email Campaigns > Create New Campaign.
This will take you to the campaign builder where you’ll walk through a few simple steps. It’s also possible to import campaigns from here if you want.
Compose Your Email
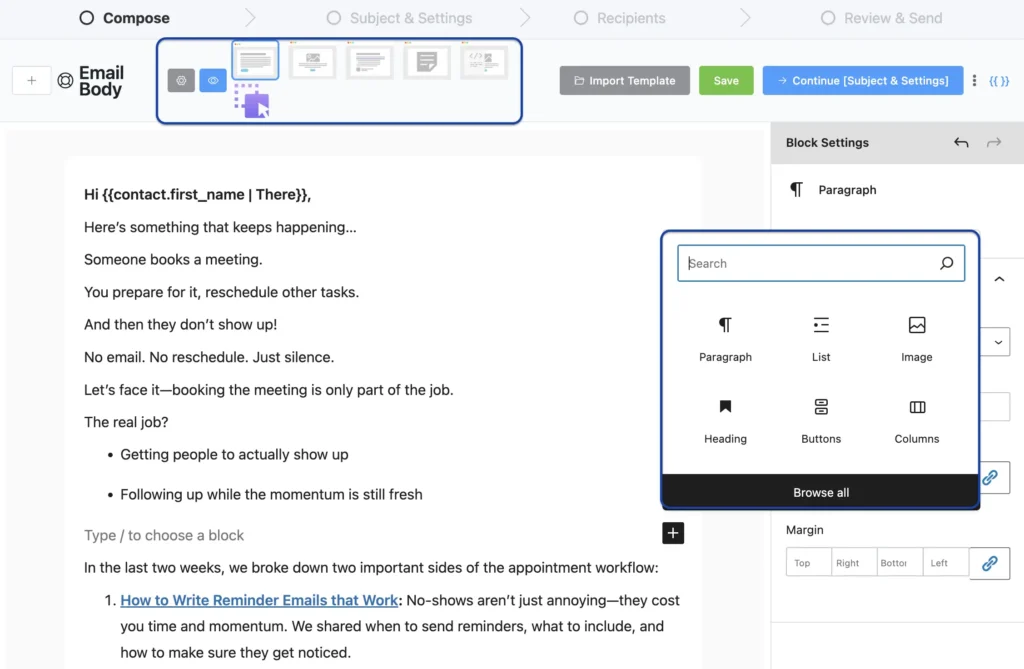
FluentCRM offers a simple, WordPress-native block editor that lets you design beautiful emails. You can use headings, paragraphs, lists, images and customize your email’s appearence just the way you want. It’s also possible to choose various template alignment options or simply go with HTML Templates.
That said, you can create any kind of email you want using FluentCRM.
You Can Also Use Drag & Drop Email Builder
FluentCRM gives you a visual editor that’s designed to be simple, even if you’ve never built an email before.
You can drag in pre-made blocks to structure your email, like:
- Text blocks for headlines, paragraphs, or body content
- Image blocks to showcase products, banners, or branding
- Button blocks to add clear calls-to-action (like “Shop Now” or “Read More”)
- Columns to organize content neatly
- Dividers and spacers for clean, visual breaks
No coding. No confusion. Just click, drag, and drop the elements you need.
You can also style each block changing colors, fonts, padding, and alignment—to match your brand.
Or… Skip the Blank Screen with Ready-to-Use Templates
Not sure where to start with your email design? No worries! FluentCRM has you covered.
Instead of building everything from scratch, you can choose from a set of professionally designed, built-in email templates.

Whether you’re sending a newsletter, announcing a product, or sharing an update, just pick a template that fits, update the content, and hit send.
These templates are fully customizable, mobile-friendly, and designed to look clean and modern right out of the box. A few of them are for pro version, but most of them are available for free.
So if you’re short on time (or ideas), templates are the perfect shortcut!
Make It Personal with Merge Tags
This is where your emails go from “generic” to “genuinely personal.”
With dynamic tags, you can automatically pull in subscriber details, like their first name, last name, or even custom fields into any part of your email.
For example:
- Instead of writing “Hi there,” you can write Hi {contact.first_name},
- You can reference recent purchases, locations, or signup sources using other tags

These tags are replaced automatically when the email is sent.
This small touch builds connection and often improves engagement rates (like more opens or clicks).
Pro Tips: Make sure to preview on all devices, including desktop and mobile devices.
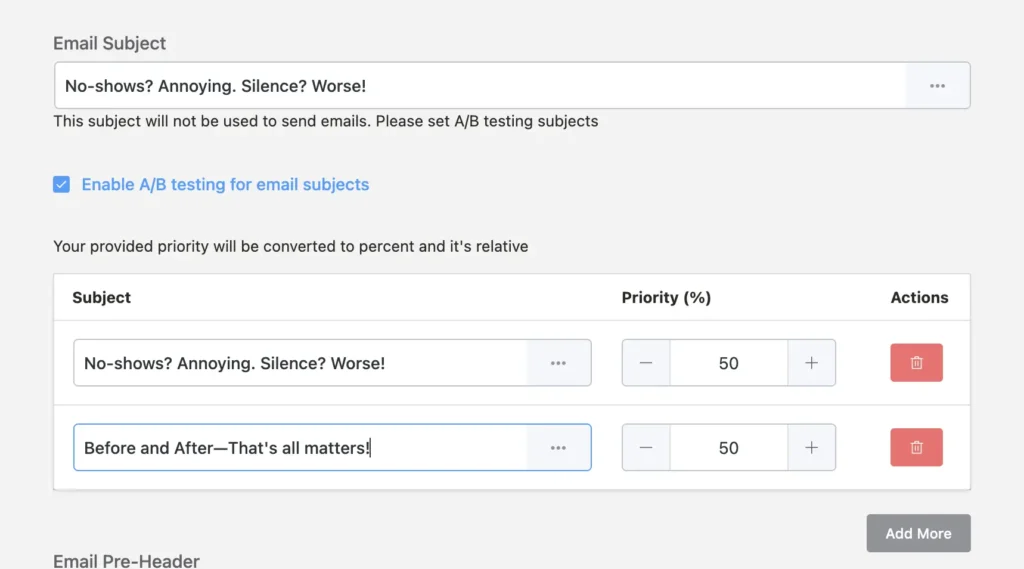
Write or Test Your Subject Line
Start with a subject line that grabs attention. Keep it short, clear, and relevant. This is your first impression, so make it count. If you want, it’s also possible to A/B test your subject line easily.
Set Up Campaign Tracking
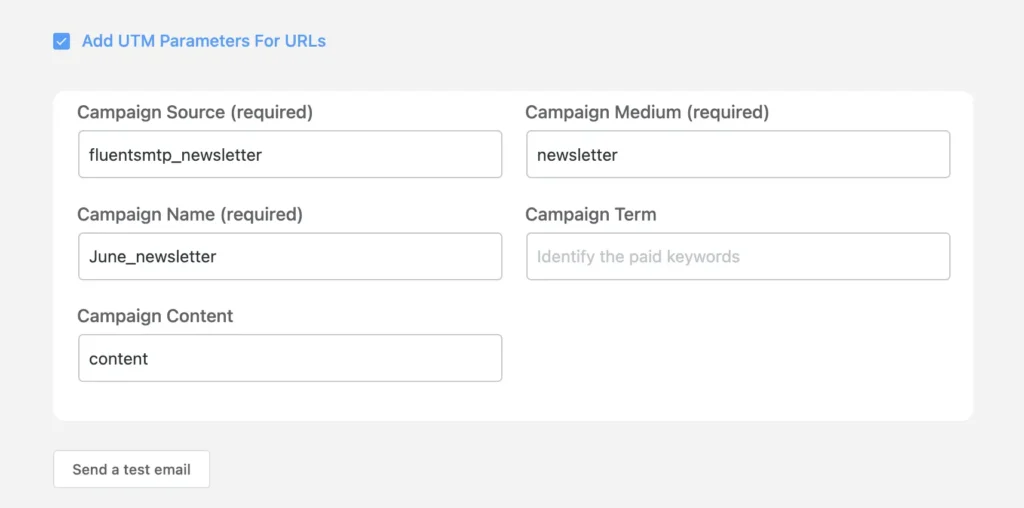
Setting up a newsletter campaign is one thing, but what if you wanted to dig deeper into your email campaign’s data?
That’s where UTM parameters come in. To set this up, all you have to do is choose the appropriate tracking terms and enter inside FluentCRM. By doing so, you’ll ensure FluentCRM adds the tracking code to all your links. And once your campaign is sent, you’ll be able to determine a campaign’s true performance inside Google Analytics.
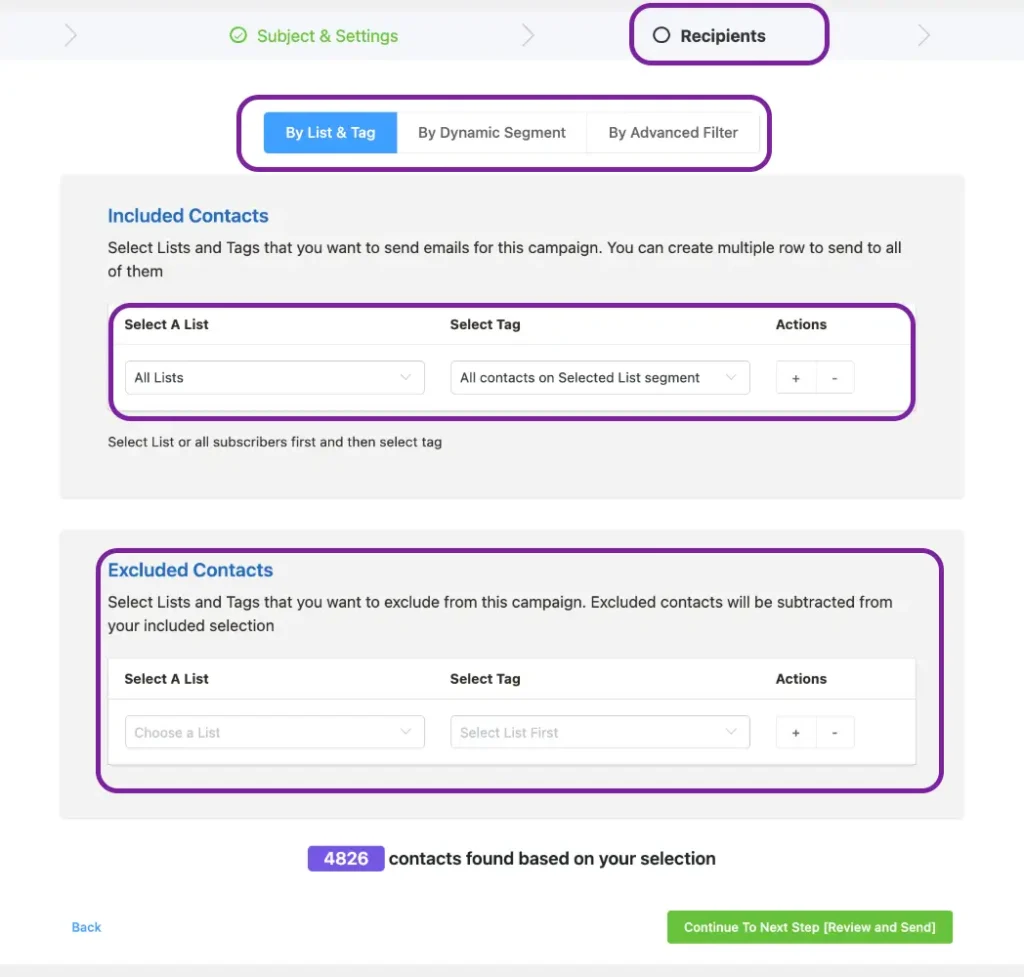
Choose Your Recipients
In the Recipients section, you’ll decide who gets the email.
You can send it to an entire List (like “Newsletter Subscribers”), or specific Tags (like “Recent Customers” or “Webinar Signups”), or even create a Custom Segment if you want more control.
Send or Schedule It
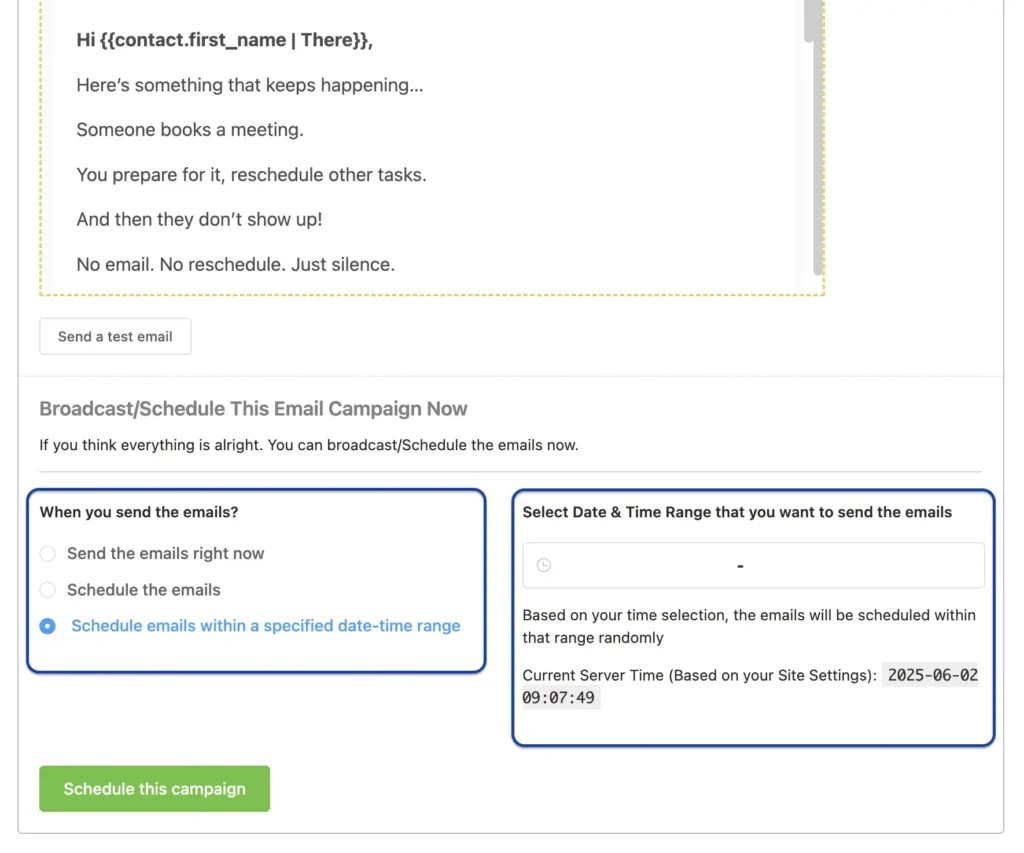
Happy with how everything looks? Perfect!
Now it’s time to send your email!
You can either send it right away or schedule it to go out at a time that works best for your audience.
Pro Tips: The best times to send emails are usually mid-morning (around 10 AM) or early afternoon (1–3 PM) on weekdays when people are most likely to check their inbox.
You should avoid late nights or weekends when open rates tend to drop.
Just set your preferred date and time, and FluentCRM will take care of the rest!
By the way, you can also send a test email to yourself to check its deliverability, format, how it looks, etc.
(Alternatively) Send Recurring Email Campaign of Latest Post Block
You already have enough on your plate. Sending the same email every week shouldn’t be another thing to worry about.
But here’s the fun part:
FluentCRM’s Recurring Campaign and Latest Posts Block lets you automate everything. Your latest content gets shared on time, every time, without lifting a finger!
You can send emails automatically based on your latest blog posts, release notes, or updates. You just need to set it up once, and FluentCRM will take care of the rest!
Here’s how you can do it:
- Set how often it should run—daily, weekly, or monthly.
- Go to your WordPress dashboard → FluentCRM → Emails → Recurring Campaigns.
- Click Create New Recurring Campaign
- Give your campaign a name (like “Weekly Blog Update”).

Once you’re in the email editor, write ‘/‘ > choose ‘Latest Post Block‘. Then, fix ‘Time’, ‘Post Number’, ‘Post View’, etc, as you want.

Finally, click save to start automating your recurring newsletter!
Monitor Performance and Optimize
Sending your email is just the first step; now comes the exciting part: seeing how it performs!
FluentCRM’s built-in reports show you easy-to-understand stats like:
- Open rate: How many people actually opened your email
- Click rate: How many clicks on links or buttons inside
- Unsubscribes: Who decided to leave your list (this helps you know what not to do next time)
- Bounces: Emails that didn’t reach the inbox

These numbers help you understand what’s working and what’s not.
For example, if your open rate is low, maybe try a catchier subject line next time. If people aren’t clicking, maybe your call-to-action isn’t clear enough or the button isn’t visible.
The best part? FluentCRM keeps all this info in one place, right inside your WordPress dashboard, no need to open extra tools or apps.’
Beyond optimizing campaigns, keeping your system lean also matters — if you no longer use virtual machines for local testing, this guide on how to uninstall Parallels on Mac explains how to remove it properly and free up system resources.
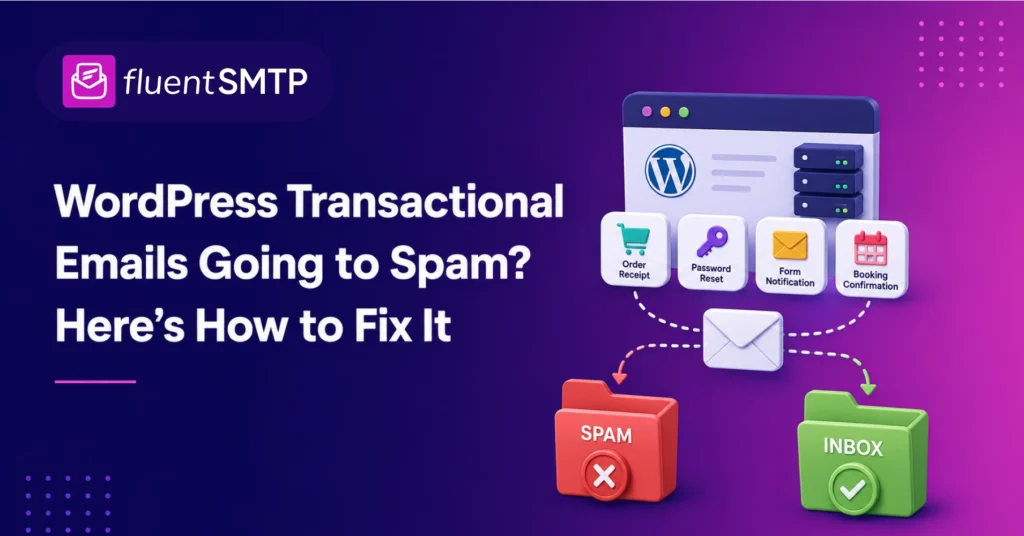
[Important] Keep Your Emails Out of Spam!
While creating an email campaign or newsletter is easy, here’s something you may not realize right away.
If you haven’t configured email deliverability, your emails might not even make it to inboxes.
And that’s a serious problem, right?
By default, WordPress uses PHP mail to send emails (like your newsletters, confirmations, or form replies).
Guess what? Most email providers see these messages as suspicious. So they either block them or send them straight to spam.
That means your subscribers might never see your emails.
To save yourself from this nightmare, you need to use an SMTP, which is a trusted way to send emails that actually reach inboxes instead of spam.
We discussed all about WordPress email settings and how to keep your emails out of spam. Be sure to check it out!
Best Practices to Create an Email Newsletter
Sending a newsletter is an easy part. But making people open it, read it, and take action? That takes a bit more thought.
Here are some simple tips to help you do it right:
- Know your readers. Think about what they like? What do they need?
- Focus only on one topic. Don’t mix too many things in one email.
- Write like you talk. Use easy words. Keep it friendly and simple.
- Make the subject short and clear. Try to grab attention.
- Use buttons, space, and font properly to make sure your message is easily readable on a phone
- Test links, fix any errors before sending a test email to yourself.
- Keep it short. Keep it helpful. That’s how you create a good newsletter.
If you follow these steps, your newsletter will be simple, helpful, and more people will want to read it
Feel free to reach us in the comment section, in case you need us to guide you manually!
Ready, Set, Send: Build Connections with Every Email
Alright, you’ve got everything you need to start sending awesome newsletters straight from your WordPress site with FluentCRM.
Just remember: it’s not about sending more emails, but sending emails that actually connect. Know your people, keep it simple, and speak like you’re talking to a friend.
And don’t stress if it’s not perfect at first. Check your stats, learn what clicks, and keep tweaking. That’s how you turn good newsletters into great ones.
Now, it’s your turn. Hit send, build that relationship, and watch your community grow one email at a time!
Frequently Asked Questions
Samira Farzana
I’m a marketer and blog writer who loves data science. With a strong focus on analytics and strategy, I create content that helps brands understand their audience, improve performance, and grow with confidence.
Table of Content
Subscribe To Get
WordPress Guides, Tips, and Tutorials


Leave a Reply