
How to Set Up Email Automation in WordPress


Managing, nurturing, and converting leads manually isn’t just time-consuming, it’s nearly impossible at scale. Email marketing demands precision:
- Sending the right message
- To the right audience
- At the right time
Without automation, it’s hard to keep up with the repetitive tasks and responsibilities involved.
In this guide, we’ll show you how to set up email automation in WordPress using FluentCRM, a complete, popular solution built to work 24/7, even while you sleep!
Get Started with FluentCRM Automation in WordPress
Before diving deep into your first automated sequence, let’s get familiar with FluentCRM’s automation builder and understand the basic ideas behind it.
Setting Up FluentCRM
First things first: you’ll need the FluentCRM plugin. You can install the free version directly from your WordPress dashboard.
For the full power of automation and the features we’ll be exploring, FluentCRM Pro is required. You can purchase the FluentCRM Pro directly from the official FluentCRM website.
Then, simply install and activate it through your WordPress dashboard. Once activated, you’re all set to begin your email automation journey with powerful tools right at your fingertips.
Also, for reliable email delivery, we highly recommend installing and configuring FluentSMTP – a free, essential plugin to ensure your emails reach the inbox.
Understanding Automation Basics
As you begin your detailed automation journey, it’s important to understand the four core components that work together to create intelligent, responsive marketing sequences:
| Component | Description | Example |
| Trigger | The event that initiates an automation sequence | A new form submission or product purchase |
| Action | The step was taken in response to a trigger or condition | Sending an email, applying a tag |
| Condition | A logical check (Yes or No) that determines the next step based on contact behavior or data | Checking if a link was clicked |
| Goal | The desired outcome that, when achieved, removes a contact from the current automation funnel | Completing a purchase or filling a survey |
If you’re still confused, this tutorial is here to help make the whole process easier to understand.
How to Build Your First Lead Nurturing Automation
Now, it’s time to put them into action by creating a common and highly effective automation: a lead-nurturing sequence triggered by a form submission.
Here, we’ll use Fluent Forms as your automation gateway because this powerful WordPress form builder integrates perfectly with FluentCRM, capturing lead data directly within your WordPress ecosystem.
Note: Other integrations like Convert Pro, MailOptin, and FluentBooking are also available for lead generation with FluentCRM.
So, let’s build your first automation-
Step 1: Create Your Lead Capture Form
The very first step to setting up your automation funnel is to create a form that will capture lead information.
From your WordPress dashboard, navigate to FluentCRM Pro > Forms. Then click the “Create a New Form” button located at the top right. Here, you’ll also have the option to select from pre-made templates to speed up the process.

Once you click, a Create a Form pop-up will appear where you’ll define your form’s basic settings:
- Form Title: Give your form a clear, descriptive name (e.g., “Lead Nurture For ABC Ltd.”).
- Add to List: Select the contact list where new submissions will be added (e.g., “New Leads”).
- Add to Tags: Apply relevant tags to automatically segment these new contacts (e.g., “Lead”).
Pro Tip: Enable Double Opt-In to eliminate false contacts, reduce bounces, and boost deliverability for a genuinely engaged audience.
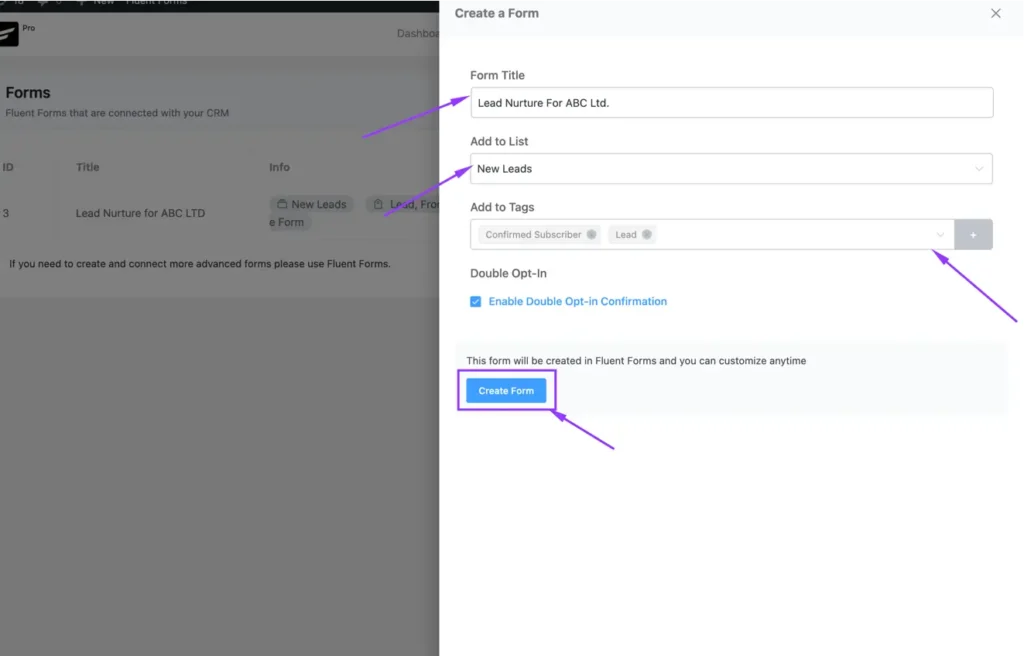
After setting everything up, just click “Create Form” to connect the lead data to your CRM and instantly trigger personalized automations.
Step 2: Build a Lead Automation Funnel
With your lead capture form ready, it’s time to build the automation funnel that will nurture your new contacts.
From your FluentCRM dashboard, navigate to the “Automations” tab in the top menu. Then click the “New Automation” button.
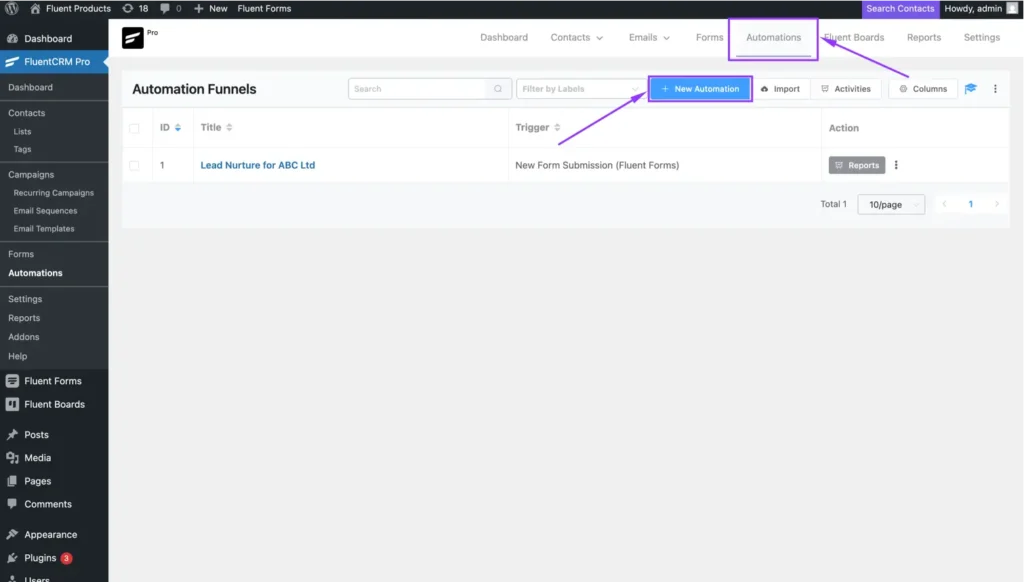
A window titled “Create an Automation Funnel” will pop up. You’ll see some handy pre-built templates, but for our custom setup, you’ll want to choose “Create from Scratch” here.
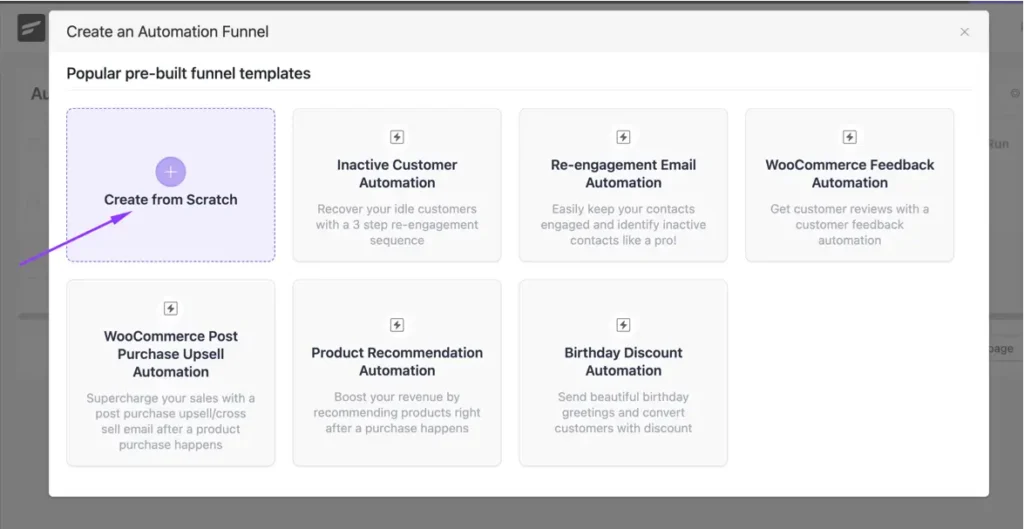
This gives you complete control to design your perfect lead-nurturing journey from the ground up!
Step 3: Set the “New Form Submission” Trigger
You already know that a trigger is the event that starts your automation. Now, let’s connect it to your lead capture form so FluentCRM knows exactly when to begin nurturing your contacts.
On the left sidebar, under the “CRM” category, select “Fluent Forms”, then choose the “New Form Submission” trigger, which activates your automation precisely when a new form is submitted.
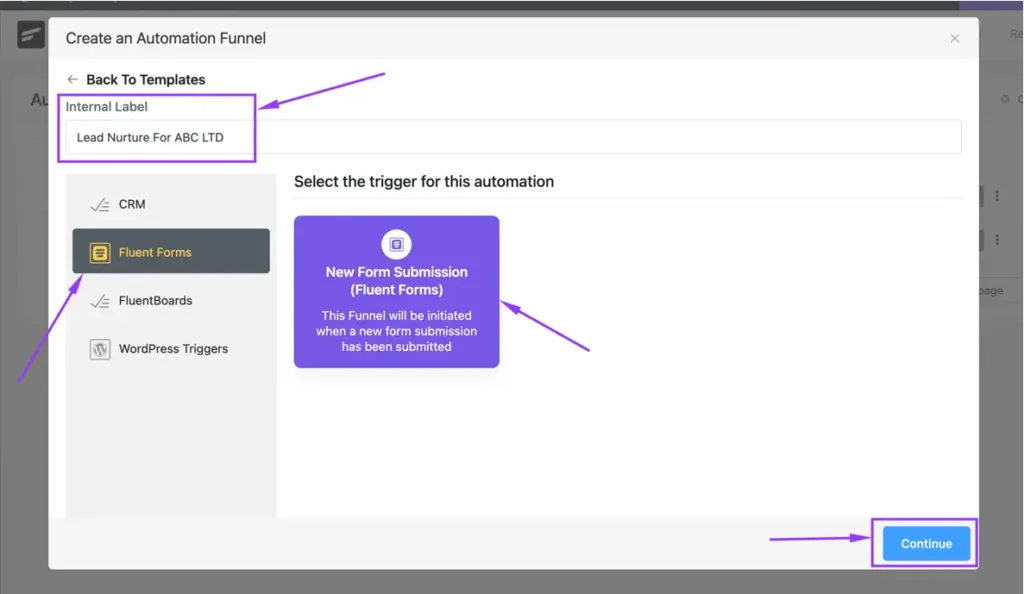
Next, set up the trigger details:
- Automation Name: Give your funnel a clear internal label (e.g., “Lead Nurture For ABC LTD”) for easy tracking.
- Select the Form: Choose the specific lead capture form you made in Step 1 (e.g., “Lead Nurture For ABC LTD”). This ensures only submissions from that form activate this journey.
- Map Lead Data: Map your form fields (like Name, Email) to FluentCRM contact fields. This accurately transfers data, building the foundation for personalized communication.
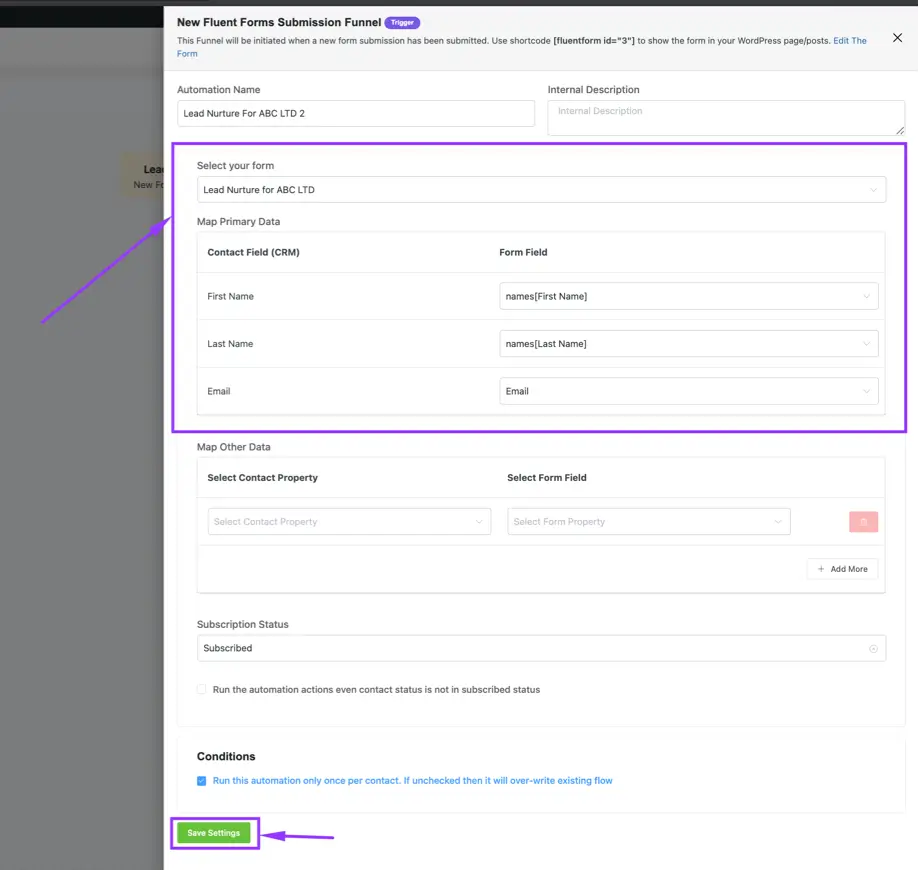
Once all settings are configured, click “Save Settings” at the bottom to finalize your trigger setup and proceed to the next stage of building your powerful automation.
Step 4: Adding Actions, Conditions, and Goals
Your automation’s trigger is set, excellent! Now comes the fun part: building out the actual sequence of steps your leads will go through.
These steps, using the Actions, Conditions, and Goals you’re already familiar with, are what make your automation truly intelligent and effective.
To begin, simply click the plus (+) icon below your trigger.
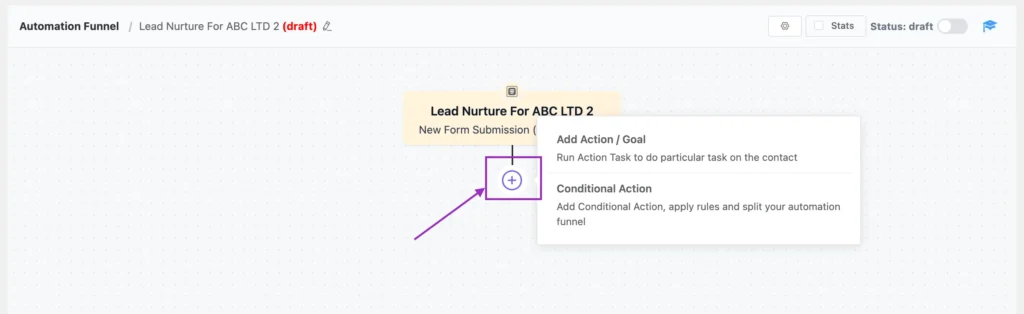
This will open a menu where you can choose from various powerful blocks: Actions, Conditions, and Goals that you’ll now strategically apply to design your unique automation flow.
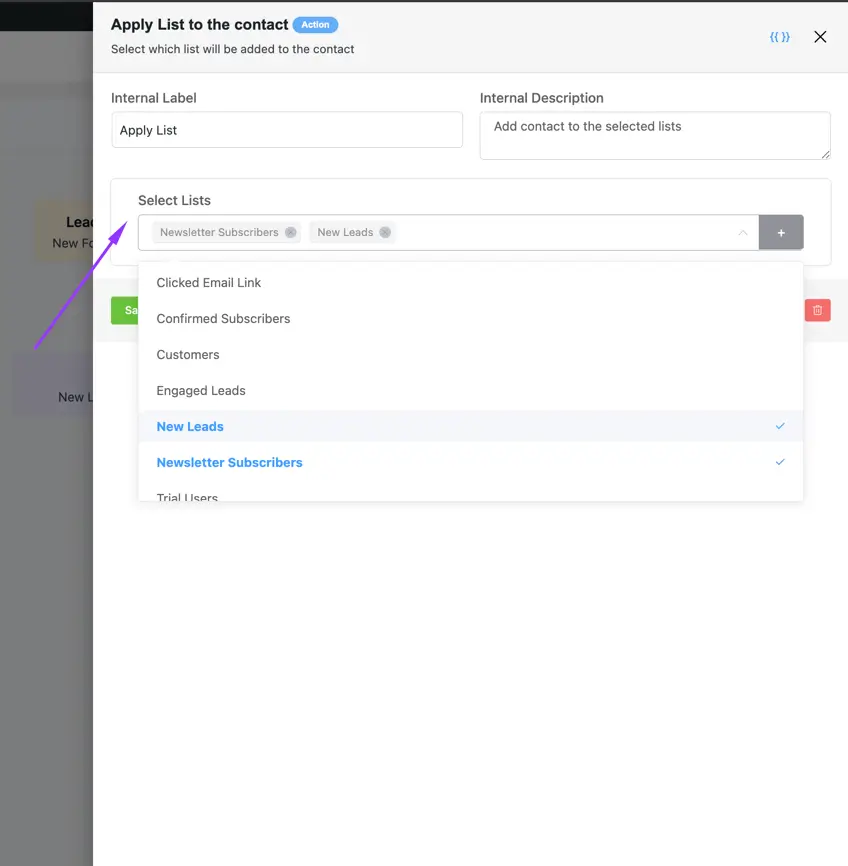
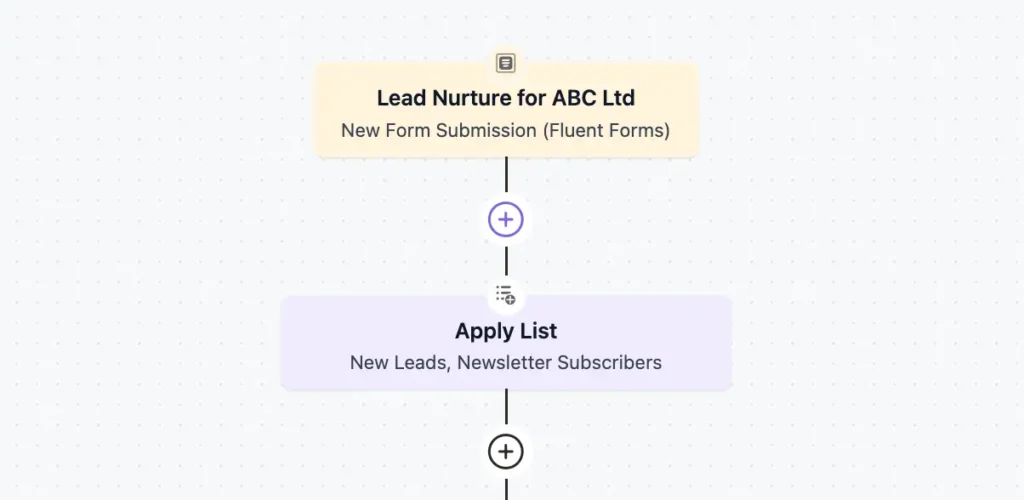
Step 5: Add an “Apply Tag” or “Apply List” Action
To effectively organize your new leads from the start, you can use two key actions: Apply List and Apply Tag.
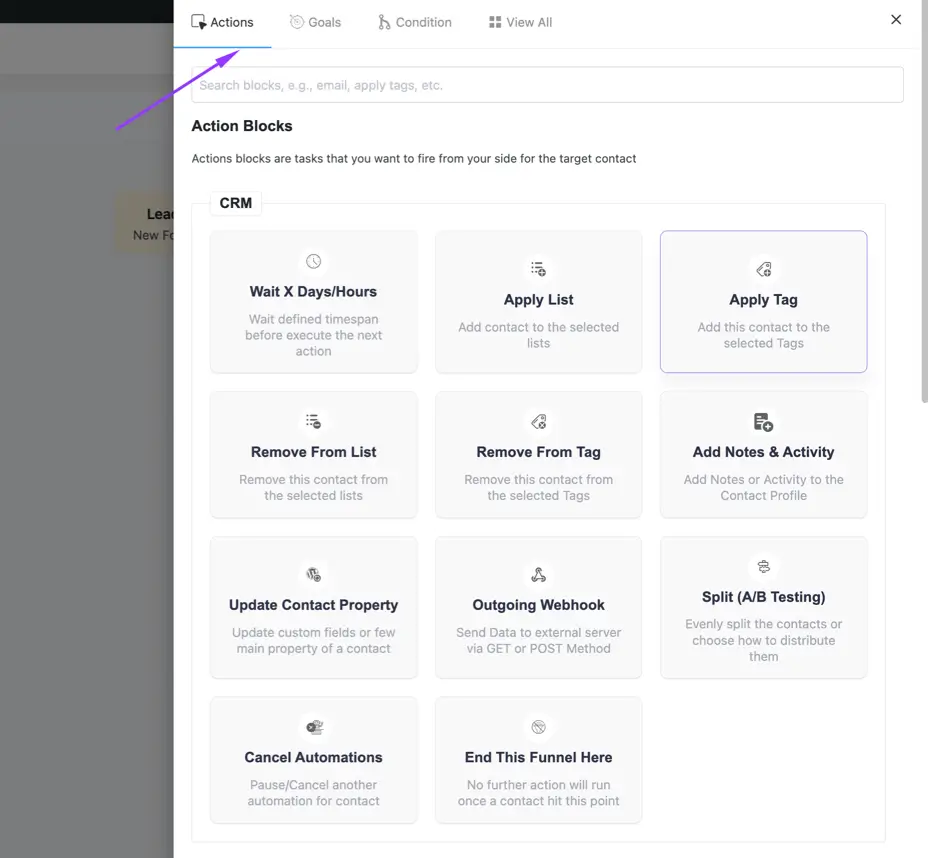
Start with an Apply List to instantly segment your contacts into relevant CRM lists, which is crucial for targeted campaigns. When setting this up, give it a clear Internal Label and select your desired lists.
You can also use Apply Tag to label contacts based on behavior or attributes. This adds flexibility for more personalized follow-ups later.
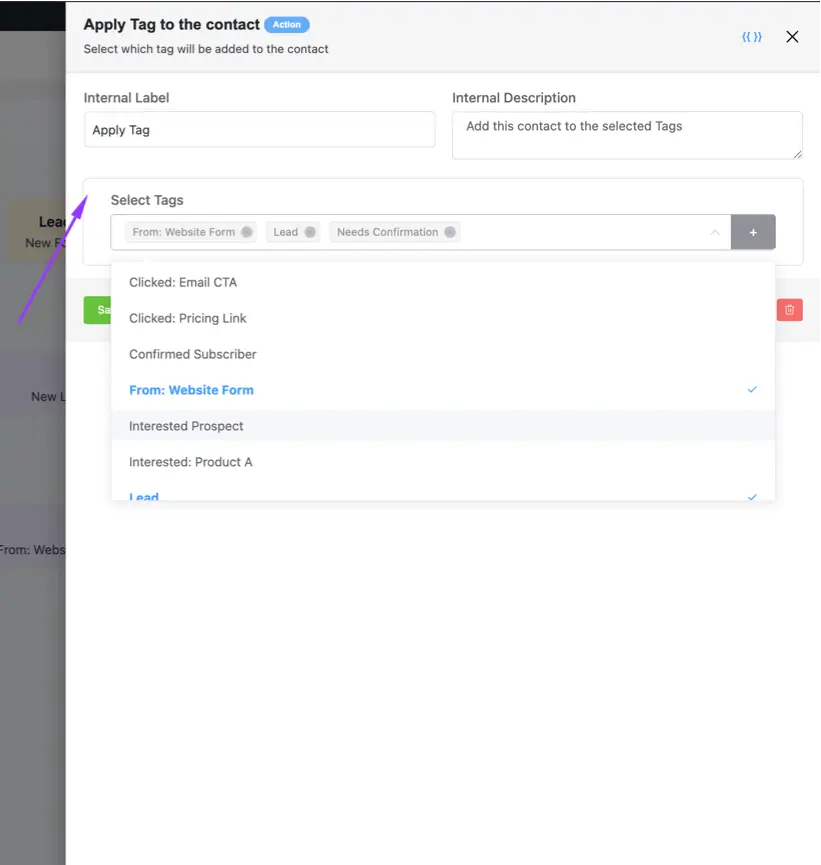
By applying both lists and tags, you’re building a rich profile for your new leads directly within FluentCRM, setting the foundation for highly effective and personalized nurturing journeys.
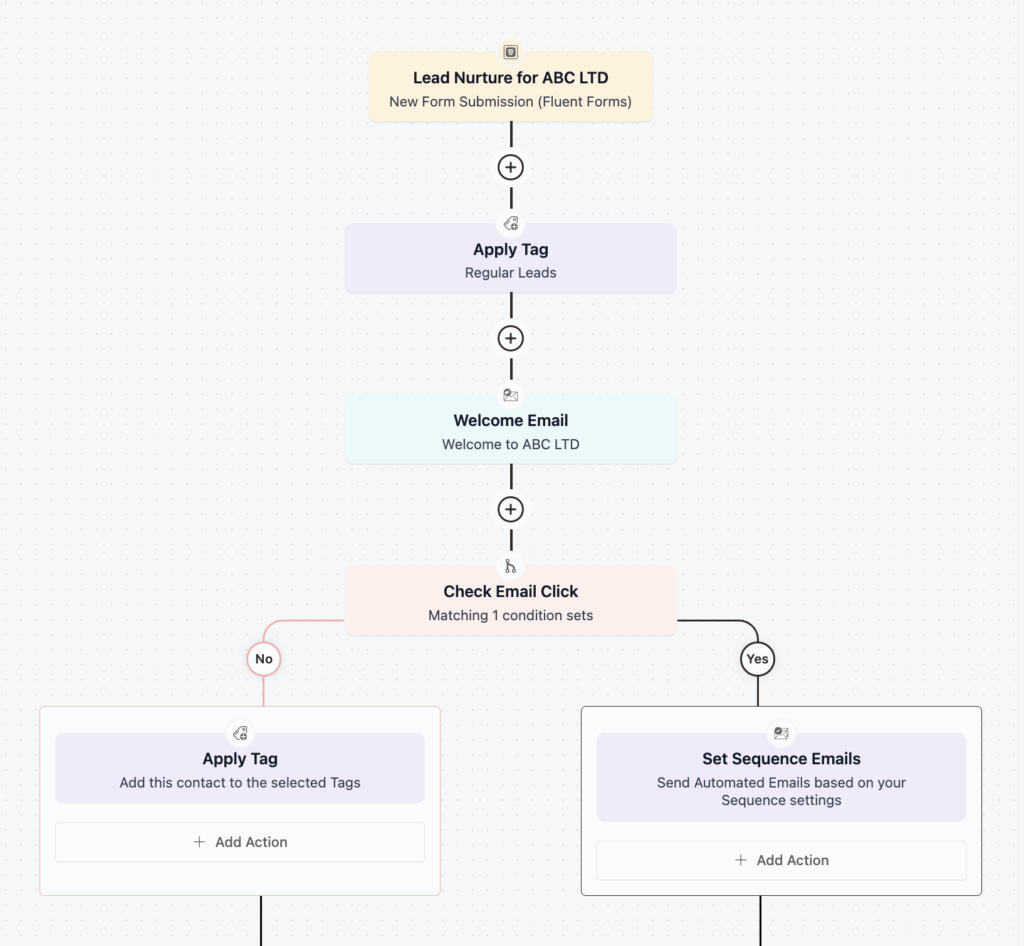
Here’s what your automation funnel should start to look like:-
Step 6: Send the Confirmation Email
Now that your leads are properly organized with lists and tags, it’s time to send them their first email.
When you click that (+) icon to add another block, you’ll find a dedicated section for email actions, giving you a few ways to connect.
Here’s what you can choose from:
- Send Custom Email: This is your go-to for an immediate, one-off message, perfect for a welcome or confirmation email that goes out as soon as someone signs up.
- Set Sequence Emails: If you’re planning a longer series, say, a 40-day email automation to nurture your subscribers over time, this option lets you easily set up that automated sequence.
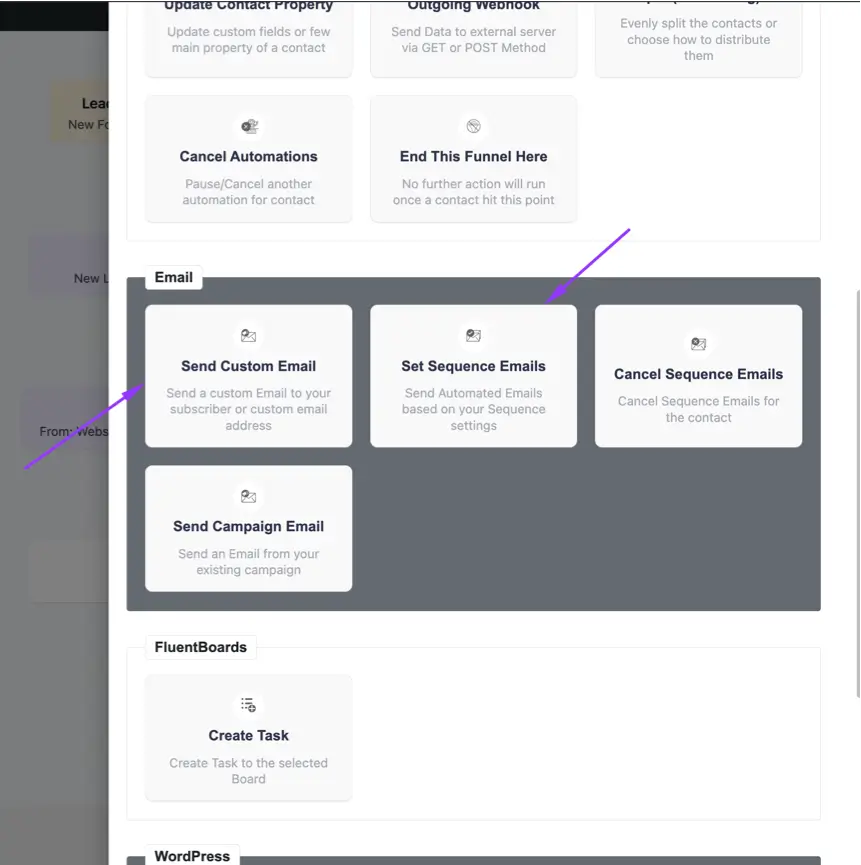
For our current setup, pick the “Send Custom Email” block. Set your Email Subject and craft your message in the Email Body. You can create a new template or save time by importing an existing one.
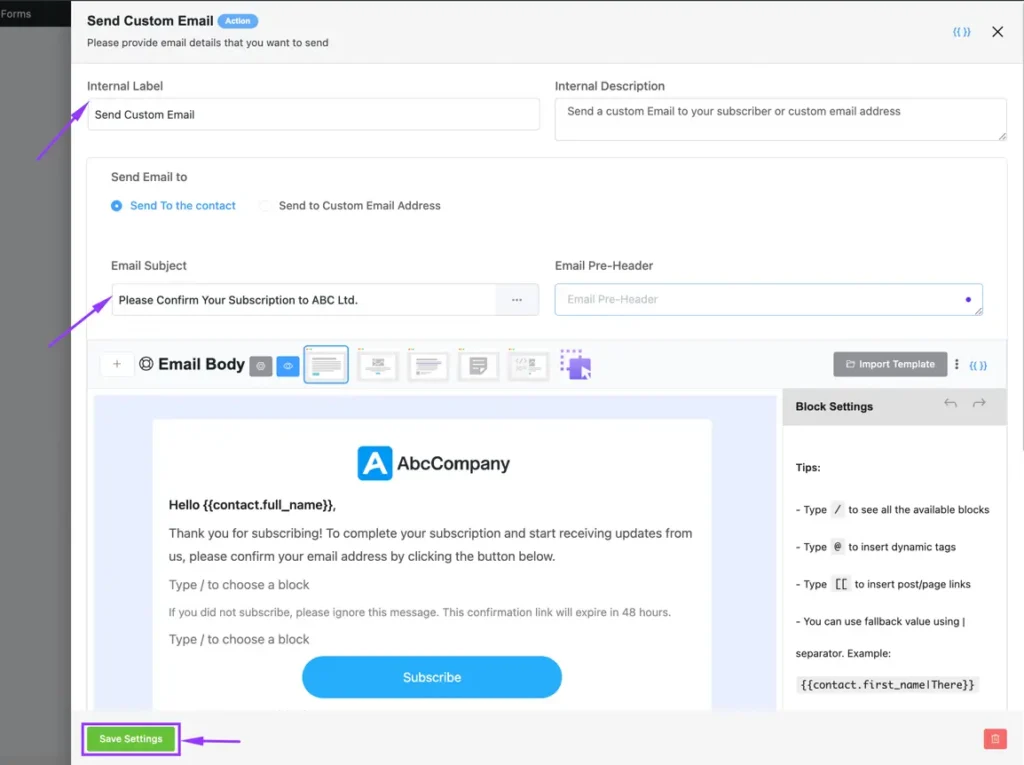
After everything looks just right, “Save Settings”, and this email will be ready to fly out automatically!
Pro Tip: Notice how the email uses dynamic tags like {{contact.full_name}} – this personalizes each email automatically with the subscriber’s actual name.
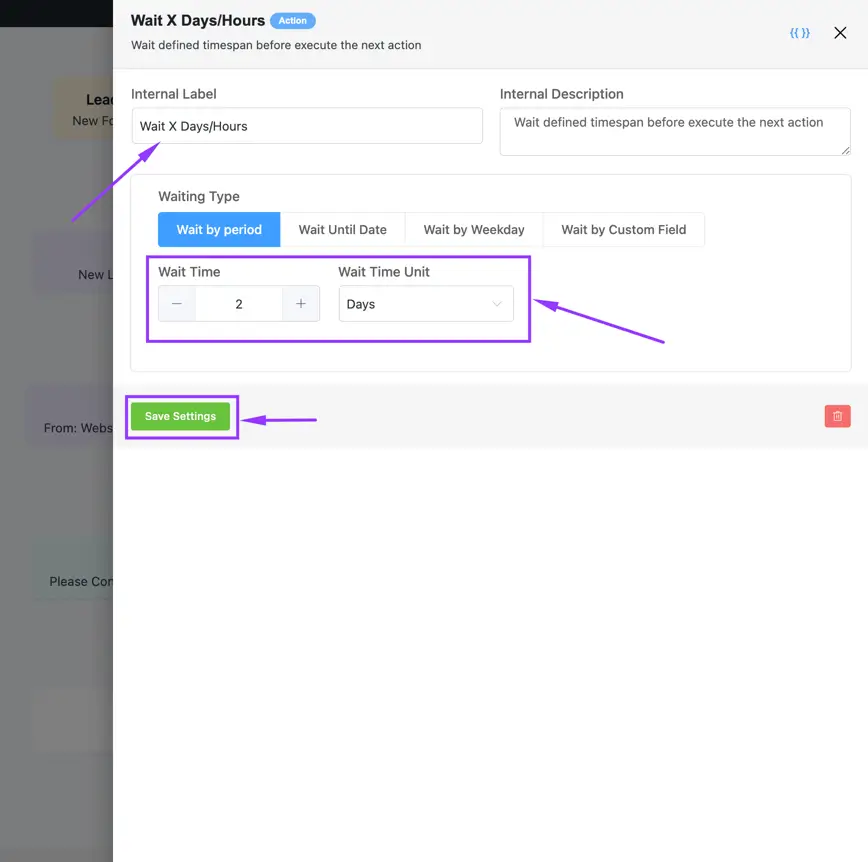
Step 7: Introduce a “Wait” Delay
Your confirmation email is now ready!
After sending that first message, you need to let subscribers actually receive and read it before moving forward. Also, if you’re building a multi-email sequence (like that 40-day plan we talked about), sending messages back-to-back defeats the purpose.
That’s precisely where the “Wait” block comes in handy.
To add it, click the (+) icon after your confirmation email and choose “Wait X Days/Hours.” Then, set your preferred wait time, like “2 Days,” and save.
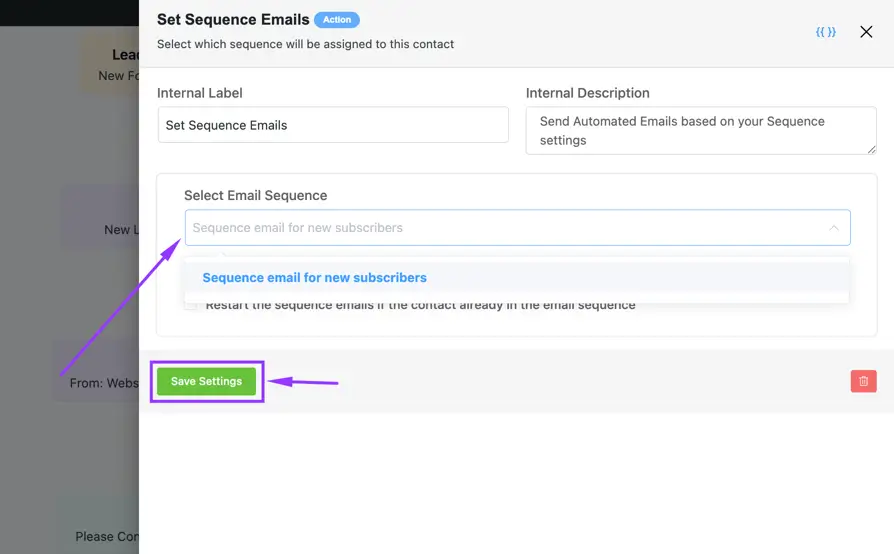
Step 8: Send a Value-Adding Sequence Email
After a little break, it’s the ideal moment to deliver even more value to your new leads, and a full email sequence is how you’ll do it.
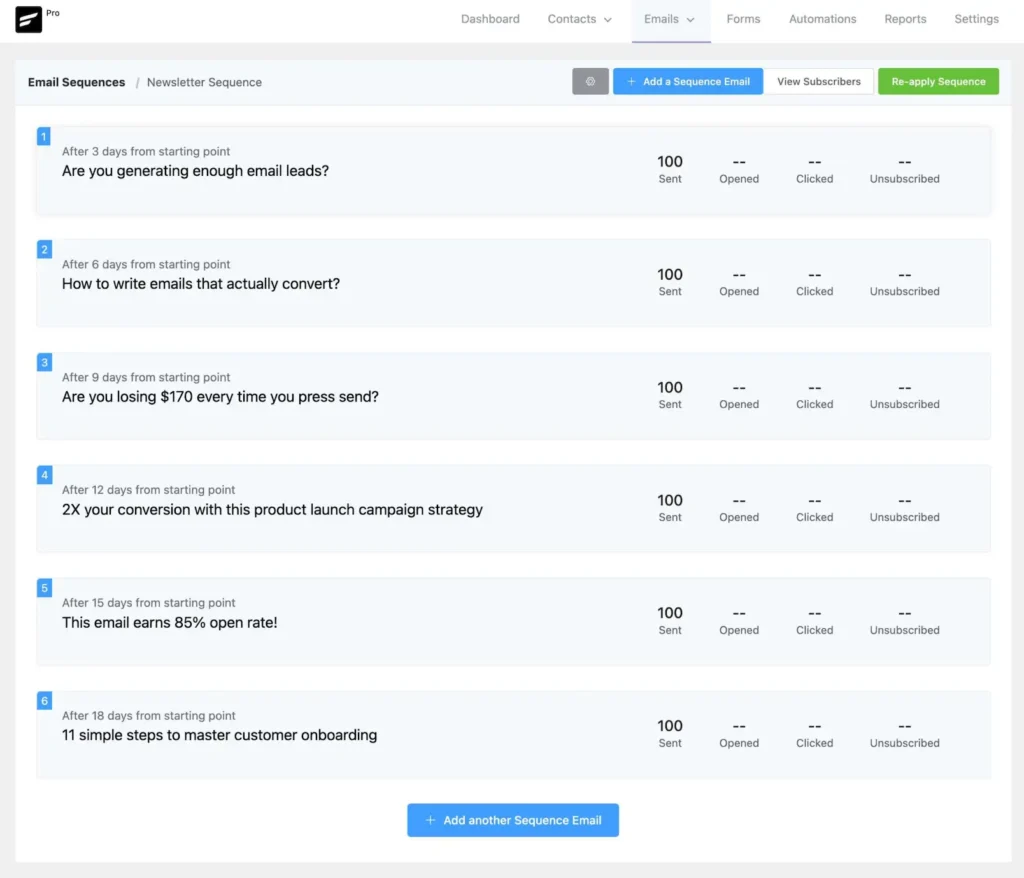
Just like before, click the (+) icon after your “Wait” block. This time, choose the “Set Sequence Emails” action. This is where the magic happens for nurturing your audience over the long term.
Inside its settings, you’ll easily Select Email Sequence from your pre-created sequences in your CRM, as shown here.
Don’t forget to hit Save Settings!
Note: Before setting up your sequence, make sure you’ve created your email series in FluentCRM. A well-structured sequence should provide genuine value while gradually building trust and moving subscribers toward your desired action.
Perfect! You’ve just set up a relationship-building powerhouse that works 24/7. You can practically see the finish line from here!
Step 9: Implement “Conditional Logic” (Check Email Click)
Your subscribers are receiving your valuable email sequence, and the next step involves implementing conditional logic, the most important feature that determines your funnel’s success.
After your email block, add a “Conditional Action” by selecting the (+) icon. Then, set your condition, such as “Clicked Email Link,” to direct the automation based on subscriber behavior.
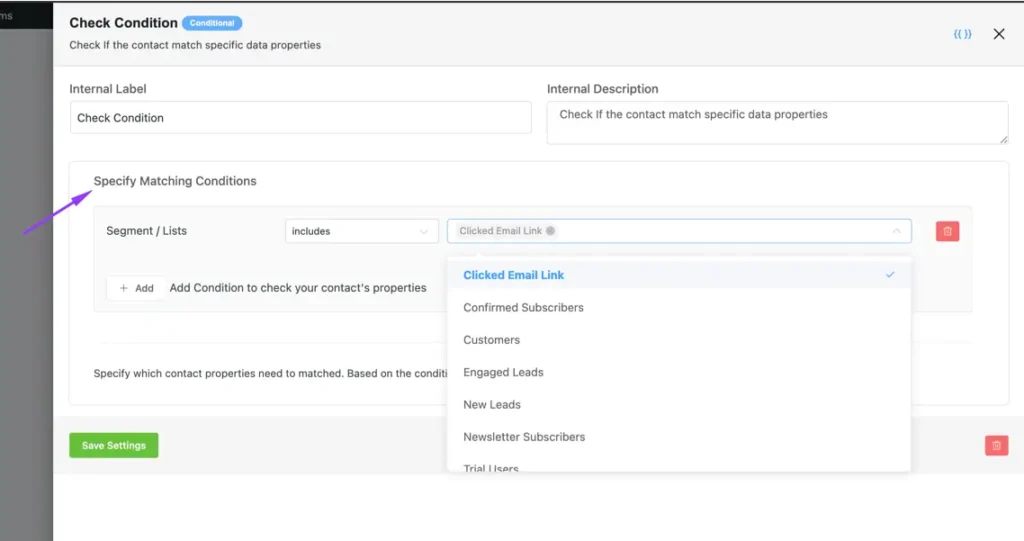
Once you set this condition, your automation divides into two paths:
Path 1 (Clicked): Identify these contacts as engaged leads—tag them accordingly and send your targeted offer.
Path 2 (Not Clicked): Follow up with a reminder or offer assistance to encourage engagement.
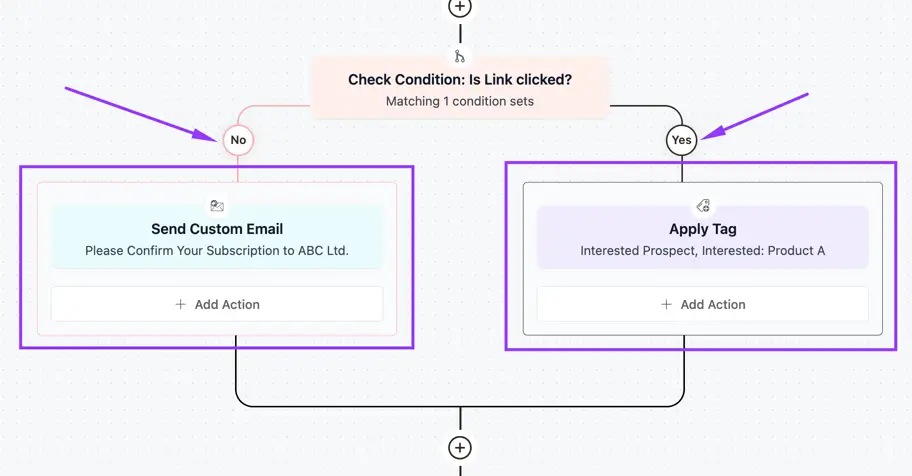
By using smart conditional logic, you ensure your messages are relevant to each subscriber, which improves engagement and increases conversion rates.
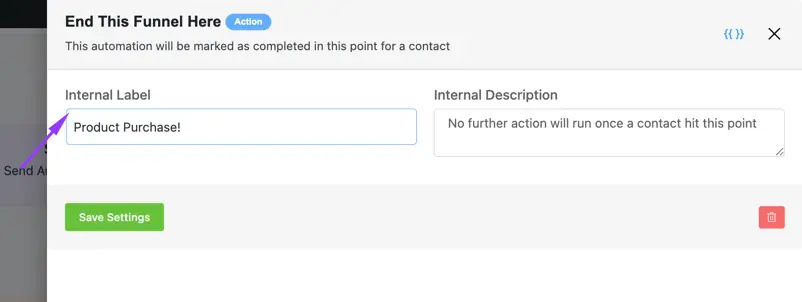
Step 10: Set a “Goal” for Automation
We’re in the final stretch now! After all that brilliant setup and smart conditional logic, it’s time to define the ultimate success point for your automation.
This is where you set a Goal, or choose to End This Funnel Here when a specific desired action has occurred.
Click the (+) icon after an action block or path end, and select a goal like “Link Click,” “Email Sequence Completed,” or “Tag Applied” these mark important milestones in your funnel.
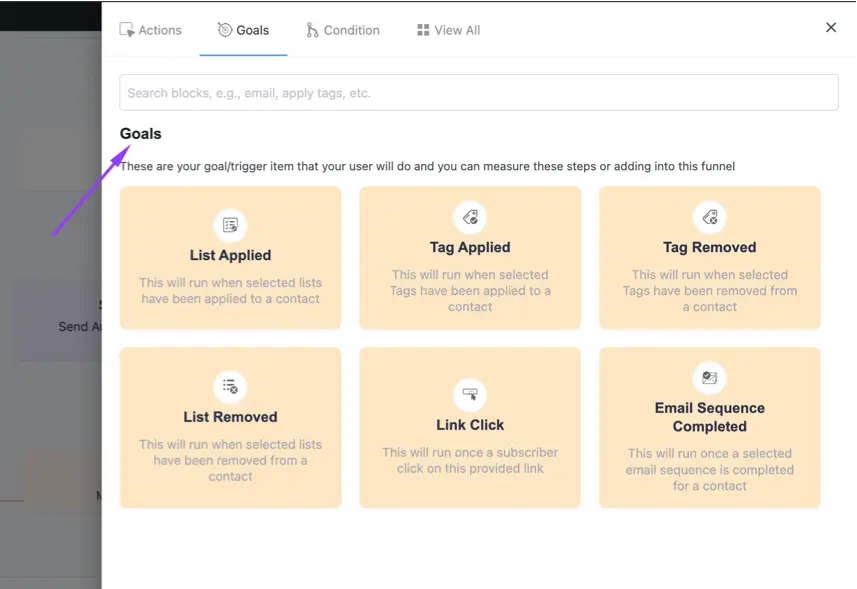
Alternatively, choose “End This Funnel Here” when a contact completes a desired action, like making a purchase or confirming a subscription. This keeps your automation clean and focused.
Well done! Your powerful, intelligent automation funnel is complete. Here’s how your automations might look depending on how you build:
We’re sharing an example automation, but you can always customize based on your business’s specific needs.
How FluentCRM Integrations Improve Automation with Core Triggers
Now that you’ve built your first automation, let’s see how the same principles apply to other areas of your WordPress site. FluentCRM connects with over 45 tools, so automations can trigger from actions across your entire ecosystem.
Here are three common scenarios:
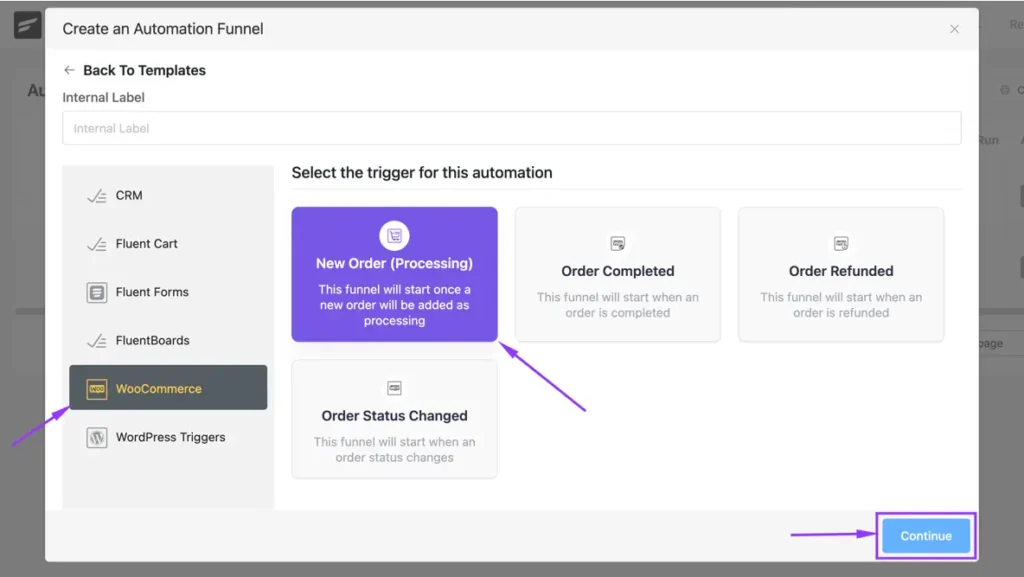
E-Commerce
If you run an e-commerce store, managing post-purchase tasks like follow-ups and tagging can be challenging. FluentCRM integrates with multiple e-commerce platforms, including WooCommerce, Easy Digital Downloads, and SureCart, to simplify and automate these processes, improving customer lifecycle management.
We’ll showcase WooCommerce, the most popular WordPress e-commerce solution, where you can automatically:
- Tag customers based on their purchase history
- Send timely emails like order confirmations and review requests
- Target specific products or categories to personalize follow-ups
- Automate complex post-purchase workflows based on dynamic order statuses
Available triggers include:
- New Order (Processing)
- Order Completed
- Order Refunded, and
- Order Status Changed
After selecting the appropriate trigger, you can then define specific order details and conditions to guide FluentCRM on when to launch the automation flow.
Pro Tip: See what kind of Automations you can build to 3x your E-commerce sales effortlessly!
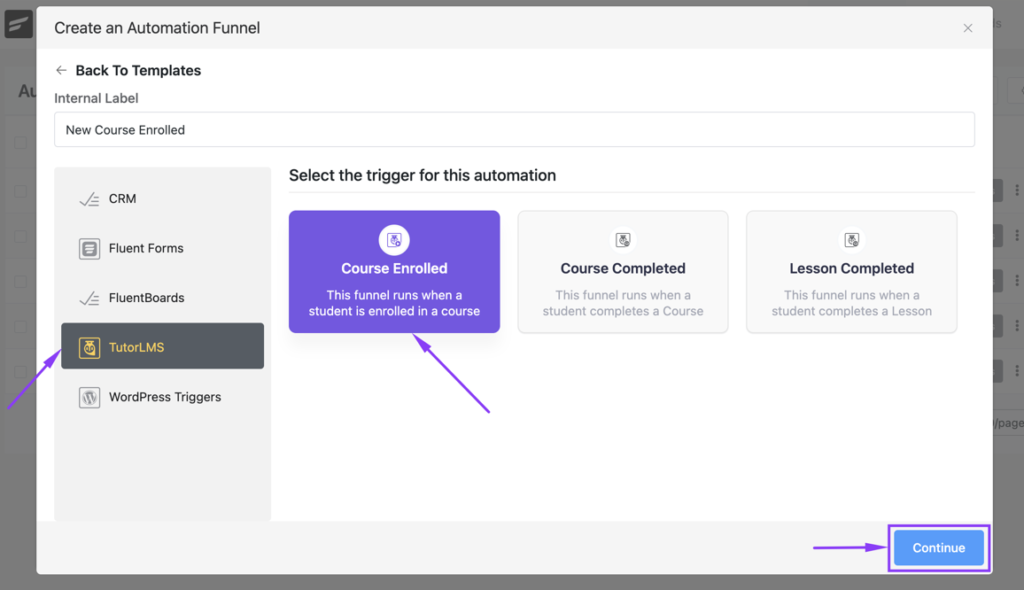
Learning Management Systems (LMS)
When you’re managing an online course platform using LMS software, it involves more than just publishing content; you also need to welcome students, track their progress, and keep them engaged through to course completion.
Therefore, FluentCRM integrates with LMS platforms like TutorLMS, LearnDash, LifterLMS, LearnPress, and Academy LMS to simplify these tasks, making it easier to maintain communication with your learners.
Using TutorLMS as our example, here’s what you can automate:
- Send onboarding emails with helpful resources
- Remind students to complete lessons or quizzes
- Congratulate them on finishing a course and offer the next steps
- Re-engage students who haven’t logged in recently
To set this up, you’ll find trigger options like:
- Course Enrolled
- Course Completed, and
- Lesson Completed
Simply select your trigger, choose the target course, and define conditions that tell FluentCRM when to start your student engagement sequence.
Membership
Managing your membership site means more than just giving members access, you need to welcome new members, track their activity, and keep them engaged.
Fortunately, FluentCRM integrates with membership platforms like MemberPress, BuddyBoss, WishList, Paid Membership Pro, Restrict Content Pro, and FluentCommunity to help you automate member communication and stay connected.
With FluentCommunity integration, you can automate things like:
- Sending welcome messages to new members
- Congratulating members when they complete courses
- Sharing exclusive content based on membership levels
- Re-engaging inactive members with reminders or offers
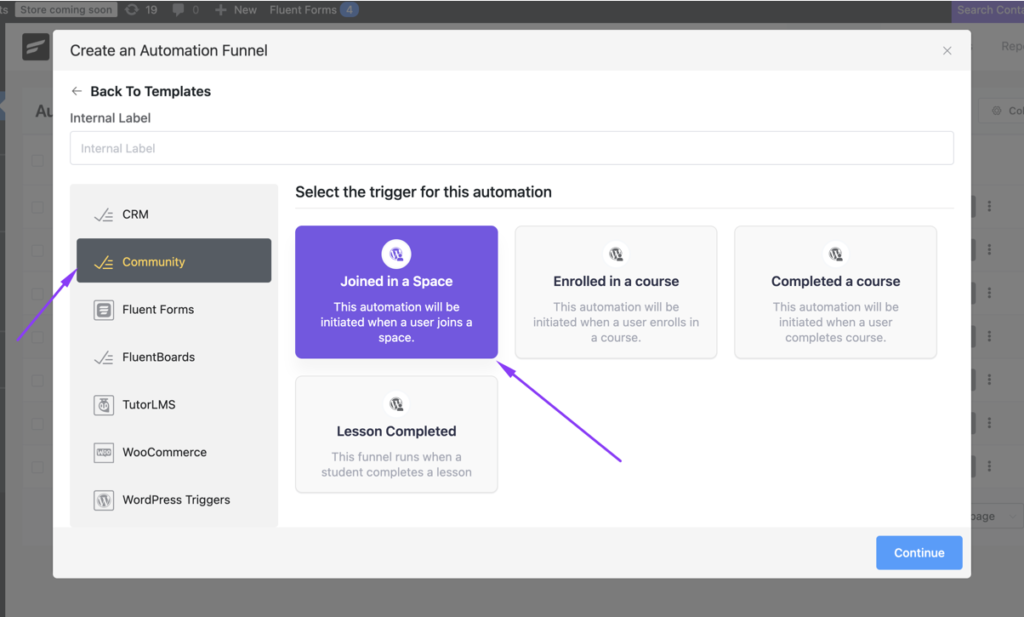
You can trigger these automations when someone:
- Joins a community space
- Enrolls in a course
- Completes a course
- Finishes a lesson
To set it up, first choose the related course or community, then define the conditions for when the automation should begin.
Now It’s Your Turn to Automate!
You’ve just discovered the blueprint for email automation that works while you sleep. With FluentCRM, you’re not just sending emails, you’re building relationships, nurturing leads, and converting prospects into loyal customers, all on autopilot.
The best part?
You don’t need to be a tech wizard to make this happen. Start with one simple automation today, then watch as your engagement rates soar and your workload lightens.
The truth is, your future self will thank you for taking this step. It’s time to automate your success and turn your WordPress site into your most powerful marketing assistant.
So, what automation will you build first?

Mahjabin Sheikh
Hey, good people! I’m Mahjabin, a Digital Marketer at WPManageNinja. Just like the quote from Before Night Falls – ‘I write, and I survive’ – that’s me in a nutshell! With coffee in hand, I dive headfirst into WordPress and Project Management. When I’m off the clock? You’ll find me writing about movies, breaking down series moments, and, of course, scrolling through memes for a good laugh!
Table of Content
Subscribe To Get
WordPress Guides, Tips, and Tutorials


Leave a Reply