

How to Create Your Affiliate Program on WordPress in Under 10 Minutes


Affiliate marketing is a powerhouse for growth. It allows you to build a dedicated sales team from your most loyal customers, fans, and partners. But for many WordPress site owners, launching an affiliate program seems daunting, expensive, or technically complex.
What if you could set up a powerful, full-featured affiliate program right inside your WordPress dashboard, with zero technical headache, and in just a few minutes?
That’s why you need an all-in-one solution built to launch and manage your affiliate program without ever leaving WordPress.
In this guide, we’ll show you how to get your own affiliate program up and running in a few minutes.
Why You Should Run Your Affiliate Program in WordPress
Running your affiliate program directly on WordPress gives you full control, flexibility, and cost savings. Here’s why WordPress is the perfect home for your affiliate program:
- You own your data: All clicks, referrals, and commission records stay on your site. No external service has access to your customers or affiliates.
- Easy setup and management: You can launch and manage your program without any coding or technical hassle, and no switching tabs or juggling multiple dashboards.
- Seamless integrations: WordPress plugins integrate naturally with WooCommerce, membership sites, LMS platforms, forms, and more, with no complicated API setups.
- Cost-effective growth: You avoid expensive SaaS subscriptions while still getting professional-grade tracking, reporting, and dashboards.
- Customizable for your needs: Want different commission rates, affiliate groups, or special promotions? WordPress plugins let you configure your program exactly how you want.
In short, hosting your affiliate program on WordPress keeps everything under your control, saves money, and makes it easy to scale as your business grows.
How to Set up an Affiliate Program on WordPress: Step-by-Step Guide
There are many affiliate management plugins in WordPress. This time, we will use FluentAffiliate, the ultimate affiliate management plugin, and we’ll walk through the five core but easy steps, from installation to a fully functional program.
Let’s start the timer.
Step 1: Install and Activate FluentAffiliate
This is the standard WordPress setup you’re already familiar with.
- In your WordPress dashboard, go to Plugins > Add New.
- Click Upload Plugin, choose the .zip file you downloaded from www.wordpress.org, and click Install Now. Or you can directly search for Fluent Affiliate from the dashboard and install.
- Once installed, click Activate Plugin.
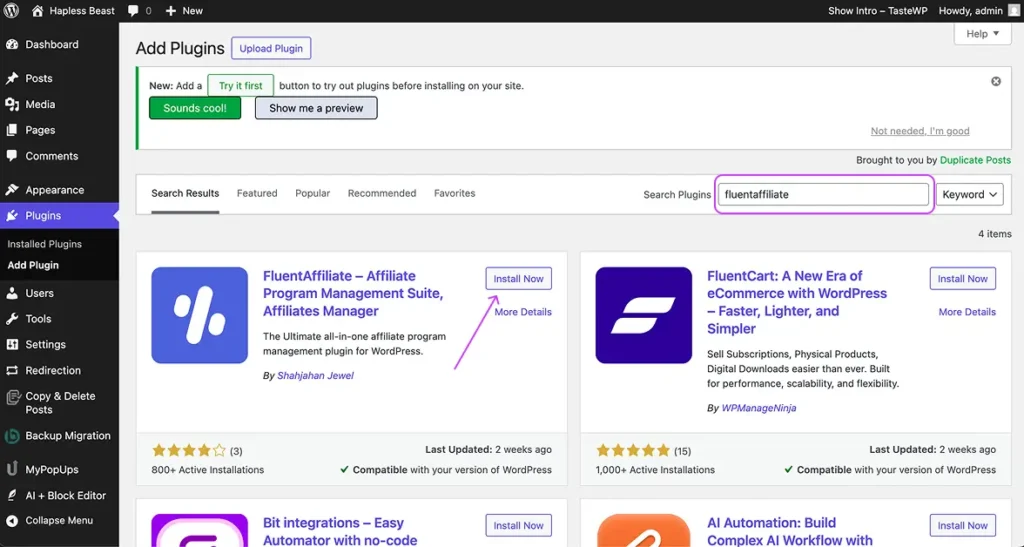
You’ll now see a new FluentAffiliate menu in your dashboard.
Step 2: Run the Onboarding Wizard
This is where the magic happens. FluentAffiliate includes a quick-start wizard that handles all the essential configuration.
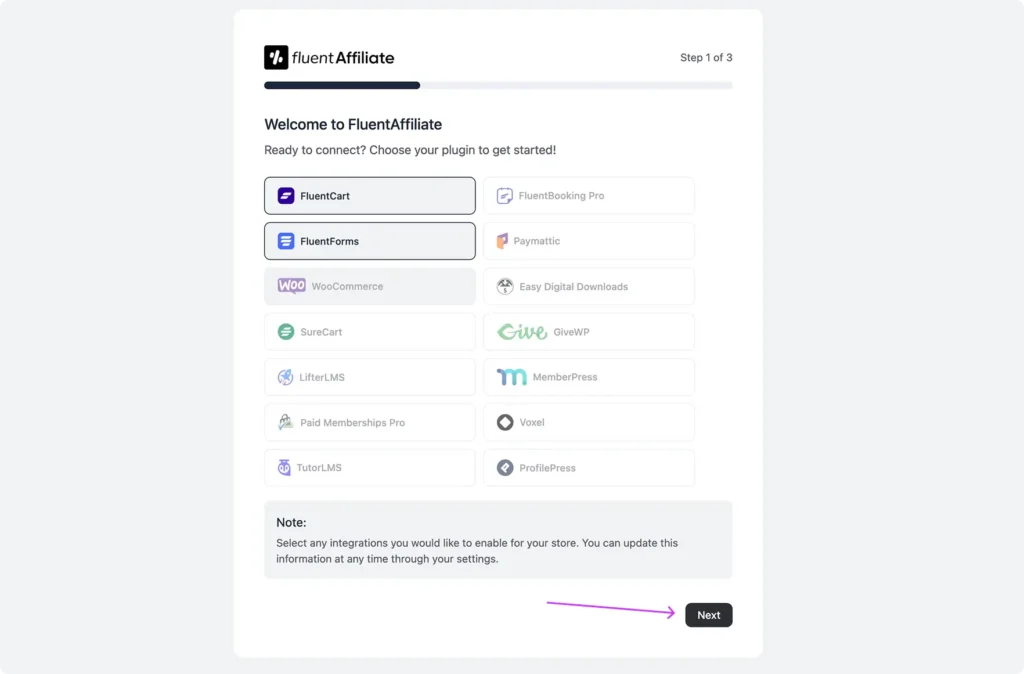
Navigate to the FluentAffiliate menu. You’ll be greeted by the setup wizard.
- The wizard will automatically detect your installed e-commerce or membership plugins (like FluentCart). Simply check the box for the platforms you want to enable commissions on.
In the next step, you’ll define the basic referral and commission rules that your affiliate program will use by default.
- Referral Variable: This is the parameter that appears in every affiliate link. For example, if you choose “ref,” the URL will look like yoursite.com/?ref=username. Pick a simple keyword that makes sense for your brand.
- Default Referral Format: Decide how affiliates are identified in their links, either by their numeric ID or by their WordPress username. Both options work seamlessly for tracking, so choose the format you prefer.
- Rate: Enter the commission amount affiliates will earn for each successful referral. You can set this as a percentage of the order total or as a fixed payout per sale.
- Default Currency: Choose the currency you want to use for all commission calculations and payouts from the dropdown menu.

After reviewing these options and making your selections, click Next to continue the setup process.
Turn every FluentCart purchase into affiliate commissions with FluentAffiliate!
Step 3: Create Your Affiliate Portal
The last step is to set up a dedicated space where your affiliates can log in, monitor their stats, and access their referral tools. This will be your main Affiliate Portal.
- In the Affiliate area, choose which page will act as the portal. You can pick an existing page from the dropdown, or click the plus (+) icon to instantly create a new one.
- If you decide to create a new page, a small pop-up will appear. Just type in the Page Title (for example, Join as an Affiliate) and hit Add. That’s all you need to do; FluentAffiliate will take care of the rest.
- Once the page is set, FluentAffiliate automatically inserts the shortcode [fluent_affiliate_portal], which loads the full affiliate dashboard on that page. No manual setup. No extra steps.
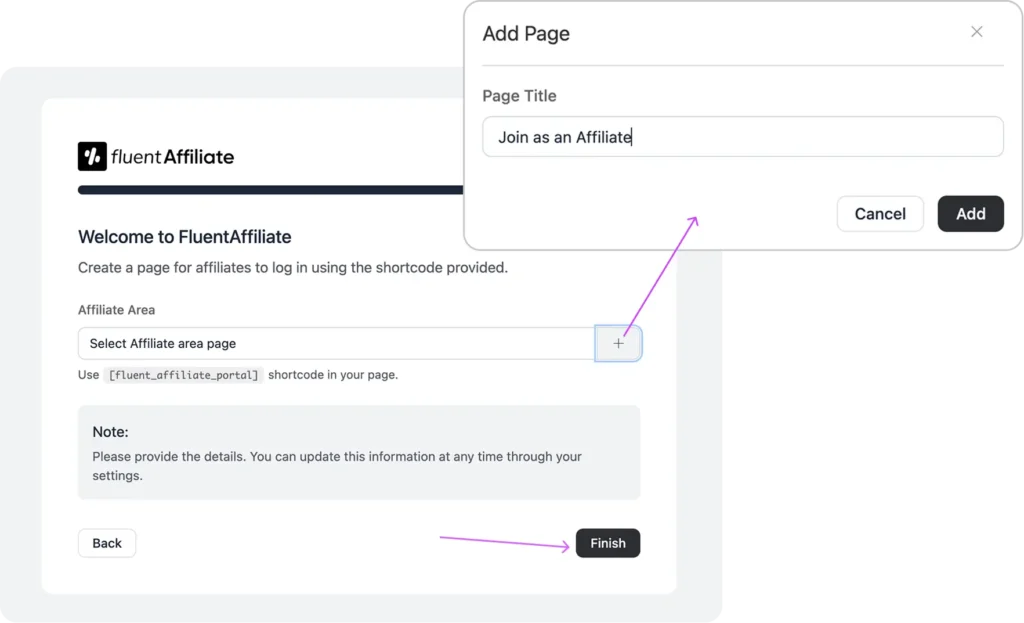
After everything looks good, click Finish to save your onboarding settings.
You’re done! Your Affiliate Portal is ready, and your affiliate program is officially set up and good to go.
Step 4: Set Up Your Affiliate Registration
Now, you need a way for people to sign up. FluentAffiliate makes this simple.
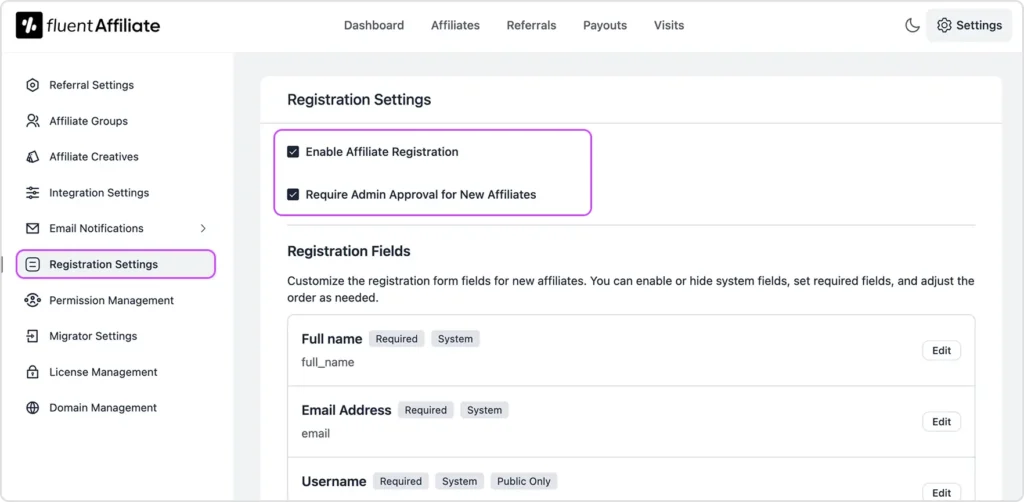
- Go to FluentAffiliate > Settings > Registration Settings.
- Enable the option “Enable Affiliate Registration.”
- You can also enable “Enable Admin Approval for New Affiliates,” if you want to review each affiliate and then approve them.
- Also, you can customize the registration form fields, and finally, “Save Settings.”
Step 5: Promote Your Affiliate Program
- Announce the program to your community, email list, or existing customers – inviting them to become affiliates.
- Create a dedicated affiliate page (e.g., “Join our affiliate program”) with benefits, commission rate, and how it works.
- Provide marketing assets (banners, link guidelines, social suggestions, etc.).
- Monitor performance: check clicks, conversions, and affiliate contributions from your dashboard and optimize accordingly.
That’s it. In less time than it takes to finish a cup of coffee, you’ve launched a scalable, powerful affiliate program on your own WordPress site.
From here, FluentAffiliate handles the rest. It will track clicks, automatically log commissions when a sale is made, and provide a full dashboard for you to manage your affiliates, review referrals, and handle payouts.
Tips to Make Your Affiliate Program Successful
- Be clear & transparent: Make sure affiliates know how much they’ll earn, how tracking works, and when payouts happen.
- Recognise top affiliates: Consider higher-tier rates or bonuses for your best performers.
- Provide marketing support: Give them tools (assets, copy snippets, recommended links) so they can promote effectively.
- Track performance and iterate: Use the reporting features to see which affiliates, links, or marketing channels work best and focus your efforts there.
- Stay consistent with payouts: Affiliates trust programs that pay out timely. A good payout process keeps momentum high.
- Grow over time: Once you’re comfortable, you can extend to multiple domains, special campaigns, recurring or lifetime commissions, etc.
Turn Your WordPress Site into a Sales Machine
Setting up your own affiliate program on WordPress doesn’t have to be complicated or time-consuming. With FluentAffiliate, you’ve seen how easy it is to create a fully functional system in just a few minutes, from tracking referrals to managing payouts.
By empowering your loyal customers, fans, and partners to promote your products, you’re not just increasing sales, you’re building a community that grows with your brand.
The next step is simple: launch your program, invite affiliates, and watch your business reach new heights. With the right tools and strategy, your WordPress site can become a 24/7 sales machine.
We wish you all the best!

Ratul Ripon
I enjoy turning complex ideas into simple ones and engage with people through my writing. With a background in Oceanography, I create technical content that’s both easy to understand and interesting.
Table of Content
Subscribe To Get
WordPress Guides, Tips, and Tutorials


Leave a Reply