
How to Add Facebook Pixel to WordPress


In the 21st century, data is king and you need to know your customer better than ever before. When you understand their behavior, preference, and need, that can push your marketing strategy into the kingdom of accuracy and effectiveness.
But how do you get access to this valuable data of your customers?
The answer is the Facebook Pixel – a code that tracks user engagement on your website, acting as a bridge to collect and share vital data with Facebook about user interactions. With the Facebook Pixel, you can:
- Create custom audiences
- Measure conversions
- Optimize your ads
- Analyze and improve
In this article, we will guide you through the steps of creating and installing the Pixel code on your website in a few minutes.
Stay tuned and boost your business strategy!
What is Facebook Pixel?
Facebook Pixel is an analytics tool that measures the effectiveness of your Facebook advertising. It is a piece of code for your website that lets you measure, optimize, and build audiences for your ad campaigns.
It works by placing and triggering cookies to track user’s actions on your website and provide data for building targeted ad campaigns. With the Pixel, you can create custom conversions that track user behavior, such as button clicks, purchases, or other key conversion events.
How to create Facebook Pixel for WordPress
Facebook Pixel works like Google Analytics for Facebook campaigns. It helps to get deep insight into your campaign that will help you to optimize it better way.
To set up Facebook Pixel, first, you need to create a Facebook Ads Manager account from your Facebook business page. Then go to Event Manager by clicking straight to this link.
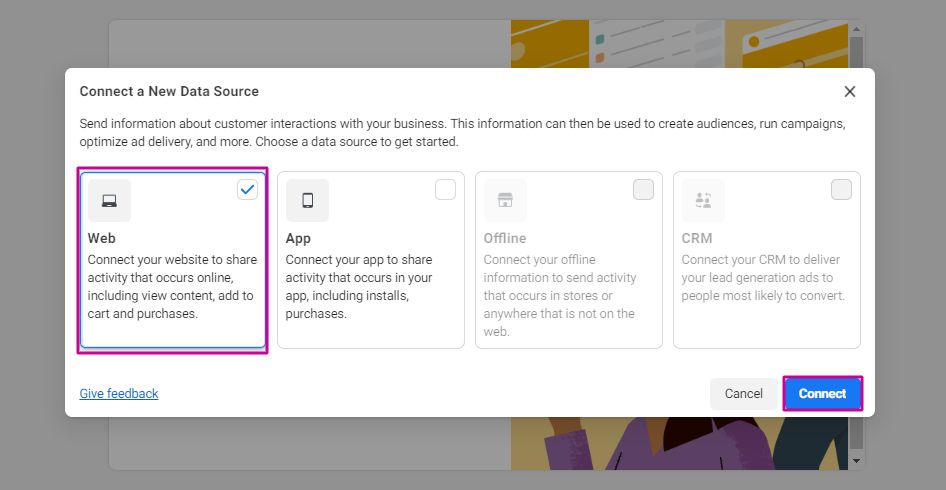
Now click on the Connect Data Source from the left sidebar menu. Give a checkmark on the Web option and after that click on the connect button.
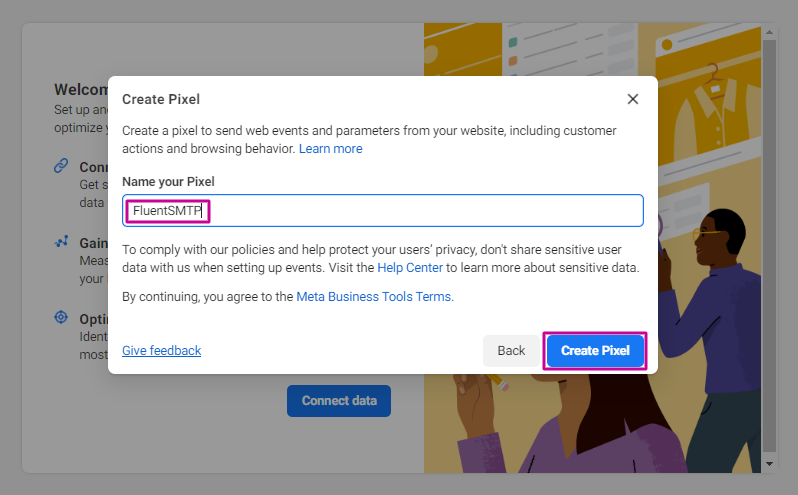
In the next popup window, enter your Pixel name. Try to give the name according to your business name so that you can easily identify it.
Now click on the Create Pixel button.
And congratulations! You have successfully created your Facebook Pixel. Now you need to connect Pixel with your WordPress website. You can do it in many different ways with or without plugin.
But no worries!
We will show you how you will set up Facebook Pixel manually (without Plugin), and Google Tag Manager (with Plugin).
How to add Facebook Pixel to WordPress Website manually(without plugin)
To add Pixel to the WordPress website without any plugins is a straightforward option if you don’t want to track customer journeys in detail.
However, adding manually Facebook Pixel to your WordPress website has two steps:
- First one needs to create a Pixel in your Facebook Ads Manager account (that we already discussed above)
- Secondly, need to install the Pixel code on the Header section of your website
No worries, it’s very simple! When you set it up successfully you will understand how easy it is.
So let’s get started!
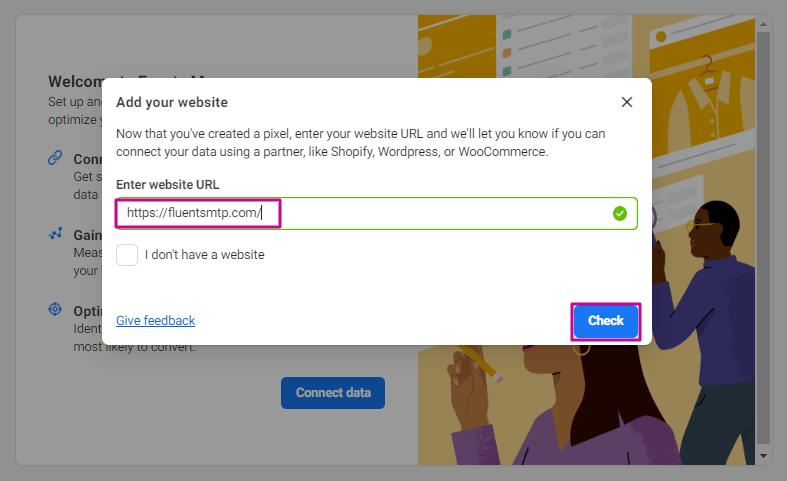
Enter your Website URL
In the next section, you need to just simply put your website URL. And if your website is eligible for integration, will show you a green check mark on the right side. After that click on the Check button.
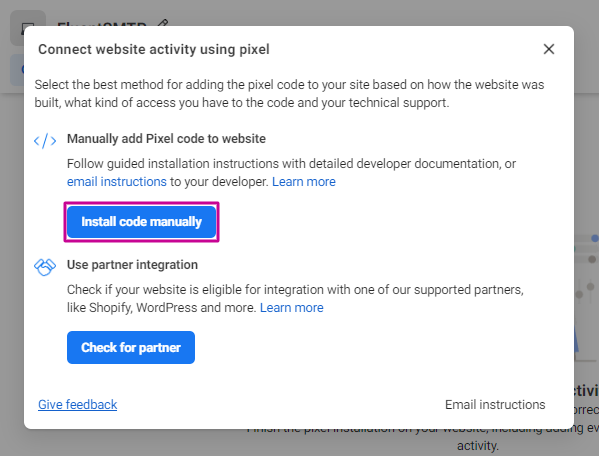
Select connection method
In this section, you will see two options to connect with your website. Now select the Install code manually option.
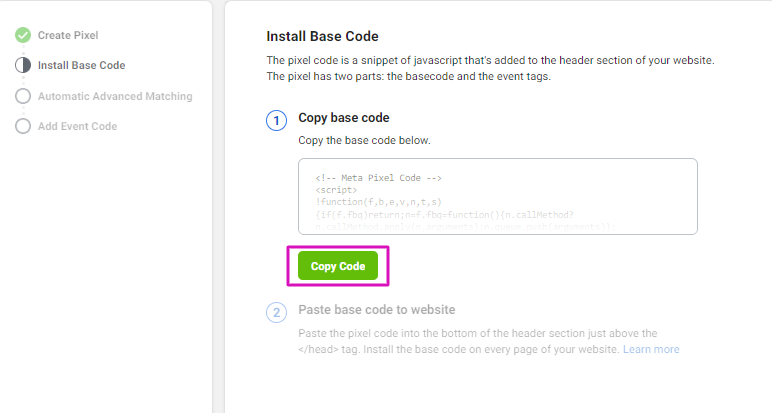
Copy the code
Now copy the code, actually this is a Javascript code that is needed to insert your website Header section for connecting Pixels with your website.

Go to your website dashboard
For that go to your website Dashboard then scroll down. On the left side, keep your cursor on the Appearance section and click on the Theme File Editor section.
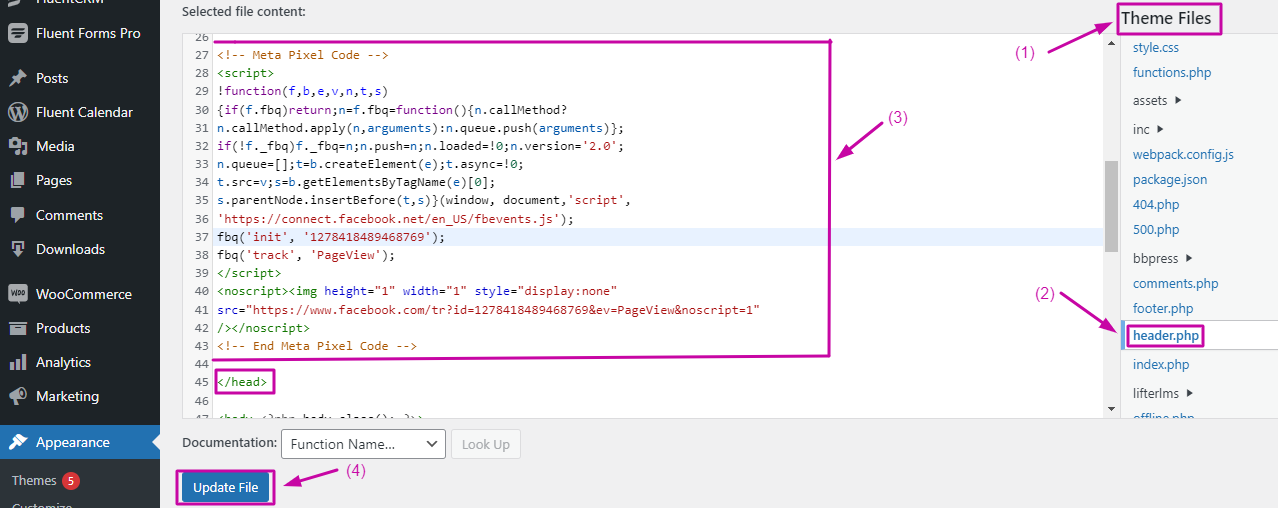
Paste the code on the Header section
Under the Theme Files, in the right corner, you will discover the header.php option. Now paste the code into the bottom of the header section just above the </head> tag. Now click the button Update File and it’s saved!
Now your Facebook Pixel code is installed on your WordPress website.
How to add Facebook Pixel to WordPress with Google Tag Manager
Google Tag Manager is a powerful tool that helps you track your website’s customer journey or activities without modifying the website’s source code.
And with that, you can send your website customer journey to any third party like Facebook, Tiktok, Google, etc. It helps you to track all third-party tracking in one platform.
To add Facebook Pixel to WordPress, you need to connect Google Tag Manager with your website. After that, we will set up Pixel to Google Tag Manager. And it will connect with your website.
Let’s follow the steps:
Create a Google Tag Manager Account
You need to visit this website to create a Google Tag Manager account. Then click on Start for Free button to sign up. After login –
- Click on the Create Account button
- Enter your account name
- Select your country
- Create a Container that can be IOS, Web, Android, AMP, or Server. We will select Web
- Give a Check Mark on Google Tag Manager Terms and Services Agreement and click on the Yes button
Add GTM (Google Tag Manager) with Website
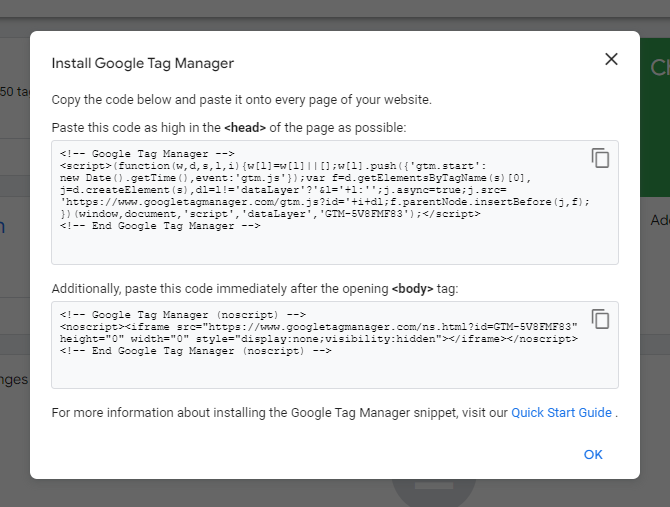
Now you will see a popup that is telling you to install the GTM code on your website <head> and <body> section. Something like this:
Now we can connect GTM with the website in 2 ways:
- Installing codes on <head> and <body> tag into website
- Another is Just adding GTM Measurement ID through a Plugin
We will install a plugin to prevent slow website loading because of excessive backend code pasting. It’s a standard option for you if you are not a coder or feel uncomfortable with coding.
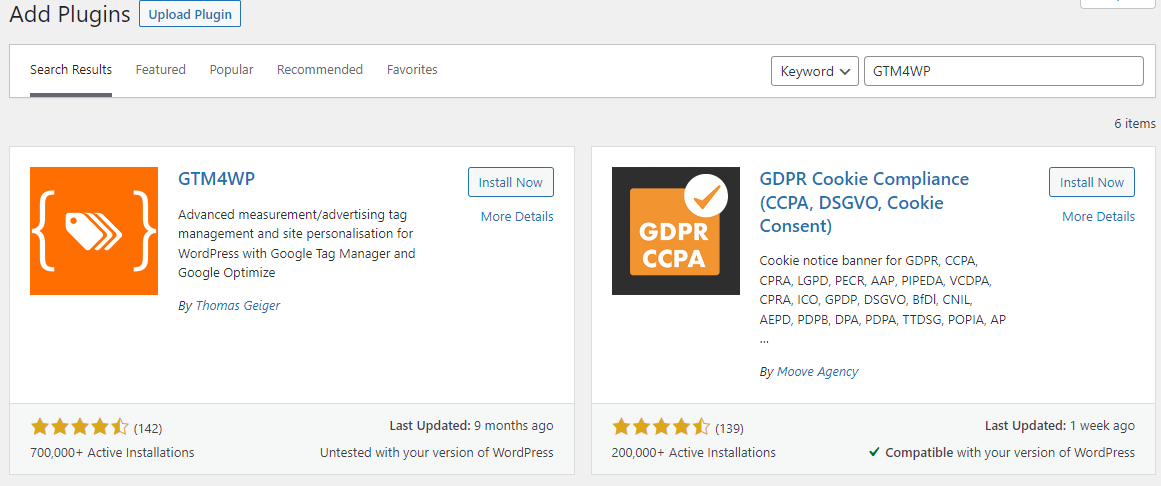
Install GTM4WP Plugin and Enter GTM Measurement ID
To install the GTM4WP plugin go to your website Dashboard and from the plugin section click on Add New. Then Search GTM4WP by Thomas Geiger and install it by clicking on the install button. Now activate it.
Copy the Measurement ID
Now it’s time to install GTM Measurement ID. To do it go to your GTM account and copy the ID.
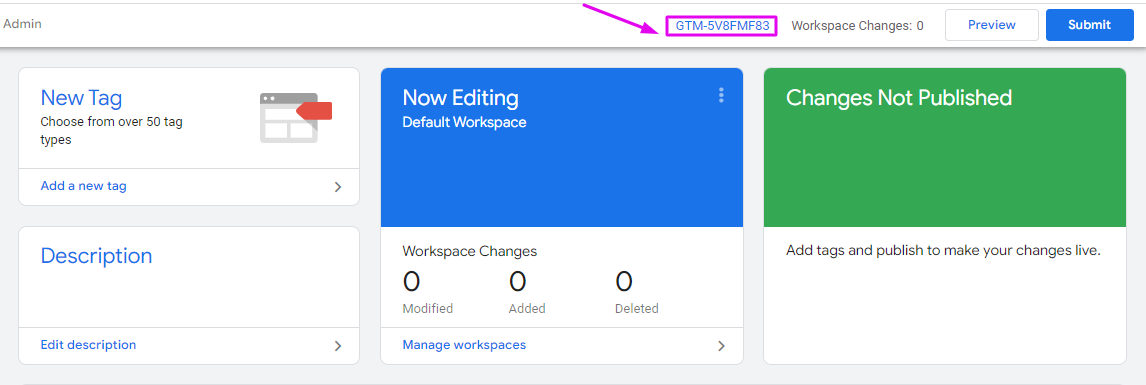
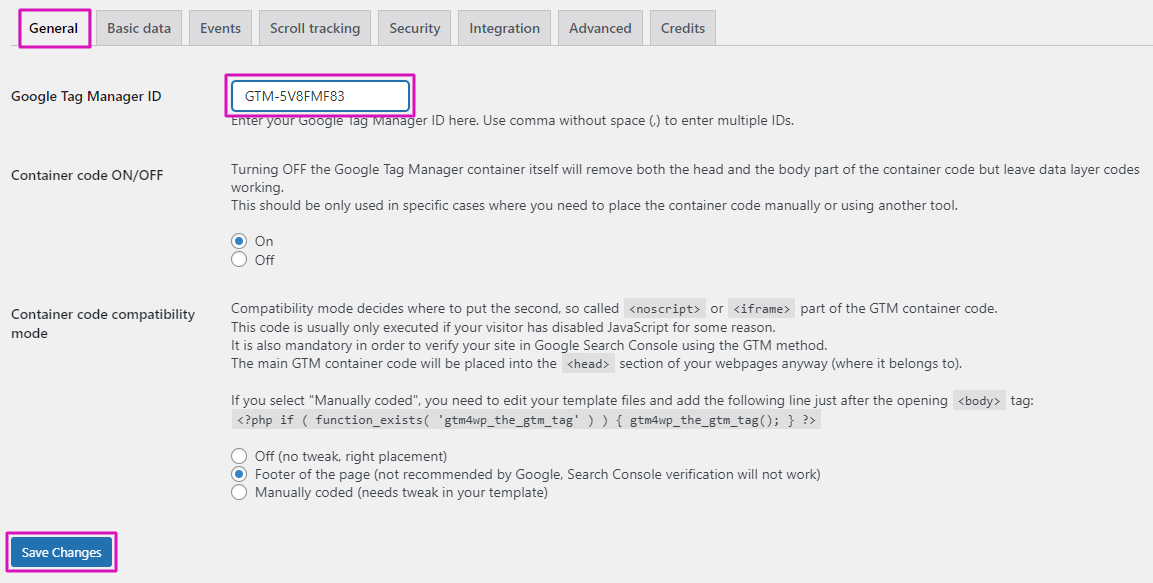
Paste the Measurement ID on the GTM4WP plugin
Now it’s time to add this measurement ID to your website Dashboard. From the plugin section click on the settings of the GTM4WP plugin. Then click on the General button now you will see an option to paste the GTM Measurement ID and click on the Save Changes button.
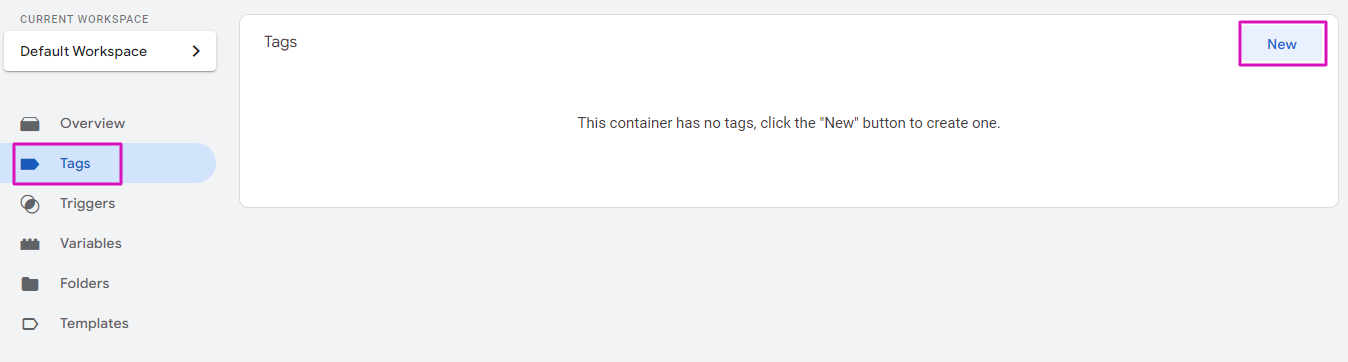
Add Tag and Trigger on GTM
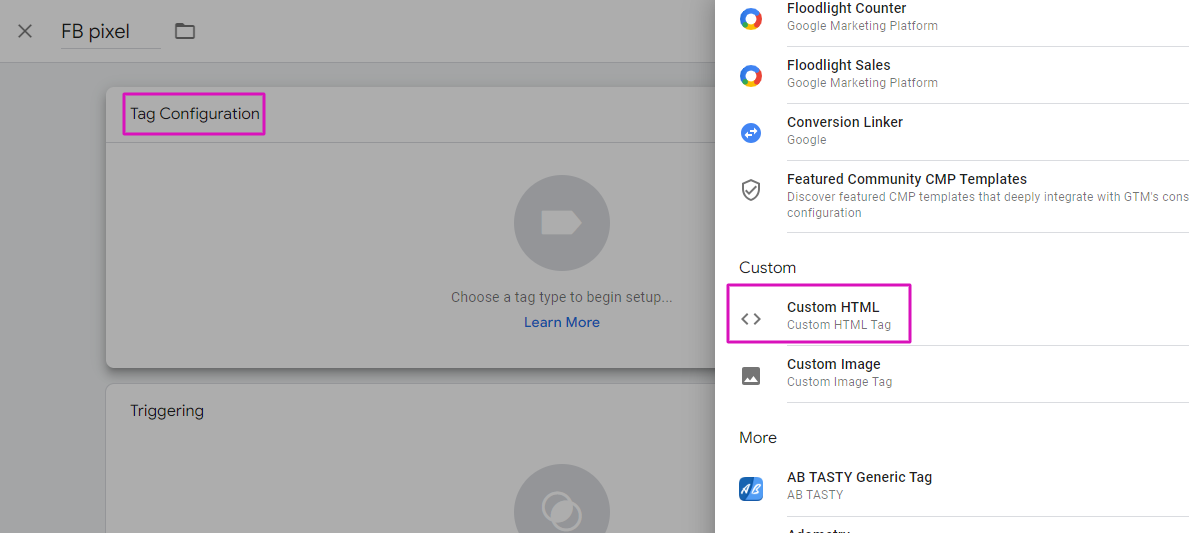
Until now we have made a connection between a website and GTM (Google Tag Manager). Now it’s time to connect to Facebook Pixel with GTM. For this, we need to create a Tag. For that click on the Tag option. Then to the right corner click on the new button.
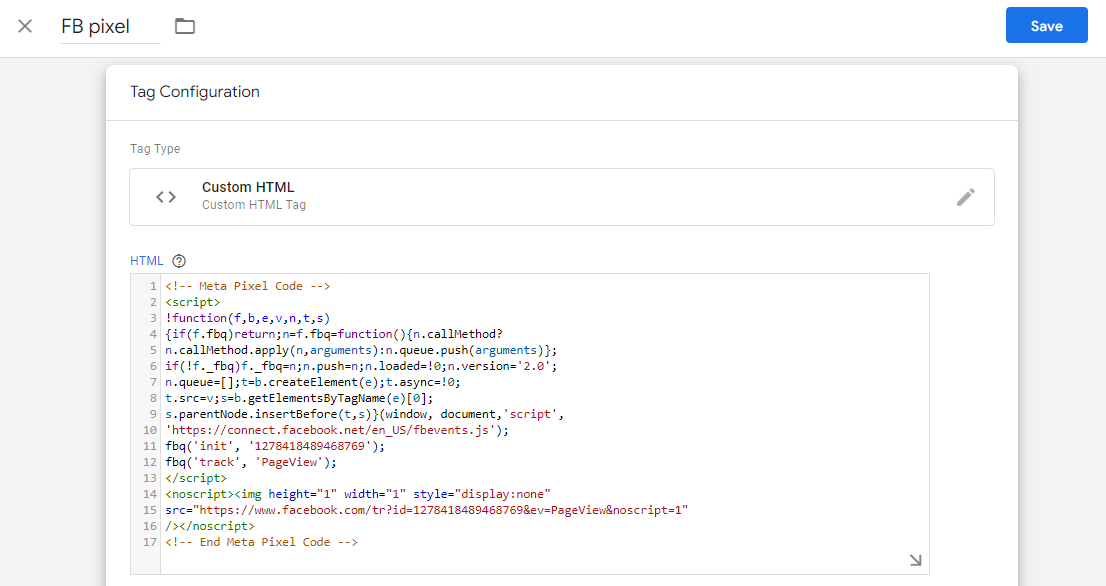
Then give a name of your Tag as we gave it FB Pixel. Then click on Tag Configuration and choose Tag type. Now scroll down and select Custom HTML.
Now copy the code as we have shown in the previous section and copy the code under how to add Facebook Pixel to WordPress without plugin.
Then paste it on the HTML box–
Now scroll down, click on Triggering, choose a trigger on All Pages, and save it.
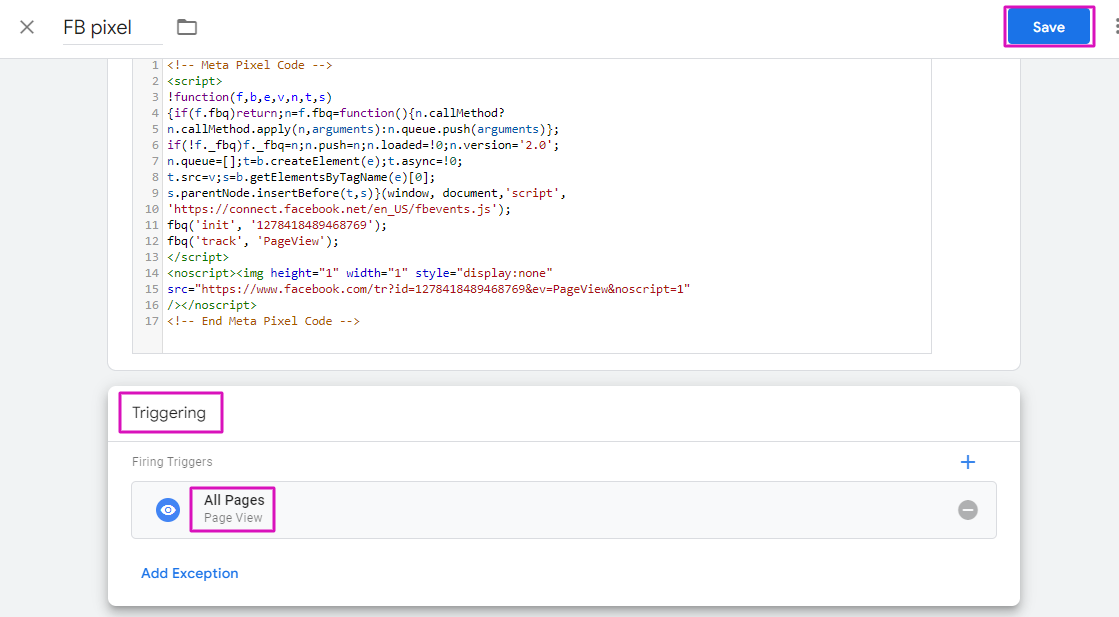
Don’t forget to submit it when you are done with your setup. Otherwise, it will not work properly. And with that, you are done with your FB pixel setup!
Pretty easy, right?
Set up additional settings for Facebook Pixel
So, you primarily have done your FB Pixel setup but still, there are some additional settings to configure or setup. Still, there are some additional settings to complete your setup. These are:
- Enable automatic advanced matching
- Track events automatically
- Enable traffic permission
Turn on the automatic advanced matching setup
Under the event manager account, select the Pixel account that you created. Then hit on the settings option and ensure that Automatic Advanced Matching of your Pixel is on.
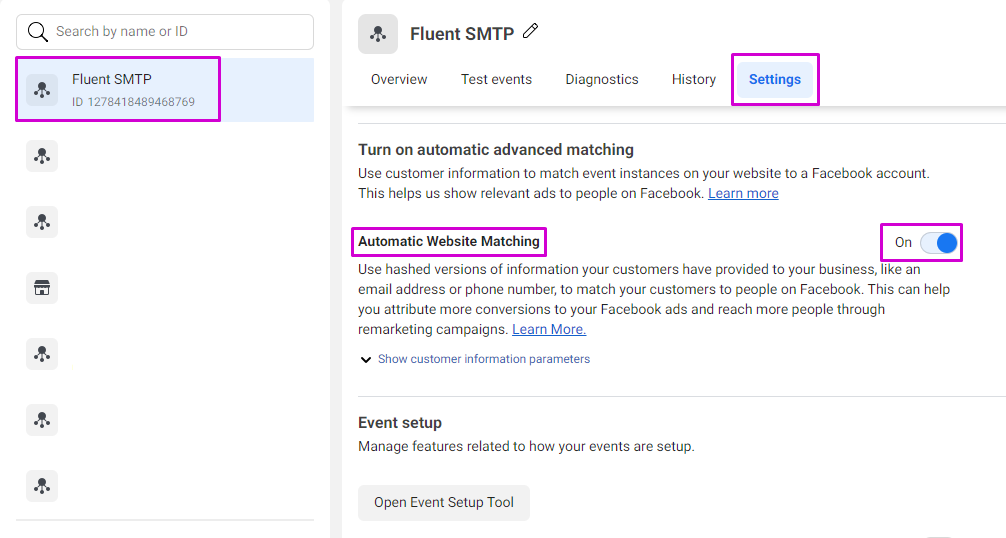
By using this setting, Facebook will make it easier to connect your website visitors with Facebook profiles and enhance the effectiveness of your campaign.
Turn on track events automatically without code
For this setup scroll down and turn on track events automatically without code.
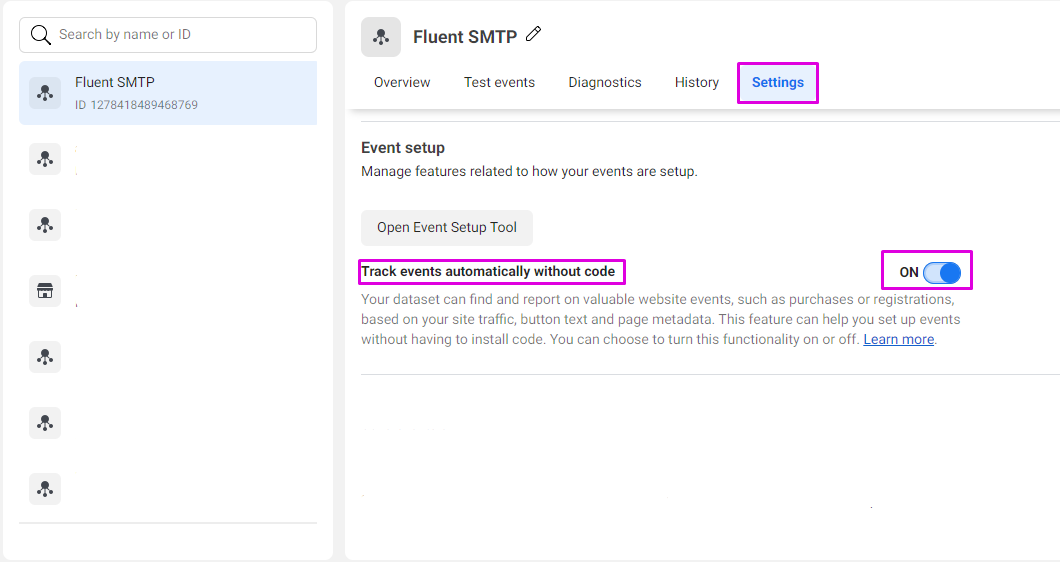
As a result, Facebook Pixel will be able to discover and report necessary website activities such as purchases or registrations, based on user actions on your website.
It helps to create events without uploading additional code to your website.
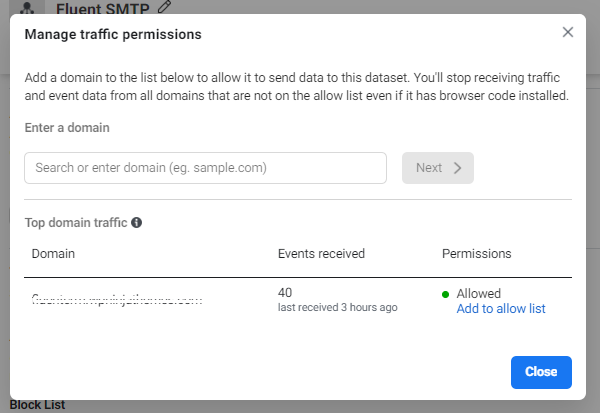
Traffic permission
For setting traffic permission scroll down and under the traffic permission option hit on the Create allow list.
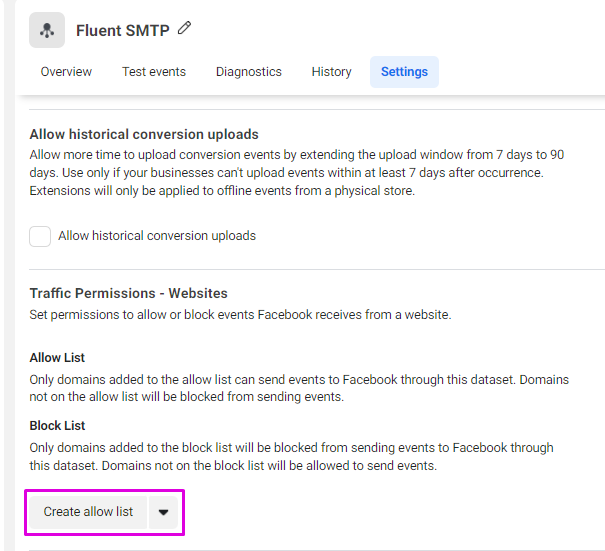
After that enter the domain that you want to on allow list then close it.
This setting recommends Facebook, to focus only on events that are coming from your domain and subdomains and ignore requests from external websites. It works as a safeguard if other websites use copies of your content and enhance data accuracy.
Even without issues, this parameter setting is recommended for improved Pixel performance.
How to check if your Facebook Pixel is working or not
After setting your Facebook Pixel ID, you probably want to make sure that your Pixel is working correctly on your site.
To check it you can use these methods–
- With Meta Pixel Helper Extension
- Testing in the Test Events tool
- Check Diagnostics tab
With Meta Pixel Helper Extension
To see if your FB Pixel is set up on your website or not, you need to download Meta Pixel Helper. It’s a Google Chrome Extension.
You can download this by clicking here. When you downloaded this make sure you pin this on your Chrome Extension bar. Now go to your website and reload the website URL.
If your Pixel is working properly you will see something like that:
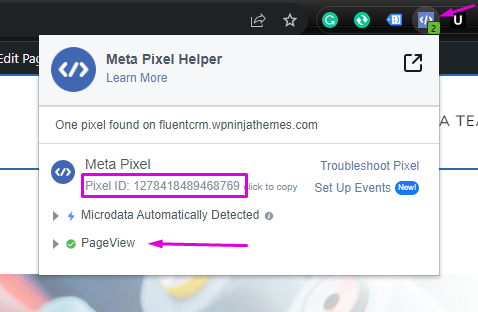
If you are using an ad blocker make sure it is allowed for your website. Otherwise, the Pixel will not show even though it’s here.
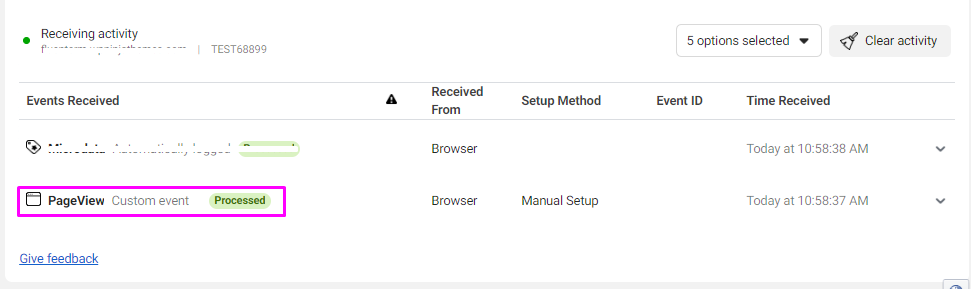
Testing in the Test Events tool
Another method is to test in Test Event Tools. To do this go to your Event Manager account. Select the Pixel you set up under the data source. Now click on the Test Event option and enter your website URL and click on Open website.
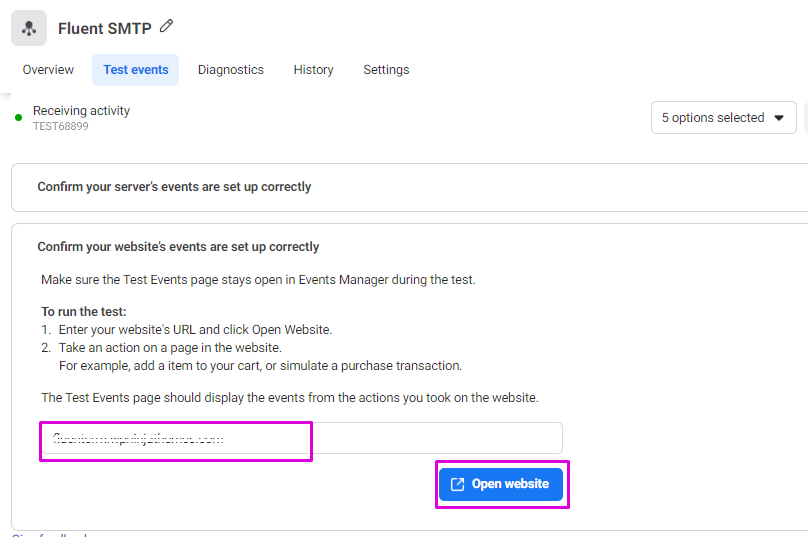
Now do some action on your website and you will see the interaction under the Test events within 30 seconds.
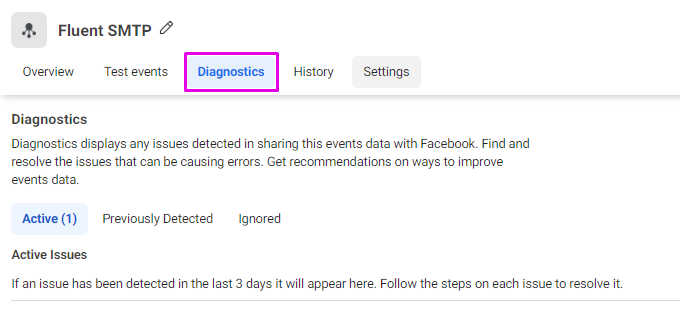
Check the Diagnostic tab under the data source
You can use Event Manager’s Diagnostics tab to identify and fix issues with how your event is set up. If an issue is found, suggestions will be provided to enhance your event setting.
Enhance Facebook ad conversions by setting Facebook Pixel
Setting up Facebook Pixel to a WordPress website will enhance the possibility of gaining insight into the customer journeys on your website. You can target your customers precisely and optimize your Facebook campaign to convert more sales.
We hope you’ll be able to set up Facebook Pixel on your website by following these steps. And if you have any questions or problems relating to Facebook Pixel setup feel free to ask or comment!

Jhorna Rani Gope
Meet Jhorna Gope, a passionate Digital Marketer and content-writing enthusiast. Along with this, she loves exploring new things with tech world, planting trees, and cherishing time with her family.
Table of Content
Subscribe To Get
WordPress Guides, Tips, and Tutorials


Leave a Reply