How to Fix LearnDash Not Sending Email Notifications Issues in Easy Steps
If you’re running an online course with LearnDash, keeping your learners informed is key to keeping them engaged and on track.
LearnDash makes it easy to create and sell courses, but what happens when those all-important email notifications like course updates or quiz reminders don’t get sent?
Frustration, confusion, and lost connection with your learners.
Don’t worry, in this blog, we’ll break down why LearnDash might not be sending emails and show you an easy-peasy solution on how to fix it quickly.
Ready to keep your learners in the loop?
Let’s get started!
Why are My LearnDash Notification Not Sending?
LearnDash is a popular LMS (Learning Management System) plugin for WordPress. It allows you to manage online courses directly from your WordPress website. Therefore, it is important to properly configure all of its functions to maximize the benefits of LMS.
However, when your LearnDash notifications aren’t being delivered, it can quickly become a major headache. Various factors may be causing this issue, from incorrect settings to server-related problems.
In this section, you’ll uncover the three most common reasons behind the notification failures:
- Incorrect LearnDash Email Notification settings
- WordPress’ Default PHP(wp_mail) function
- Issue with the Sender’s email address
Let’s break down each of these reasons.
Incorrect LearnDash Email Notification Settings
If you’re not receiving email notifications from LearnDash, it’s likely because the notification settings aren’t set up correctly.
First, install the LearnDash Notifications add-on through your WordPress dashboard to enable email alerts for different events on your site.
While setting it up, make sure to select the right event that will trigger the email, decide who should receive it, and set any delay times.

If any of these details are incorrect or missing, there’s a high chance your students won’t receive the notifications you expect.
WordPress’ Default PHP(wp_mail) Function
Another possible reason for LearnDash not sending email notifications is WordPress’ default PHP wp_mail() function. WordPress uses this function to send emails directly from your website, but it comes with several limitations:
- It relies on your server’s email configuration, which can often be unreliable, especially in shared hosting environments
- It doesn’t provide proper email authentication, making your emails more likely to be marked as spam or blocked by the recipient’s server
- It cannot handle large volumes of emails, which can cause delivery issues if you’re sending many notifications at once
To address these limitations, we recommend you install an SMTP(Simple Mail Transfer Protocol) plugin like FluentSMTP – a free powerful WordPress plugin.
This plugin replaces the wp_mail() function with SMTP, a more secure and reliable method for sending emails that ensures your email notifications are delivered as expected.
Issues with the Sender’s Email Address
Another potential reason for LearnDash not sending email notifications could be problems with the sender’s email address. If the email address you’re using doesn’t match your website’s domain or lacks proper authentication, email servers may mark your messages as suspicious.
For example, if your WordPress email is [email protected], but your domain is yourdomain.org, the email might be considered invalid and rejected by the recipient’s server.
Additionally, using a free email service (like Gmail) instead of a professional one linked to your domain can further increase the chances of delivery issues.
How Can I Fix LearnDash Not Sending Email Notification Issue?
Ready to get your LearnDash email notifications back on track?
Let’s dive into the three effective solutions below to resolve the email deliverability issues you’re facing with LearnDash.
Configure LearnDash Notification Settings
If you are experiencing an issue with email notifications not sending, we assume you have already installed the LearnDash plugin in your dashboard.
But, as we mentioned earlier, to set up notifications in LearnDash, you need to install the LearnDash notifications addon.
This addon lets you set when notifications are sent, decide who gets them, and customize what they say for different events, including course enrollment, course completion, and other activities.
So, if you’re having trouble with email notifications, the first thing you have to do is review and adjust their notification settings. Here’s how you can do it:
Access LearnDash Notification Settings:
- Log in to your WordPress admin dashboard.
- Go to LearnDash>Notification.
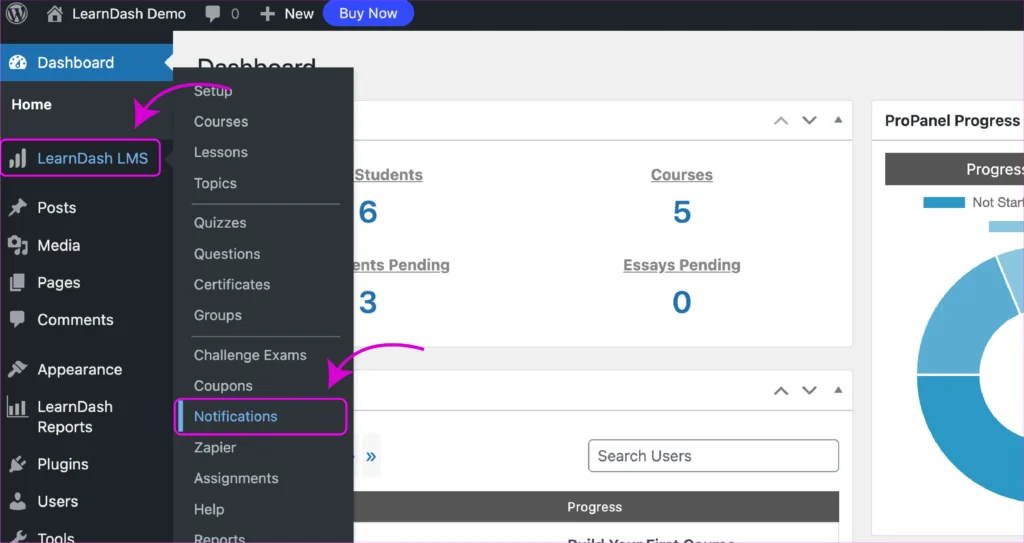
Configure Notification Settings:
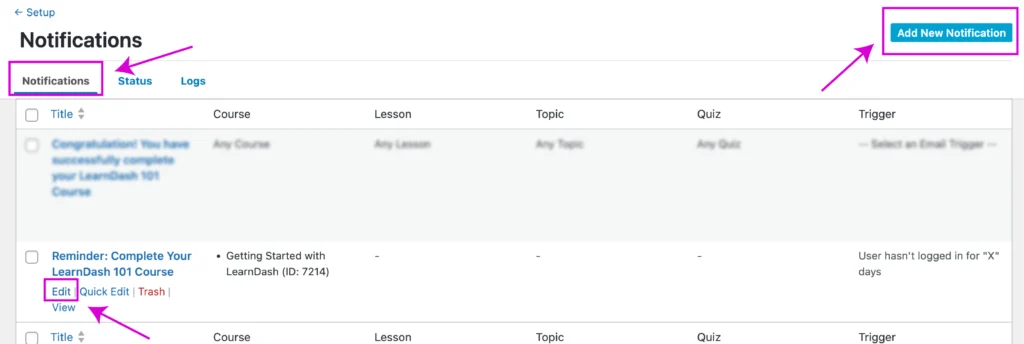
- After clicking on the Notification you will find a list of notifications.
- Click on the notification you want to edit from the list
- Go to the Edit option or you can create a new notification trigger by clicking Add New Notification
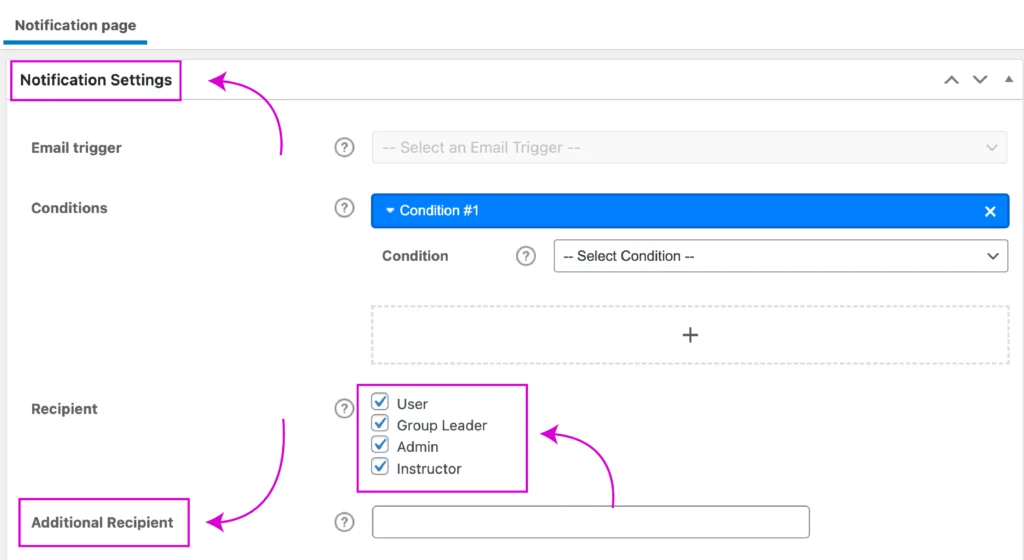
- On the notification page find the Notification Settings Tab
- Preview the checkmarks next to Recipients to make sure the correct option is selected for those who will get the notification.
- To send the notification to additional email addresses, enter the email addresses in the Additional Recipients box, separated by commas.
Setup Delay Option
The delay option is very concerning. If you select the wrong option in the Delay Unit, the notification might be delayed and arrive later than expected.
- Locate the Delay setting for the notification and select the appropriate unit (days, hours, minutes).
- Enter the delay time. (For most notifications, set this to 0 days for immediate delivery.) Ensure your settings are saved to apply the delay correctly.

Review the same options for all other notifications within the LearnDash plugin in your WordPress dashboard.
If this solution doesn’t resolve the issue of LearnDash not sending email notifications, move on to the next step: installing an SMTP plugin.
Install FluentSMTP Plugin
Installing the FluentSMTP plugin can be a simple and effective way to ensure your emails are delivered every time.
And the best part! It’s free for a lifetime.
Here’s how you can set it up and get your notifications back on track:
Install and Activate FluentSMTP Plugin
- Go to your WordPress site and log in with your admin credentials.
- In the left-hand menu, click Plugins and select Add New.
- In the search bar, type FluentSMTP.
- Once you find the FluentSMTP plugin, click Install Now.
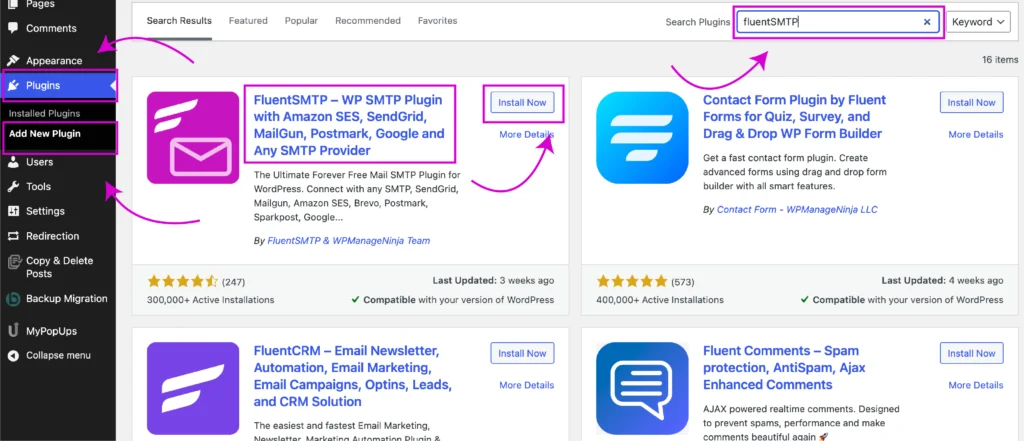
5. After installation, click the “Activate” button to enable the plugin.
Configure FluentSMTP Settings
- In your WordPress dashboard, go to Settings > FluentSMTP.
- You’ll see a list of popular SMTP providers that can integrate with FluentSMTP.
- Select your preferred SMTP provider from the list.
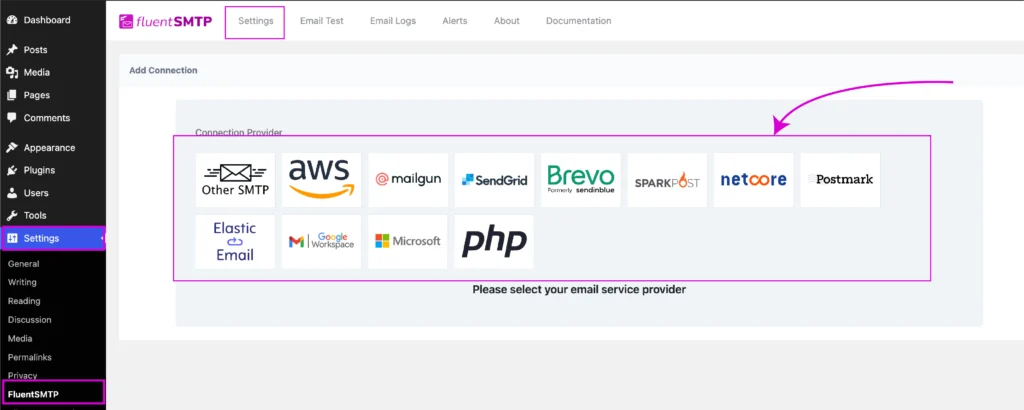
If you haven’t signed up for an email-sending service yet, check out our recommended list of the best transactional email services and sign up for one!
- Once you’ve chosen a provider, obtain the API key to connect FluentSMTP.
- If your SMTP provider isn’t listed, choose Other SMTP to manually enter the SMTP settings.
- Input the API key in the API key field and click Save Connection Settings.
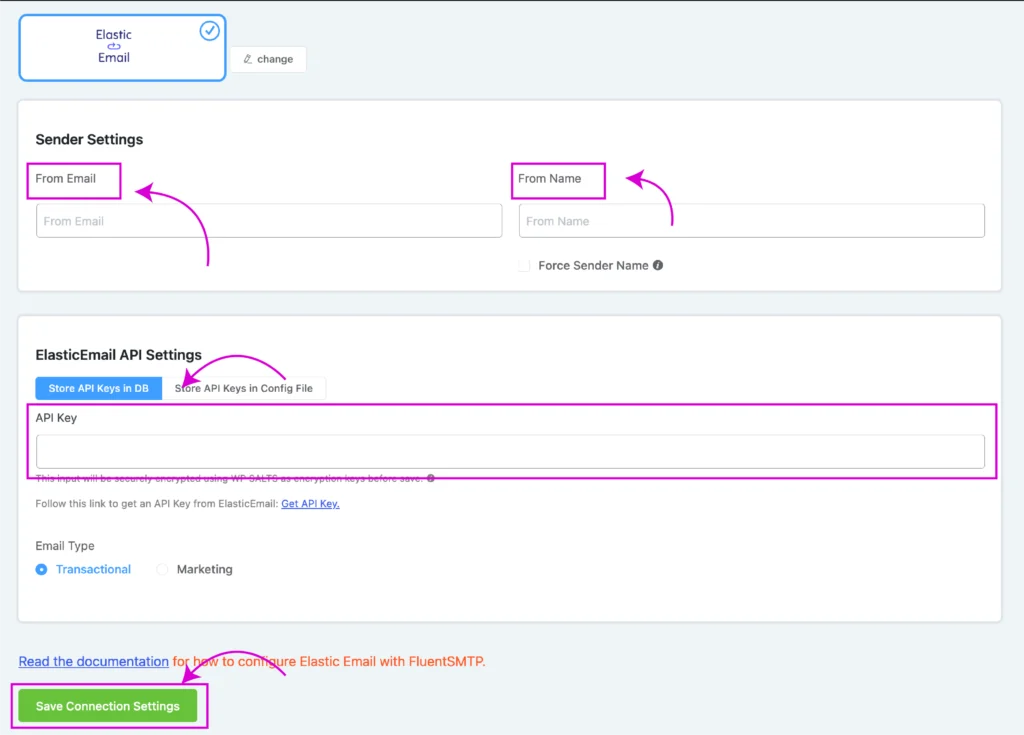
If you’re confused about configuring these mailers with FluentSMTP, our easy documentation can help guide you through the process.
Additionally, if you need to use multiple mailers for different purposes, FluentSMTP allows you to add multiple connections.
Test Email Configuration:
- Navigate to Settings>Log Email and check Log All Email for Reporting
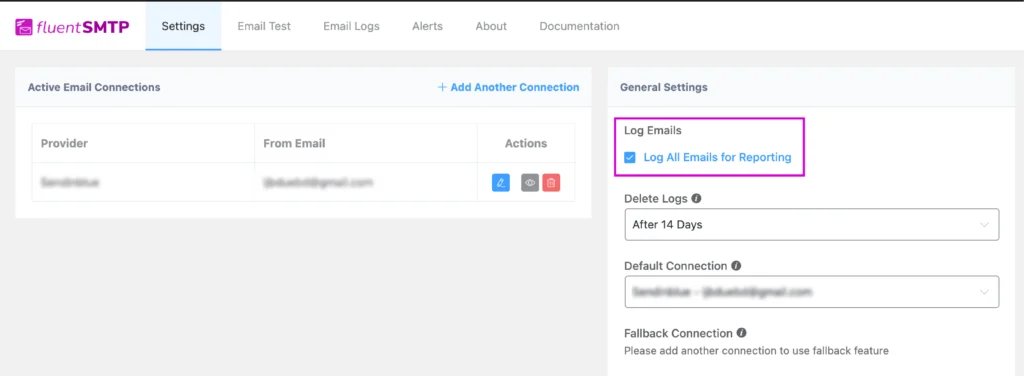
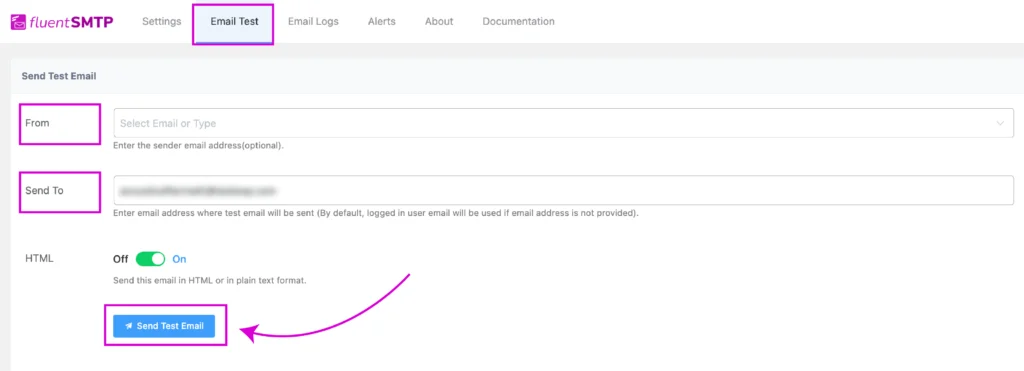
- Go to the Email Test tab in FluentSMTP
- Enter a valid email address in both the From and Send To fields to specify where the test email will be sent from and where it will be received
- Click on Send Test Email, and you should see a confirmation that your test email has been successfully sent!
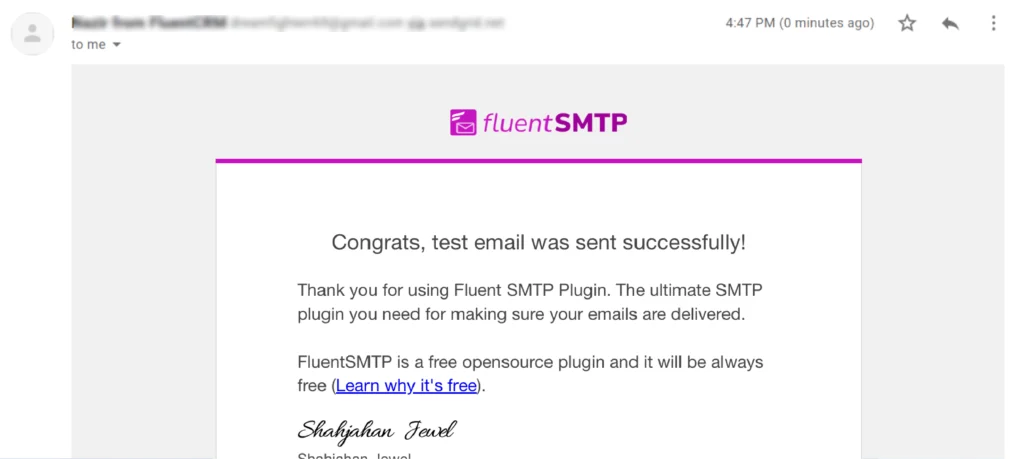
5. You can check if the test email landed in your inbox successfully
- Click on Email Logs in the menu to view sent emails and their addresses. You can also resend, view, or delete emails as needed.

That’s how you can track your email deliverability using FluentSMTP’s email log feature.
Verify LearnDash Email Settings
Ensure that LearnDash is properly configured for email notifications by navigating to the LearnDash settings and confirming that the email addresses are correct.
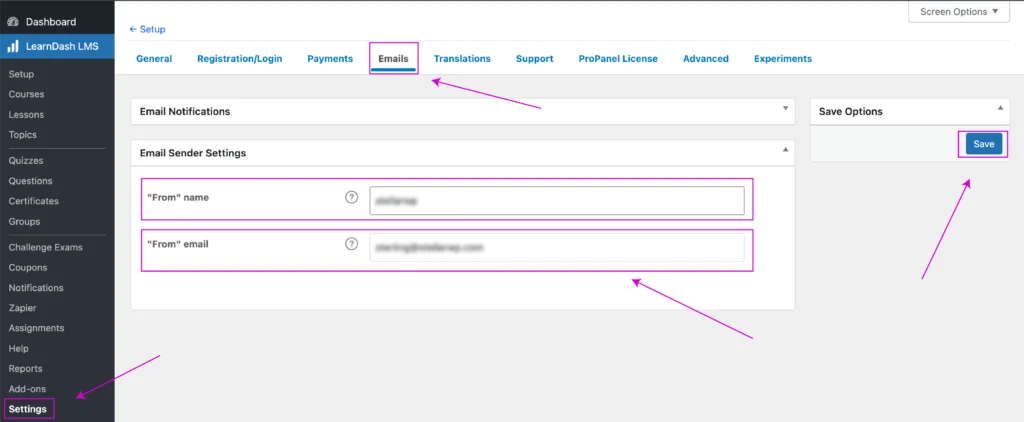
- Go to LearnDash > Settings > Email Tab.
- Verify that the From Name and From Email fields are correctly filled. If not, enter a valid name and email address you want to use as the sender.
- Click the Save button.
Boost Email Deliverability by Updating Your DNS Records
Still having trouble with LearnDash emails not reaching your users? It might be time to update your DNS records. Setting up SPF, DKIM, and DMARC records ensures your emails are authenticated properly and prevents them from being flagged as spam.
Why These DNS Records Matter for Your Emails:
- SPF(Sender Policy Framework): Tells email providers which servers can send messages from your domain, stopping unauthorized senders in their tracks.
- DKIM(DomainKeys Identified Mail): Adds a unique digital signature to your emails, proving they’re legitimate and haven’t been altered.
- DMARC (Domain-based Message Authentication, Reporting, and Conformance): Guides email servers on how to handle unverified messages, protecting your domain from phishing and spoofing.
By updating these DNS settings, your emails will be more likely to land in inboxes instead of spam folders.
Need help getting started? Check out our complete guide to setting up DMARC, SPF, and DKIM for seamless email delivery.
And for an even easier fix, you can use the FluentSMTP plugin to ensure your emails reach the right inbox.
Next: Automate Learndash Email Marketing
You’ve fixed the issue with LearnDash not sending emails, but now it’s time to boost your sales. The more you promote your courses, the more you’ll sell.
That’s where FluentCRM comes in. This tool makes LearnDash marketing easy by automating your course-related emails.

Also, you can set up emails to go out when someone shows interest or completes a course. And the best part is, you can do all of these in a single WordPress dashboard.
Additionally, FluentCRM helps you to send promotions, updates, and special offers to keep people interested and encourage them to sign up.
This way, you can reach potential students at the right time without having to send each email manually. It saves you time and helps you grow your course enrollments.

Ratul Ripon
I enjoy turning complex ideas into simple ones and engage with people through my writing. With a background in Oceanography, I create technical content that’s both easy to understand and interesting.
Table of Content
Subscribe To Get
WordPress Guides, Tips, and Tutorials






Leave a Reply