
Email Blacklist Removal: How to Get Your Email Off a Blacklist


Are your emails suddenly landing in spam or worse, not getting delivered at all? You might be on an email blacklist. Email blacklists are real-time databases used by ISPs and spam filters to block potentially harmful senders.
And while getting blacklisted can feel like a digital death sentence, the good news is email blacklist removal is possible if you know what steps to take.
In this guide, you’ll learn how to check if you’re blacklisted, why it happens, and most importantly how to get delisted fast. We’ll also walk you through top tools, real-life examples, and a prevention checklist to help you stay in the inbox where you belong.
Let’s get your sender reputation back on track.
What is Email Blacklist?
An email blacklist is a real-time list of IP addresses or domains that are suspected of sending spam or harmful emails. These blacklists are maintained by anti-spam organizations and are widely used by email service providers (ESPs) like Gmail, Outlook, and Yahoo, as well as internet service providers (ISPs) and security tools, to filter out unwanted or potentially dangerous emails.

Email blacklists, also known as DNSBLs (Domain Name System-based Blackhole Lists) or RBLs (Real-time Blackhole Lists), are used by ISPs and spam filters to block potentially harmful senders. But sometimes, even trusted senders get caught in the net.
When that happens, your emails stop reaching recipients, your open rates drop, and your sender reputation takes a hit.
How to Run an Email Blacklist Check for Your Domain or IP?
If your emails are suddenly ending up in spam folders or getting blocked altogether, it’s time to check whether your domain or IP address is on an email blacklist. Identifying the issue early can save your sender reputation and ensure your email deliverability for better email performance.
Let’s walk through three key ways to detect if you’ve been blacklisted.
Analyze Email Headers and SMTP Error Codes for Blacklist Clues
One of the easiest ways to spot deliverability issues is by examining the email headers and SMTP error messages from bounced or rejected emails.
When an email is rejected by the recipient’s server, the error code often includes a clue. For instance, a “550 5.7.1” error might mean your IP is listed on a domain blacklist. Some servers will even mention the blacklist provider (like Spamhaus or SpamCop) directly in the bounce message.
To review headers:
- Open the original bounced email
- Look for terms like “blocked,” “blacklisted,” or “spam” in the server response
- Note the email server response or IP details that caused the rejection
This raw data can guide your next steps when submitting a blacklist removal request.
Identify Signs You’re Blacklisted (Bounce Rates, Open Rate Drops)
Sometimes, you might not see a bounce message, but your email performance metrics will hint at a deeper issue.
Here are common signs your email address or domain may be blacklisted:
- Sudden rise in bounce rates, especially for outbound emails
- Declining open and click-through rates, even for engaged segments
- Drop in email deliverability despite no content or list changes
- Emails consistently land in the spam folder across providers
These symptoms suggest spam filters are flagging your messages. Monitoring your email stats closely can help you catch blacklist status changes early before your email traffic takes a major hit.
Discover Email Metrics on Autopilot
Need a platform that automatically tracks emails for bounce, opens, clicks and click-through rates? Try our powerful email marketing tool that does it automatically for you!
Use Email Blacklist Checker Tools
To run the process, use online tools designed to check dozens of blacklist databases at once. These tools help you instantly identify whether your IP address or email domain is flagged as suspicious.
Some popular blacklist check tools include:
- MXToolbox: One of the most reliable all-in-one tools to check if your domain or IP appears on public blacklists.
- Cisco Talos Intelligence: Provides reputation scores and security insights for domains and IPs.
- MultiRBL: Checks against hundreds of blacklist providers and offers direct links to delisting processes.
Running a quick check on these platforms can reveal which email blacklist you’re on and guide your next action steps.
How to Remove Your Domain or IP from an Email Blacklist: Step by Step Guide
So, now you can check that your emails are blacklisted or not. Let’s dive into the process to get your emails remove from the blacklist.
Step 1: Identify which blacklist you’re on and diagnose the root cause
Blacklists don’t affect domains or IPs without a reason. So, before you take any action, it’s important to understand the reason behind this issue. That’s why your first step should be identify the which blacklist you are on and then identify the main reason.
Identify the Blacklist
We already say earlier and details about to run a blacklist check. And knowing exactly where you’re blacklisted helps you understand who is blocking your messages and what guidelines you’ll need to follow for removal.
Assess the Severity of the Blacklisting
If you’re only listed on a lesser-known blacklist, you may see minor disruptions. But if you’re blocked by multiple critical blacklists, your emails may not reach inboxes at all. The more severe the listing, the more you need to clean up and delist.
Understanding the Core Reason of Email Blacklist
Finding out which blacklist you’re on is just the first step. What really matters is understanding why you got listed in the first place. Here are some common reasons:
- Spam Complaints & Spam Trap: Frequent spam reports or hitting spam traps (fake or inactive emails) signal poor list hygiene and can quickly damage your sender reputation.
- High Bounce & Low Engagement: Outdated or uninterested contacts lead to bounces and low engagement, both of which can trigger blacklisting.
- Missing or Misconfigured Email Authentication: Without properly configured SPF, DKIM, and DMARC, your emails may look untrustworthy and vulnerable to spoofing.
- Sudden Increase in Email Volume: A sharp increase in email volume, especially from a cold domain, can raise red flags and land you on a blacklist.
- Lack of Consent & Unhygienic Email List: Emailing without a clear opt-in or ignoring inactive subscribers increases the risk of spam complaints and traps.
- Spammy or Suspicious Content: Misleading subject lines, shady links, or poor formatting can trigger spam filters and hurt your deliverability.
Step 2: Fix the Underlying Issues (Spam Reports, Authentication, etc.)
Before requesting delisting, it’s essential to resolve the problems that caused the blacklisting in the first place. Simply asking for removal without addressing the root causes can lead to being blacklisted again in the future. Here’s what you need to focus on:
- Review and Clean Your Email List: Remove invalid, inactive, and unengaged contacts to improve list hygiene. Also, make sure you’re only sending to subscribers who’ve opted in and are interested in your emails. This reduces the chances of hitting spam traps and receiving complaints.
- Review Content Quality and Resolve Spam Complaints: Make sure your email content is valuable and relevant to your audience. Avoid spammy language, misleading links, or suspicious attachments. Content that doesn’t resonate with your audience or looks untrustworthy can lead to complaints and blacklisting.
- Check and Fix Email Authentication: Ensure your SPF, DKIM, and DMARC records are properly set up in your email authentication process. These protocols verify your emails’ legitimacy and prevent email spoofing.
- Monitor Engagement and Bounce Rates: High bounce rates or low engagement can signal that your emails aren’t reaching the right people. Clean up your list through proper email verification to remove invalid email addresses and ensure your content is compelling enough to encourage users to open and click.
- Check Feedback Loops: Set up feedback loops with ISPs to receive notifications when recipients mark your emails as spam. This helps you identify and address problematic campaigns and take action to reduce the risk of blacklisting.
Pro Tips: With FluentSMTP, setting up SPF, DKIM, and DMARC becomes easier, especially for WordPress users. It guides you through configuring these protocols correctly so your emails are trusted and stay out of spam folders
Step 3: Send Email Blacklist Removal Request
Once you’ve fixed the issues causing blacklisting, the next step is to request removal from the blacklist. The delisting process varies by the type of blacklist and the specific rules of the organization maintaining it. Major blacklists like Spamhaus, Barracuda, and SpamCop have different procedures.
Here’s a simplified overview of how to request removal from some of the most well-known blacklists:
| Blacklist / Tool | Delisting or Usage Steps | Useful Link |
| Spamhaus | 1. Visit Spamhaus and check your IP or domain. 2. Fix the issues (e.g., spam, open relays). 3. Submit a delisting request with proof that the problem is resolved. | Spamhaus Lookup |
| Barracuda | 1. Check your domain/IP on Barracuda Central. 2. Resolve any spammy or suspicious activity. 3. Request delisting through their portal with evidence of your fixes. | Barracuda Removal |
| SpamCop | Automatically delists IPs 24 hours after spam stops. Ensure there are no open relays or infected devices formal request is needed unless issues persist. | SpamCop Check |
| SURBL | 1. Search your domain/URL on SURBL. 2. Review listing reasons and clean up harmful or suspicious links. 3. Request removal through their contact page with a proper explanation. | SURBL Analysis |
| Microsoft 365 | 1. Use Microsoft’s delisting portal. 2. Enter your blocked IP and submit your request. 3. Wait for Microsoft to investigate and remove the block. | Microsoft Delist |
Other Blacklists:
Each blacklist will have its own delisting process. Be sure to:
- Visit the specific blacklist’s website for detailed instructions.
- Follow their requirements, often including proof of corrective actions.
- Monitor your domain’s reputation post-delisting to ensure compliance and avoid future blacklisting.
Step 4: Monitor Blacklist Status and Prevent Re-listing
After submitting your delisting request, don’t just wait; keep an eye on your email performance. Check if your emails are still getting blocked or going to the spam folder.
Delisting isn’t always instant. It may take a few hours to several days depending on the blacklist. Be patient, and carefully follow any extra steps requested by the blacklist provider.
If the wait seems longer than expected, don’t hesitate to follow up with them.
Once you’re off the blacklist, stay off by:
- Fixing the original issue that caused the listing
- Maintaining proper email list hygiene
- Avoiding sudden spikes in email volume
Monitoring your sender reputation regularly
Repeated blacklisting can damage your domain reputation permanently, so keeping things clean and compliant is key.
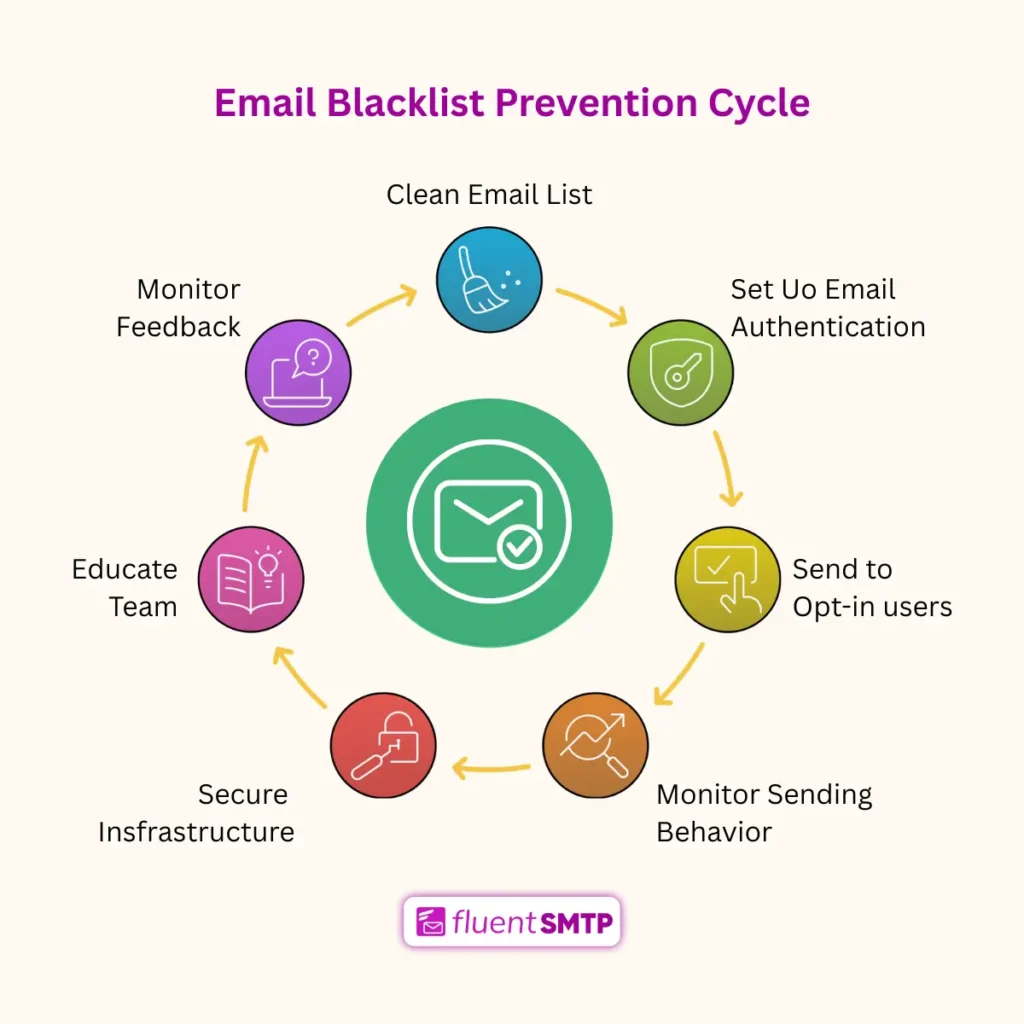
Best Email Blacklist Prevention Tips You Should Follow
Once you’ve successfully removed your domain or IP from an email blacklist, the real work begins, making sure it never happens again. Consistently following good email practices not only helps you stay off blacklists but also improves your email deliverability and sender reputation over time.
Let’s go over the best practice of email blacklist removal you should follow:
Maintain a Clean and Engaged Email List
Start by regularly cleaning your email list to remove invalid, inactive, or bounced email addresses. Sending emails to outdated or uninterested contacts increases your risk of spam complaints and blacklisting.
Use double opt-in whenever possible to ensure that the people on your list actually want to hear from you. Also, be sure to honor unsubscribe requests promptly to avoid frustrating your recipients.
Set Up Proper Email Authentication(SPF, DKIM, DMARC)
Authentication is one of the most important steps in protecting your domain. Implement SPF (Sender Policy Framework) to specify which mail servers can send emails on your behalf. Add DKIM (DomainKeys Identified Mail) to digitally sign your emails, confirming their authenticity.
To strengthen your domain further, use DMARC (Domain-based Message Authentication, Reporting & Conformance) to enforce authentication policies and monitor suspicious activity. Properly configuring these protocols builds trust with inbox providers and reduces your chances of being flagged as spam.
Only Send to People Who Want to Hear from You
Never buy email lists or send emails to people who haven’t opted in. Focus on building a permission-based list and segmenting it so you can send targeted, relevant content that your subscribers actually want.

Always include a visible unsubscribe link and respect your recipients’ preferences. Responsible email marketing builds long-term trust and reduces the chances of your emails being marked as spam.
Monitor Your Email Sending Behavior
Keep an eye on your email campaigns and look for signs of trouble like low engagement rates, rising bounce rates, or spikes in complaints. A sudden jump in email volume or inconsistent sending schedules can make your emails look suspicious.

Maintain a steady sending pattern, warm up new IP addresses gradually, and use analytics to spot and fix any deliverability issues early on.
Secure Your Email Infrastructure
Your servers and email platforms should always be up to date with the latest security patches. Implement strong password policies and use two-factor authentication (2FA) for any accounts connected to your email infrastructure.
Regularly audit your systems for signs of abuse or unauthorized access. A hacked server can send spam without your knowledge—and get you blacklisted again.
Educate Your Team on Email Best Practices
It’s not just your tech stack that needs to be strong; your team plays a big role, too. Train your staff to recognize phishing attempts, avoid spammy practices, and handle subscriber data responsibly.
Everyone involved in your email marketing should understand the impact of deliverability and how to protect your sender reputation.
Stay Aware of Feedback and Complaints
Monitor feedback loops provided by major ISPs to stay informed if users mark your emails as spam. Take any complaints seriously and investigate the source of the problem. Whether it’s your content, list hygiene, or sending frequency. Use this feedback to make necessary improvements and maintain a positive sender reputation.
Final Thoughts: Getting Off the Blacklist Is Just Step One
Getting blacklisted hurts, but getting delisted is only half the way. What truly matters is what you do next. Cleaning up your sending practices, securing your infrastructure, and staying compliant with email standards are key to keeping your domain’s reputation strong.
Think of delisting as a reset button. Now it’s your chance to build trust, maintain a clean email list, monitor engagement, and send emails that people actually want to receive. Stay consistent, follow best practices, and you’ll not only avoid future blacklists, you’ll also improve deliverability and boost results.
Frequently Asked Questions

Ratul Ripon
I enjoy turning complex ideas into simple ones and engage with people through my writing. With a background in Oceanography, I create technical content that’s both easy to understand and interesting.
Table of Content
Subscribe To Get
WordPress Guides, Tips, and Tutorials


Leave a Reply